In one of our previous article, we have explained about how to create login and registration using ASP.NET MVC with database, now in this article, I have explained how we can authenticate user based on token using Web API and C#.
Now a days, Web API is widely used because using it, it becomes easy to build HTTP services that reach a broad range of clients, including browsers, mobile devices, and traditional desktop applications.
How does token based authentication works?
The general concept behind a token-based authentication system is simple. Allow users to enter their username and password in order to obtain a token which allows them to fetch a specific resource - without using their username and password. Once their token has been obtained, the user can offer the token - which offers access to a specific resource for a time period - to the remote site.
In other words: add one level of indirection for authentication -- instead of having to authenticate with username and password for each protected resource, the user authenticates that way once (within a session of limited duration), obtains a time-limited token in return, and uses that token for further authentication during the session. Source

Advantages of Token based authentication
Cross-domain / CORS: cookies + CORS don't play well across different domains. A token-based approach allows you to make AJAX calls to any server, on any domain because you use an HTTP header to transmit the user information.
Stateless (a.k.a. Server side scalability): there is no need to keep a session store, the token is a self-contained entity that conveys all the user information. The rest of the state lives in cookies or local storage on the client side.
CDN: you can serve all the assets of your app from a CDN (e.g. javascript, HTML, images, etc.), and your server side is just the API.
Decoupling: you are not tied to any particular authentication scheme. The token might be generated anywhere, hence your API can be called from anywhere with a single way of authenticating those calls.
Mobile ready: when you start working on a native platform (iOS, Android, Windows 8, etc.) cookies are not ideal when consuming a token-based approach simplifies this a lot.
CSRF: since you are not relying on cookies, you don't need to protect against cross site requests (e.g. it would not be possible to sib your site, generate a POST request and re-use the existing authentication cookie because there will be none).
Performance: we are not presenting any hard perf benchmarks here, but a network roundtrip (e.g. finding a session on database) is likely to take more time than calculating an HMACSHA256 to validate a token and parsing its contents.
Step by step procedure to create token based authentication in Web API and C#
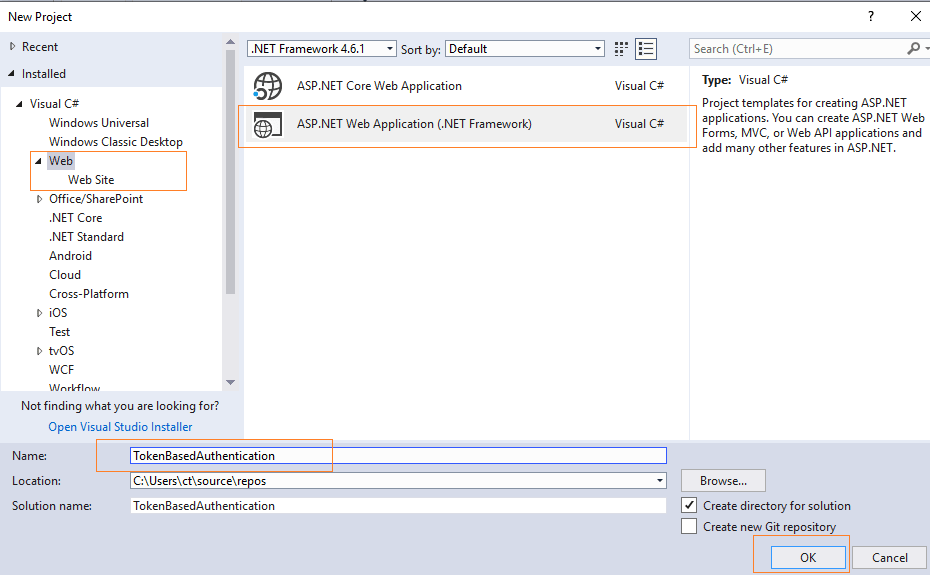
Step 1: Open your Visual Studio and Create a new project, by selecting File-> New -> Project -> Select "Web" (Left panel) and Select "ASP.NET web-application" (Right-pane), name it and click "OK"
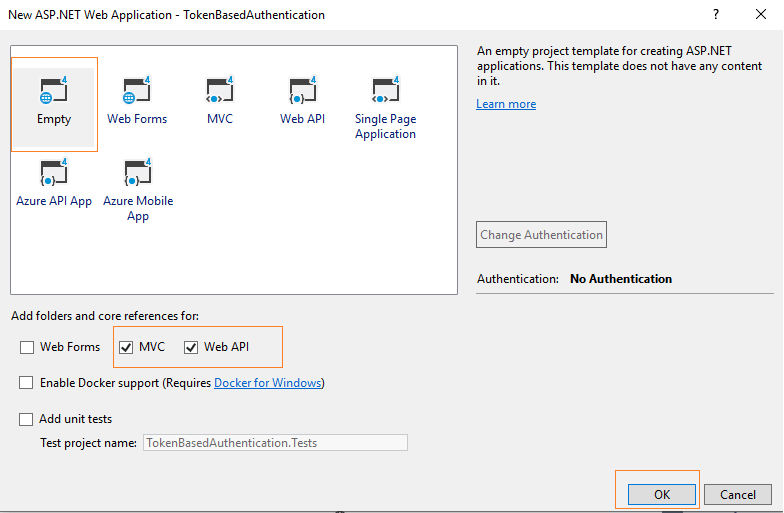
Once you are done, you will see a screen to select template, you can select "Empty" template with Checking "MVC" and "Web API" checkboxes, to generate the required folders.
Step 2: Once Visual Studio creates the project with MVC/Web API file references, we would have to add Nuget packages for following
- Microsoft.Owin.Host.SystemWeb
- Microsoft.Owin.Security.OAuth
- Microsoft.Owin.Cors
To install the above dll's in our project, you can go to "Tools"->"Nuget Package Manager" -> Select "Manage Nuget package for Solution.." -> Select "Browse" tab and search for "Microsoft.Owin.Host.SystemWeb", once you find it, select and Click "Install" , as shown in the image below
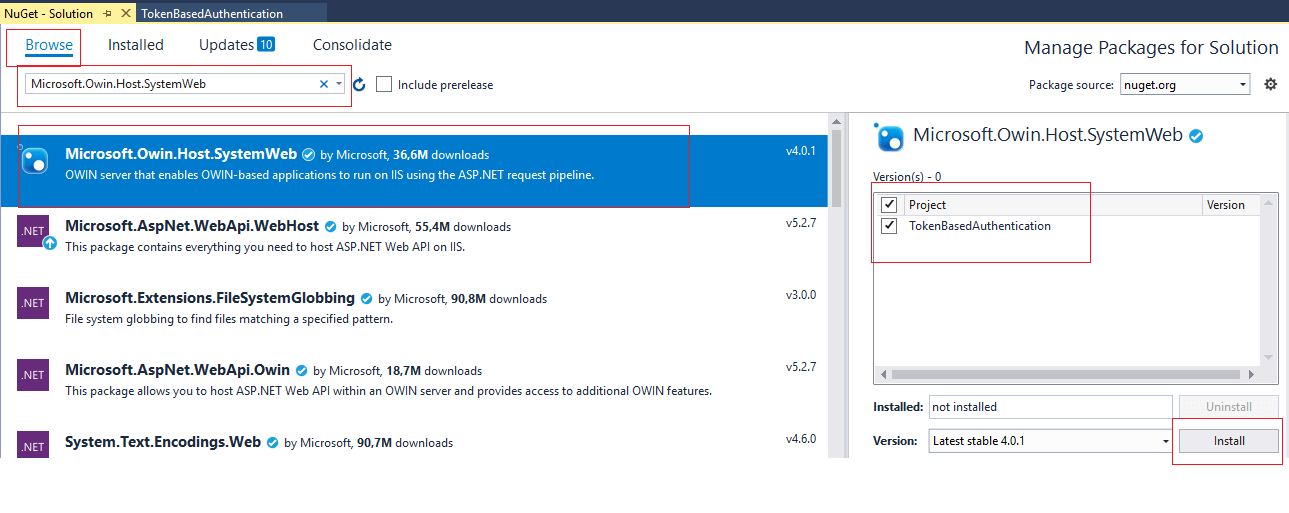
Repeat the same procedure, to install "Microsoft.Owin.Security.OAuth" and "Microsoft.Owin.Cors"
Step 3: Once we have installed all of the above package, we will need to create a class Startup.cs inside 'App_Start' folder, so right click on it and "Add"-> "Class".
Name it StartUp.cs and add the below code
using Microsoft.Owin;
using Microsoft.Owin.Security.OAuth;
using Owin;
using System;
using TokenBasedAuthentication.Providers;

[assembly: OwinStartup(typeof(TokenBasedAuthentication.App_Start.Startup))]
namespace TokenBasedAuthentication.App_Start
{
    public class Startup
    {
        public static OAuthAuthorizationServerOptions OAuthOptions { get; private set; }

        public void Configuration(IAppBuilder app)
        {
           OAuthOptions = new OAuthAuthorizationServerOptions
            {
                TokenEndpointPath = new PathString("/token"),
                Provider = new OAuthCustomeTokenProvider(), // We will create
                AccessTokenExpireTimeSpan = TimeSpan.FromMinutes(20),
                AllowInsecureHttp = true,
                RefreshTokenProvider = new OAuthCustomRefreshTokenProvider() // We will create
            };

            app.UseOAuthAuthorizationServer(OAuthOptions);
            app.UseOAuthBearerAuthentication(new OAuthBearerAuthenticationOptions());

        }
    }
}
After using above code, you will get error related to OAuthCustomeTokenProvider and OAuthCustomRefreshTokenProvider because we need to write these two methods.
So, create a new folder "Providers" inside your project and create a new class "OAuthCustomeTokenProvider.cs" inside it, and use the code below:
using Microsoft.Owin.Security;
using Microsoft.Owin.Security.OAuth;
using System;
using System.Collections.Generic;
using System.Security.Claims;
using System.Threading.Tasks;
using TokenBasedAuthentication.App_Start;
using TokenBasedAuthentication.Models;

namespace TokenBasedAuthentication.Providers
{
    public class OAuthCustomeTokenProvider : OAuthAuthorizationServerProvider
    {

        public override Task GrantResourceOwnerCredentials(OAuthGrantResourceOwnerCredentialsContext context)
        {
            return Task.Factory.StartNew(() =>
            {
                var userName = context.UserName;
                var password = context.Password;
                var userService = new UserService();
                var user = userService.Validate(userName, password);
                if (user != null)
                {
                    var claims = new List<Claim>()
                {
                    new Claim(ClaimTypes.Sid, Convert.ToString(user.Id)),
                    new Claim(ClaimTypes.Name, user.Name),
                    new Claim(ClaimTypes.Email, user.Email)
                };
                    foreach (var role in user.Roles)
                        claims.Add(new Claim(ClaimTypes.Role, role));

                    var data = new Dictionary<string, string>
                {
                    { "userName", user.Name },
                    { "roles", string.Join(",", user.Roles)}
                };
                    var properties = new AuthenticationProperties(data);

                    ClaimsIdentity oAuthIdentity = new ClaimsIdentity(claims,
                        Startup.OAuthOptions.AuthenticationType);

                    var ticket = new AuthenticationTicket(oAuthIdentity, properties);
                    context.Validated(ticket);
                }
                else
                {
                    context.SetError("invalid_grant", "Either email or password is incorrect");
                }

            });
        }

        public override Task ValidateClientAuthentication(OAuthValidateClientAuthenticationContext context)
        {
            if (context.ClientId == null)
                context.Validated();

            return Task.FromResult<object>(null);
        }


        public override Task TokenEndpoint(OAuthTokenEndpointContext context)
        {
            foreach (KeyValuePair<string, string> property in context.Properties.Dictionary)
            {
                context.AdditionalResponseParameters.Add(property.Key, property.Value);
            }
            return Task.FromResult<object>(null);
        }

    }
}
In the above code we are using "OAuthAuthorizationServerProvider", and creating Code to validate user, so you would be getting error for "UserService" which we will create in next step.
Let's create two more classes "UserService.cs" and "User.cs" inside "Models" folder of your project.
User.cs
using System;

namespace TokenBasedAuthentication.Models
{
    public class User
    {
        public int Id { get; set; }
        public String Name { get; set; }
        public String Email { get; set; }
        public String Password { get; set; }
        public string[] Roles { get; set; }
    }
}
UserService.cs
using System;
using System.Collections.Generic;
using System.Linq;

namespace TokenBasedAuthentication.Models
{
    public interface IUserService
    {
        User Validate(string email, string password);
        List<User> GetUserList();
        User GetUserById(int id);
        List<User> SearchByName(string name);
    }

    // UserService concrete class
    public class UserService : IUserService
    {

        private List<User> userList = new List<User>();
        public UserService()
        {
            for (var i = 1; i <= 10; i++)
            {
                userList.Add(new User
                {
                    Id = i,
                    Name = $"Username {i}",
                    Password = $"password{i}",
                    Email = $"user{i}@gmail.com",
                    Roles = new string[] { i % 2 == 0 ? "Admin" : "User" }
                });
            }
        }

        public User Validate(string email, string password)
            => userList.FirstOrDefault(x => x.Email == email && x.Password == password);

        public List<User> GetUserList() => userList;

        public User GetUserById(int id)
            => userList.FirstOrDefault(x => x.Id == id);

        public List<User> SearchByName(string name)
            => userList.Where(x => x.Name.Contains(name)).ToList();
    }
}
UserService.cs is creating list of dummy User data and inherting IUserService Interface, which requires methods like Validate to check if user exists, GetUserById and SearchByName, if you have basic understanding of Linq, you might understand GetUserById is searching user based on Id provided while SearchBYName method searches user in list by name value.
We are using above UserService class for testing purpose, because I suppose, you can create it and authenticate user from database easily.
Inside "OAuthCustomeTokenProvider" we still need to override "GrantRefreshToken", so you can add the below code inside it
 public override Task GrantRefreshToken(OAuthGrantRefreshTokenContext context)
        {
            var newIdentity = new ClaimsIdentity(context.Ticket.Identity);
             newIdentity.AddClaim(new Claim("newClaim", "refreshToken"));

            var newTicket = new AuthenticationTicket(newIdentity, context.Ticket.Properties);
            context.Validated(newTicket);

            return Task.FromResult<object>(null);
        }
For security purposes, access tokens may be valid for a short amount of time. Once access token expire, client applications can use a refresh token to "refresh" the access token.
That is, a refresh token is a credential artifact that lets a client application get new access tokens without having to ask the user to log in again.
We are almost done, and we need to create just one more class "OAuthCustomRefreshTokenProvider.cs" inside "Providers" folder, so right click on "Provdiers" Folder and add new class, and use the code below
    public class OAuthCustomRefreshTokenProvider: IAuthenticationTokenProvider
    {
        // Add a static variable
        private static ConcurrentDictionary<string, AuthenticationTicket> _refreshTokens = new ConcurrentDictionary<string, AuthenticationTicket>();

        // We will add code here
    }
Since we inherited from IAuthenticationTokenProvider interface so we need to implement following methods in this class. We will use only CreateAsync and ReceiveAsync but still we need to implement Create and Receive synchronous methods, so we will throw error from them.
Here are the methods of aboev used interface
public interface IAuthenticationTokenProvider
{
    void Create(AuthenticationTokenCreateContext context);
    Task CreateAsync(AuthenticationTokenCreateContext context);
    void Receive(AuthenticationTokenReceiveContext context);
    Task ReceiveAsync(AuthenticationTokenReceiveContext context);
}
So, after adding the required methods, our complete class will look like this
using Microsoft.Owin.Security;
using Microsoft.Owin.Security.Infrastructure;
using System;
using System.Collections.Concurrent;
using System.Threading.Tasks;


namespace TokenBasedAuthentication.Providers
{
    public class OAuthCustomRefreshTokenProvider : IAuthenticationTokenProvider
    {
        // Add a static variable
        private static ConcurrentDictionary<string, AuthenticationTicket> _refreshTokens = new ConcurrentDictionary<string, AuthenticationTicket>();

        public async Task CreateAsync(AuthenticationTokenCreateContext context)
        {
            var guid = Guid.NewGuid().ToString();
            /* Copy claims from previous token
             ***********************************/
            var refreshTokenProperties = new AuthenticationProperties(context.Ticket.Properties.Dictionary)
            {
                IssuedUtc = context.Ticket.Properties.IssuedUtc,
                ExpiresUtc = DateTime.UtcNow.AddMinutes(40)
            };
            var refreshTokenTicket = await Task.Run(() => new AuthenticationTicket(context.Ticket.Identity, refreshTokenProperties));

            _refreshTokens.TryAdd(guid, refreshTokenTicket);

            // consider storing only the hash of the handle
            context.SetToken(guid);
        }

        public async Task ReceiveAsync(AuthenticationTokenReceiveContext context)
        {
            AuthenticationTicket ticket;
            string header = await Task.Run(() => context.OwinContext.Request.Headers["Authorization"]);

            if (_refreshTokens.TryRemove(context.Token, out ticket))
                context.SetTicket(ticket);
        }

        public void Create(AuthenticationTokenCreateContext context)
        {
            throw new NotImplementedException();
        }
        public void Receive(AuthenticationTokenReceiveContext context)
        {
            throw new NotImplementedException();
        }


    }
}
That's it, we are done, now we can create tokens for users.
In the above code, we are expiring token after 40 minutes using these line of code
var refreshTokenProperties = new AuthenticationProperties(context.Ticket.Properties.Dictionary)
            {
                IssuedUtc = context.Ticket.Properties.IssuedUtc,
                ExpiresUtc = DateTime.UtcNow.AddMinutes(40) //expire token after 40 min
            };
We are doing this for security purpose, so in the above example, user needs to get new access_token after every 40 mins.
If you have noticed, we are using dummy users like "Username 1" with "password 1", so let's build this project and run. You will see an error in browser, but that's fine, as we have not created any default view.
I have Postman installed on my pc, let's open it and try to call our OAuth API using it and get the token.
So here is what I tried in postman
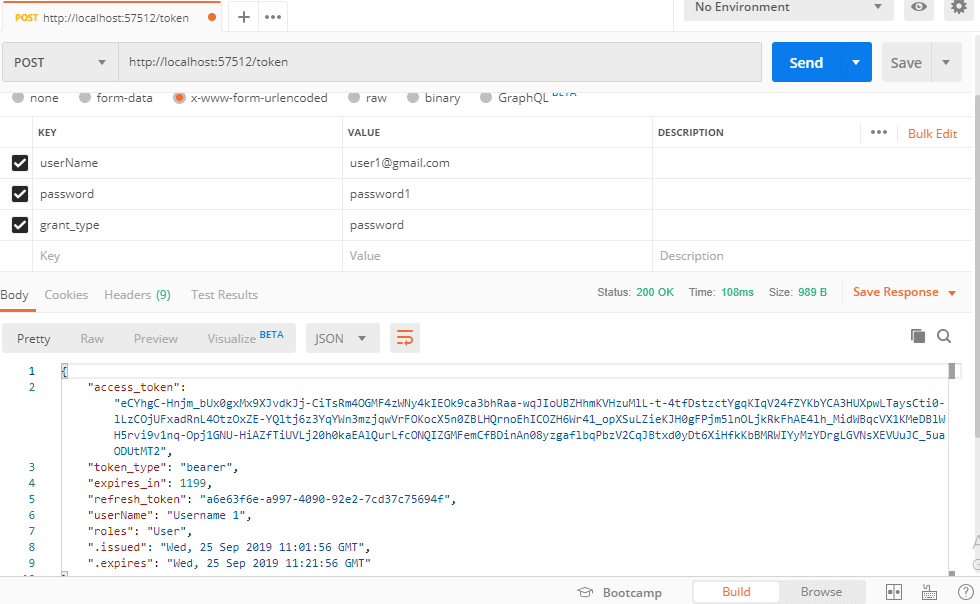
- URL: http://localhost:57512/token
- Method: POST
- Body: userName = user1@gmail.com
- Body: password = password1
- Body: grant_type = password
And Got the JSON response with "access_token" which is valid for 20 minutes ( 20 minutes time is set using Code in StartUp.cs AccessTokenExpireTimeSpan = TimeSpan.FromMinutes(20)).
{
    "access_token": "eCYhgC-Hnjm_bUx0gxMx9XJvdkJj-CiTsRm4OGMF4zWNy4kIEOk9ca3bhRaa-wqJIoUBZHhmKVHzuMlL-t-4tfDstzctYgqKIqV24fZYKbYCA3HUXpwLTaysCti0-lLzCOjUFxadRnL4OtzOxZE-YQltj6z3YqYWn3mzjqwVrFOKocX5n0ZBLHQrnoEhICOZH6Wr41_opXSuLZieKJH0gFPjm5lnOLjkRkFhAE4lh_MidWBqcVX1KMeDBlWH5rvi9v1nq-Opj1GNU-HiAZfTiUVLj20h0kaEAlQurLfcONQIZGMFemCfBDinAn08yzgaflbqPbzV2CqJBtxd0yDt6XiHfkKbBMRWIYyMzYDrgLGVNsXEVUuJC_5uaODUtMT2",
    "token_type": "bearer",
    "expires_in": 1199,
    "refresh_token": "a6e63f6e-a997-4090-92e2-7cd37c75694f",
    "userName": "Username 1",
    "roles": "User",
    ".issued": "Wed, 25 Sep 2019 11:01:56 GMT",
    ".expires": "Wed, 25 Sep 2019 11:21:56 GMT"
}
How to check if our token is working?
Create a new WebAPI Controller inside Controller Folder of your project to test it.
Right-click on "Controllers"-> Select "Add"-> Select "Web API 2 Controller with read/write" -> keep the name same for testing purpose "DefaultController"-> Click "OK"
Once you are done, add [Authorize] Attribute for this controller, so complete code for controller would be
using System.Collections.Generic;
using System.Web.Http;

namespace TokenBasedAuthentication.Controllers
{
    [Authorize]
    public class DefaultController : ApiController
    {
        // GET: api/Default
        public IEnumerable<string> Get()
        {
            return new string[] { "value1", "value2" };
        }

        // GET: api/Default/5
        public string Get(int id)
        {
            return "value";
        }

        // POST: api/Default
        public void Post([FromBody]string value)
        {
        }

        // PUT: api/Default/5
        public void Put(int id, [FromBody]string value)
        {
        }

        // DELETE: api/Default/5
        public void Delete(int id)
        {
        }
    }
}
Now try to call the " http://localhost:57512/api/default" using postman without passing token, you will get error
{
    "Message": "Authorization has been denied for this request."
}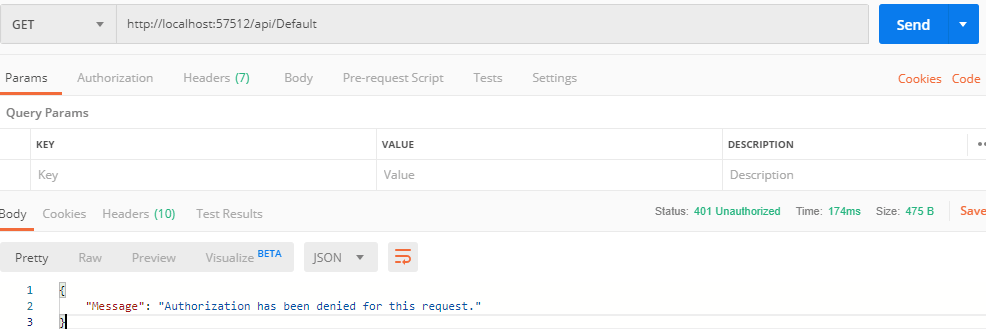
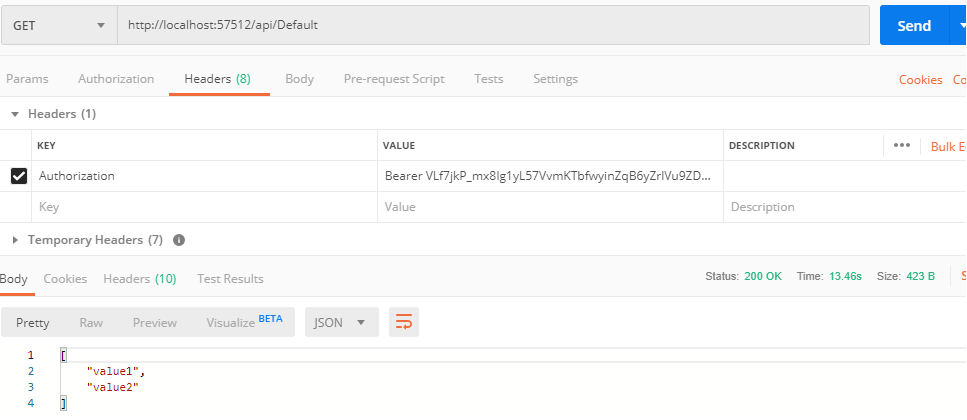
As you can see we didn't passed the Token in above request, so got the error, now, let's pass the Authorisation token with api call
- URL : http://localhost:57512/api/default
- Method: GET
- Header: Authorization = Bearer T-8NHXhRT....I4Rx8HRB
You will see the correct returned data, as shown in the image below
That's it, we are done, if you have questions feel free to ask it in the comment's section.
Note: You may need to modify Refresh Token and claims code according to your project need.
You can download the demo project from here.
You may also like to read:
