
If you have been working for a web-application you may need to create an admin panel for data-entry or sending emails, for which you may need to integrate rich text-editor in your asp.net MVC application, previously I have discussed using CKEditor for ASP.NET web-forms, in this article, I am going to explain you about using rich text-editor in MVC, so we will be using CKEditor as rich text-editor in ASP.NET MVC razor view.
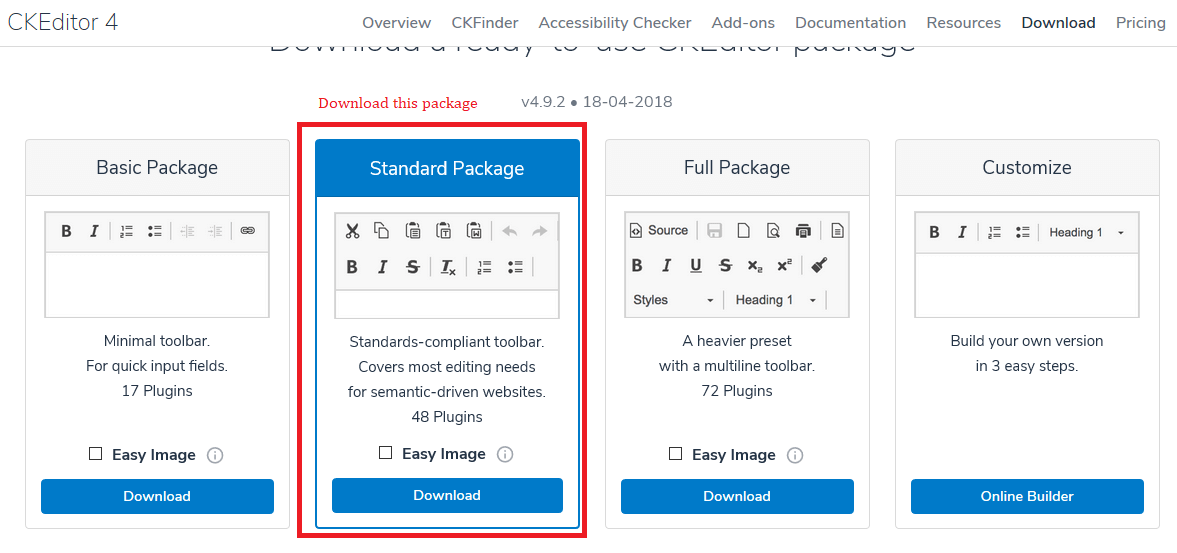
Step 1: First of all, you will need to download CKEditor required files from its official website https://ckeditor.com/ckeditor-4/download/
Now, you can extract all the files and keep it safe, we will use it after creating our project.
Step 2: Create a new project in your Visual Studio (File->New->Project-> ASP.NET Empty Web Application)
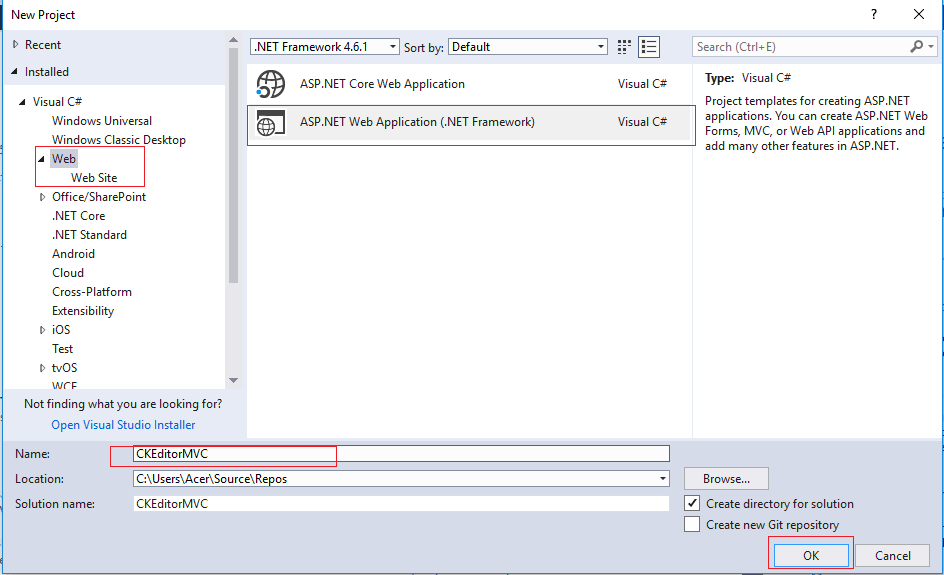
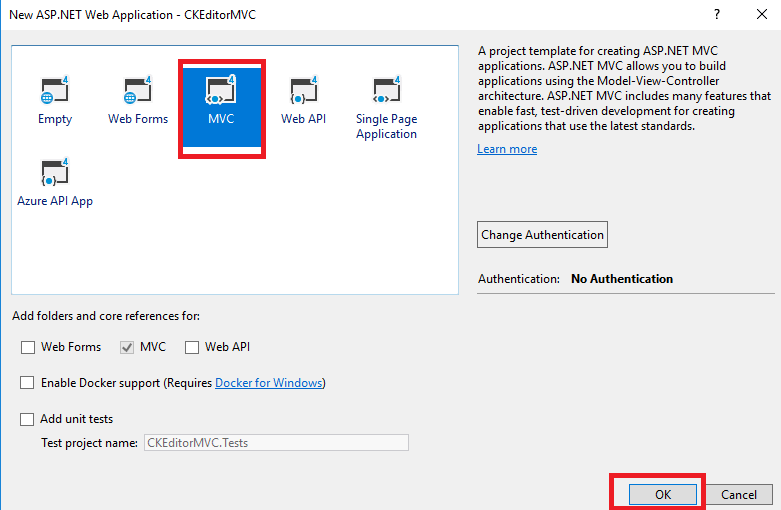
Name the Project as you like, I named it "CKEditorMVC", click "OK" & then select MVC template in the new screen
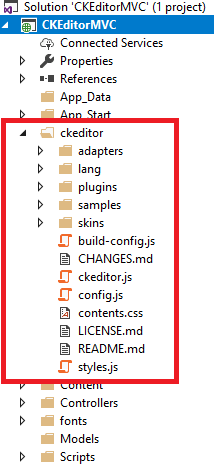
Click "OK", now add the extracted CKEditor folder in your web-application as shown below
Step 3: Now you need add the required js file of CKEditor in your _layout.cshtml razor view
<body>
<div class="navbar navbar-inverse navbar-fixed-top">
<div class="container">
<div class="navbar-header">
<button type="button" class="navbar-toggle" data-toggle="collapse" data-target=".navbar-collapse">
<span class="icon-bar"></span>
<span class="icon-bar"></span>
<span class="icon-bar"></span>
</button>
@Html.ActionLink("Application name", "Index", "Home", new { area = "" }, new { @class = "navbar-brand" })
</div>
<div class="navbar-collapse collapse">
<ul class="nav navbar-nav">
<li>@Html.ActionLink("Home", "Index", "Home")</li>
<li>@Html.ActionLink("About", "About", "Home")</li>
<li>@Html.ActionLink("Contact", "Contact", "Home")</li>
</ul>
</div>
</div>
</div>
<div class="container body-content">
@RenderBody()
<hr />
<footer>
<p>© @DateTime.Now.Year - My ASP.NET Application</p>
</footer>
</div>
@Scripts.Render("~/bundles/jquery")
@Scripts.Render("~/bundles/bootstrap")
<script src="~/ckeditor/ckeditor.js"></script>
@RenderSection("scripts", required: false)
</body>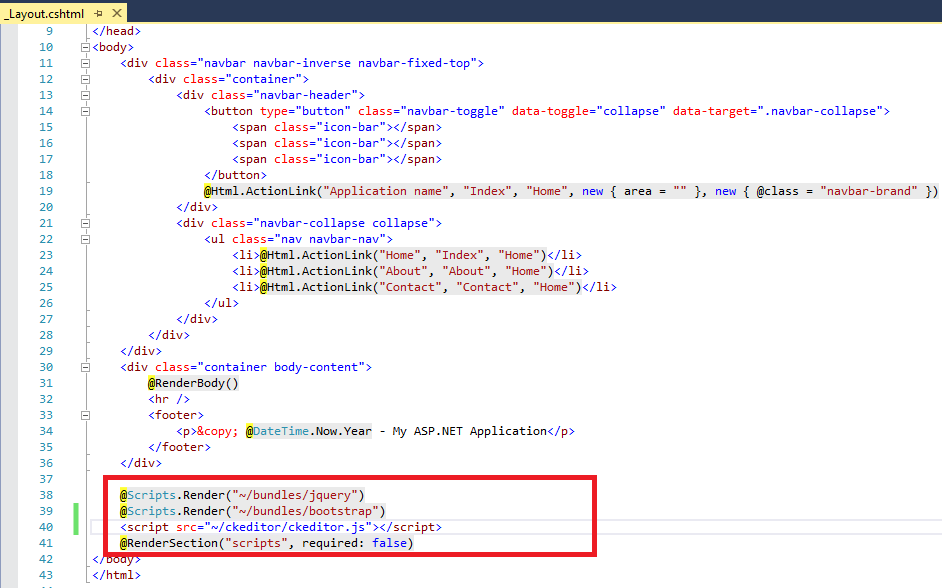
Step 4: In your view, just mention the TextArea Id in jQuery code and you are done
@section scripts{
    <script>
        $(document).ready(function () {
            //initialize CKEditor by givin id of textarea
            CKEDITOR.replace('BlogDescription');
    </script>
}
This was a quick explanation of adding CKEditor in your View, now if you need to learn more about it read this article further for a more detailed explanation on how to add/update data in the database.
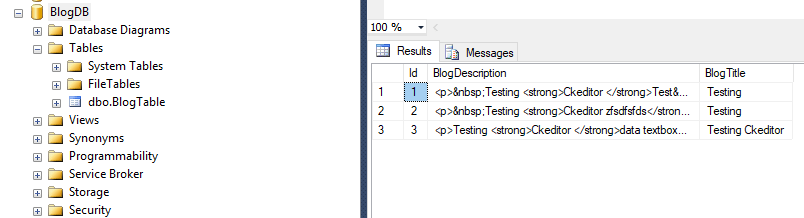
Step 5: Let's create a sample database & a table in which we will be saving details and retrieving data from it, here is our database image with sample data
You can create this on your pc locally by running the script below
USE [master]
GO
/****** Object: Database [BlogDB] Script Date: 5/21/2018 12:35:39 AM ******/
CREATE DATABASE [BlogDB]
CONTAINMENT = NONE
ON PRIMARY
( NAME = N'BlogDB', FILENAME = N'C:\Program Files\Microsoft SQL Server\MSSQL11.SQLEXPRESS2\MSSQL\DATA\BlogDB.mdf' , SIZE = 3072KB , MAXSIZE = UNLIMITED, FILEGROWTH = 1024KB )
LOG ON
( NAME = N'BlogDB_log', FILENAME = N'C:\Program Files\Microsoft SQL Server\MSSQL11.SQLEXPRESS2\MSSQL\DATA\BlogDB_log.ldf' , SIZE = 1024KB , MAXSIZE = 2048GB , FILEGROWTH = 10%)
GO
ALTER DATABASE [BlogDB] SET COMPATIBILITY_LEVEL = 110
GO
IF (1 = FULLTEXTSERVICEPROPERTY('IsFullTextInstalled'))
begin
EXEC [BlogDB].[dbo].[sp_fulltext_database] @action = 'enable'
end
GO
ALTER DATABASE [BlogDB] SET ANSI_NULL_DEFAULT OFF
GO
ALTER DATABASE [BlogDB] SET ANSI_NULLS OFF
GO
ALTER DATABASE [BlogDB] SET ANSI_PADDING OFF
GO
ALTER DATABASE [BlogDB] SET ANSI_WARNINGS OFF
GO
ALTER DATABASE [BlogDB] SET ARITHABORT OFF
GO
ALTER DATABASE [BlogDB] SET AUTO_CLOSE OFF
GO
ALTER DATABASE [BlogDB] SET AUTO_CREATE_STATISTICS ON
GO
ALTER DATABASE [BlogDB] SET AUTO_SHRINK OFF
GO
ALTER DATABASE [BlogDB] SET AUTO_UPDATE_STATISTICS ON
GO
ALTER DATABASE [BlogDB] SET CURSOR_CLOSE_ON_COMMIT OFF
GO
ALTER DATABASE [BlogDB] SET CURSOR_DEFAULT GLOBAL
GO
ALTER DATABASE [BlogDB] SET CONCAT_NULL_YIELDS_NULL OFF
GO
ALTER DATABASE [BlogDB] SET NUMERIC_ROUNDABORT OFF
GO
ALTER DATABASE [BlogDB] SET QUOTED_IDENTIFIER OFF
GO
ALTER DATABASE [BlogDB] SET RECURSIVE_TRIGGERS OFF
GO
ALTER DATABASE [BlogDB] SET DISABLE_BROKER
GO
ALTER DATABASE [BlogDB] SET AUTO_UPDATE_STATISTICS_ASYNC OFF
GO
ALTER DATABASE [BlogDB] SET DATE_CORRELATION_OPTIMIZATION OFF
GO
ALTER DATABASE [BlogDB] SET TRUSTWORTHY OFF
GO
ALTER DATABASE [BlogDB] SET ALLOW_SNAPSHOT_ISOLATION OFF
GO
ALTER DATABASE [BlogDB] SET PARAMETERIZATION SIMPLE
GO
ALTER DATABASE [BlogDB] SET READ_COMMITTED_SNAPSHOT OFF
GO
ALTER DATABASE [BlogDB] SET HONOR_BROKER_PRIORITY OFF
GO
ALTER DATABASE [BlogDB] SET RECOVERY SIMPLE
GO
ALTER DATABASE [BlogDB] SET MULTI_USER
GO
ALTER DATABASE [BlogDB] SET PAGE_VERIFY CHECKSUM
GO
ALTER DATABASE [BlogDB] SET DB_CHAINING OFF
GO
ALTER DATABASE [BlogDB] SET FILESTREAM( NON_TRANSACTED_ACCESS = OFF )
GO
ALTER DATABASE [BlogDB] SET TARGET_RECOVERY_TIME = 0 SECONDS
GO
USE [BlogDB]
GO
/****** Object: Table [dbo].[BlogTable] Script Date: 5/21/2018 12:35:39 AM ******/
SET ANSI_NULLS ON
GO
SET QUOTED_IDENTIFIER ON
GO
SET ANSI_PADDING ON
GO
CREATE TABLE [dbo].[BlogTable](
[Id] [int] IDENTITY(1,1) NOT NULL,
[BlogDescription] [varchar](max) NULL,
[BlogTitle] [varchar](500) NULL,
CONSTRAINT [PK_BlogTable] PRIMARY KEY CLUSTERED
(
[Id] ASC
)WITH (PAD_INDEX = OFF, STATISTICS_NORECOMPUTE = OFF, IGNORE_DUP_KEY = OFF, ALLOW_ROW_LOCKS = ON, ALLOW_PAGE_LOCKS = ON) ON [PRIMARY]
) ON [PRIMARY] TEXTIMAGE_ON [PRIMARY]
GO
SET ANSI_PADDING OFF
GO
SET IDENTITY_INSERT [dbo].[BlogTable] ON
INSERT [dbo].[BlogTable] ([Id], [BlogDescription], [BlogTitle]) VALUES (1, N'<p> Testing <strong>Ckeditor </strong>Test </p>', N'Testing')
INSERT [dbo].[BlogTable] ([Id], [BlogDescription], [BlogTitle]) VALUES (2, N'<p> Testing <strong>Ckeditor zfsdfsfds</strong></p>', N'Testing')
INSERT [dbo].[BlogTable] ([Id], [BlogDescription], [BlogTitle]) VALUES (3, N'<p>Testing <strong>Ckeditor </strong>data textbox</p>', N'Testing Ckeditor')
SET IDENTITY_INSERT [dbo].[BlogTable] OFF
USE [master]
GO
ALTER DATABASE [BlogDB] SET READ_WRITE
GO
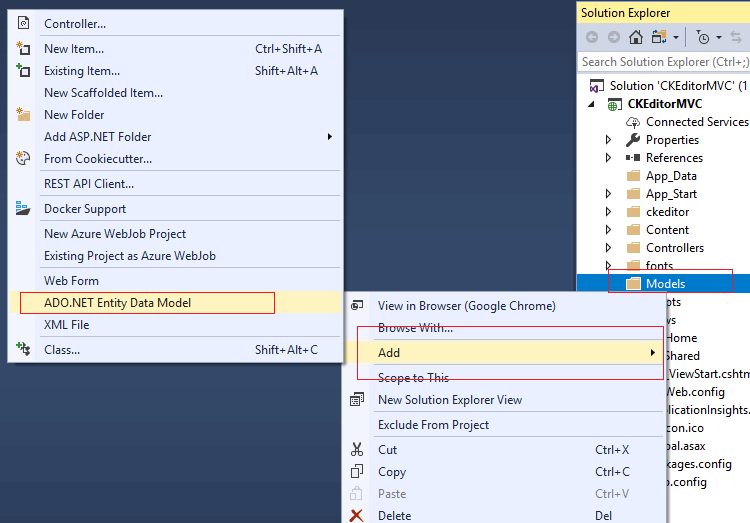
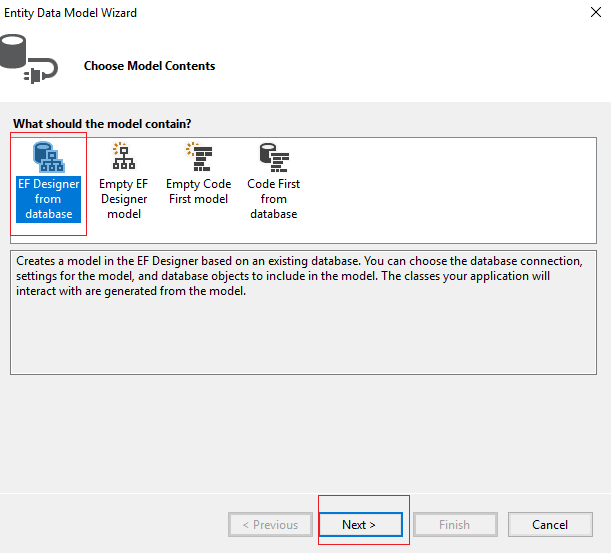
Step 6: Connect your project with the database using EDMX, right click on your project's Model folder, then select "ADD" and then "ADO.NET Entity Data Model" as shown below"
Give a name and click "OK". select "EF Designer from database" option and click "Next"
Now, you need to click on "New connection" and enter the details of your database, to select the correct database.
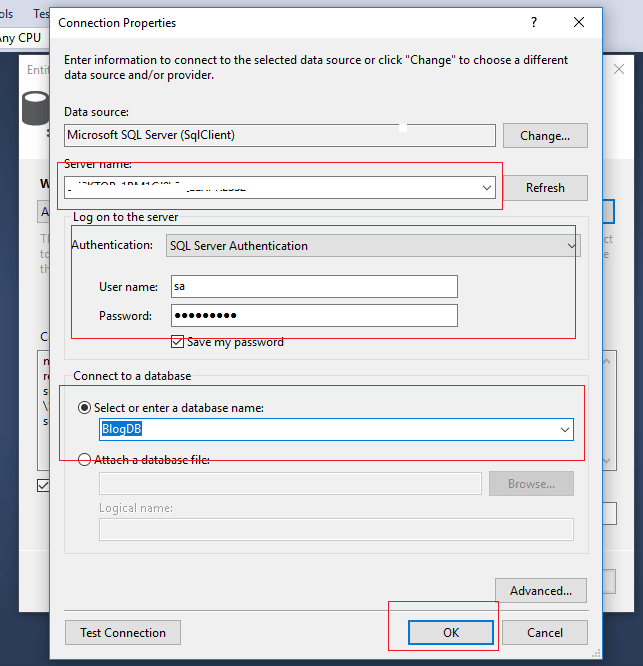
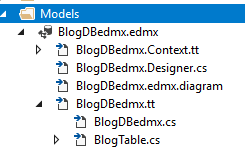
Once done, you need to click "OK", select "Yes" radio button to include connection string, then "Next", select tables you want to include in the edmx file, and click "Next", then select "Finish", once all the steps are done, you can should see output like below in your model's folder
Step 7: Now as we are connected to the database we can create the list view to show a list of rows of the table, and create/edit view also.
Go to your HomeController.cs and use the below C# code
namespace CKEditorMVC.Controllers
{
    public class HomeController : Controller
    {
        public ActionResult Index()
        {
            var list = new List<BlogTable>();
            using (var context = new BlogDBEntities())
            {
                list = context.BlogTables.ToList();
            }
            return View(list);
        }

        public ActionResult Create()
        {

            return View();
        }


        [ValidateInput(false)]
        [HttpPost]
        public ActionResult Create(BlogTable bt)
        {

            using (var context = new BlogDBEntities())
            {

                context.BlogTables.Add(bt);
                context.SaveChanges();
            }
            return RedirectToAction("Index");
        }

        public ActionResult Edit(int id)
        {
            var model = new BlogTable();
            using (var context = new BlogDBEntities())
            {
                model = context.BlogTables.Where(a => a.Id == id).FirstOrDefault();
            }
            return View(model);
        }


        [ValidateInput(false)]
        [HttpPost]
        public ActionResult Edit(BlogTable bt)
        {

            using (var context = new BlogDBEntities())
            {
                context.Entry(bt).State = EntityState.Modified;

                context.SaveChanges();
            }
            return RedirectToAction("Index");
        }


    }
}
as you can notice while saving Model details I have used [ValidateInput(false)] attribute for saving/updating data of Model in the database, this is done to avoid any HTML error while saving details, as a rich text editor like CKEditor will submit form data as HTML.
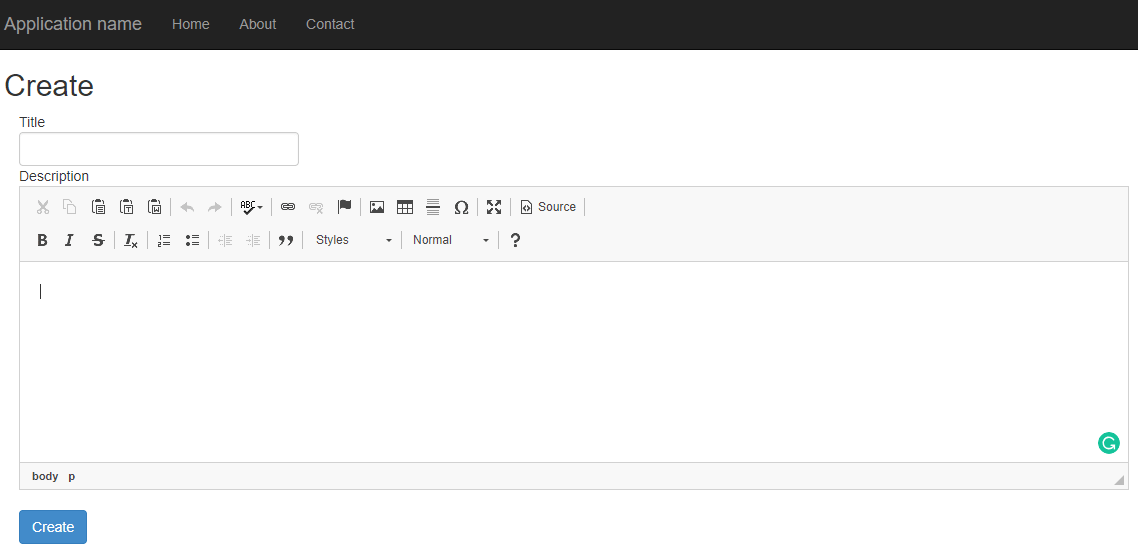
Now, create a view for Create() ActionMethod to enter model data
@model CKEditorMVC.Models.BlogTable
@{

    ViewBag.Title = "Create";
}
<h2>Create</h2>
@using (Html.BeginForm("Create", "Home", FormMethod.Post, new { @id="CreateForm"}))
{
    <div class="col-lg-12">
        Title
    </div>
    <div class="col-lg-12">
        @Html.TextBoxFor(a => a.BlogTitle, new { @class = "form-control " })
    </div>
    <div class="col-lg-12">
        Description
    </div>
    <div class="col-lg-12">
        @Html.TextBoxFor(a => a.BlogDescription)
    </div>
    <br />
    <div class="col-lg-12">
        <input type="submit" class="btn btn-primary" value="Create" id="submit" />
    </div>
}
@section scripts{
    <script>
        $(document).ready(function () {
            //initialize CKEditor by givin id of textarea
            CKEDITOR.replace('BlogDescription');

            //call on form submit
            $('#CreateForm').on('submit', function () {

                //get each instance of ckeditor
                for (instance in CKEDITOR.instances) {
                    //update element
                    CKEDITOR.instances[instance].updateElement();
                }

                //set updated value in textarea
                $('#BlogDescription').val(CKEDITOR.instances["BlogDescription"].getData());
            });
        })
    </script>
}
I have explained the required jQuery code to implement CKEditor and pasting its data in the original TextArea to get data in C# Controller Model and save it in the database.
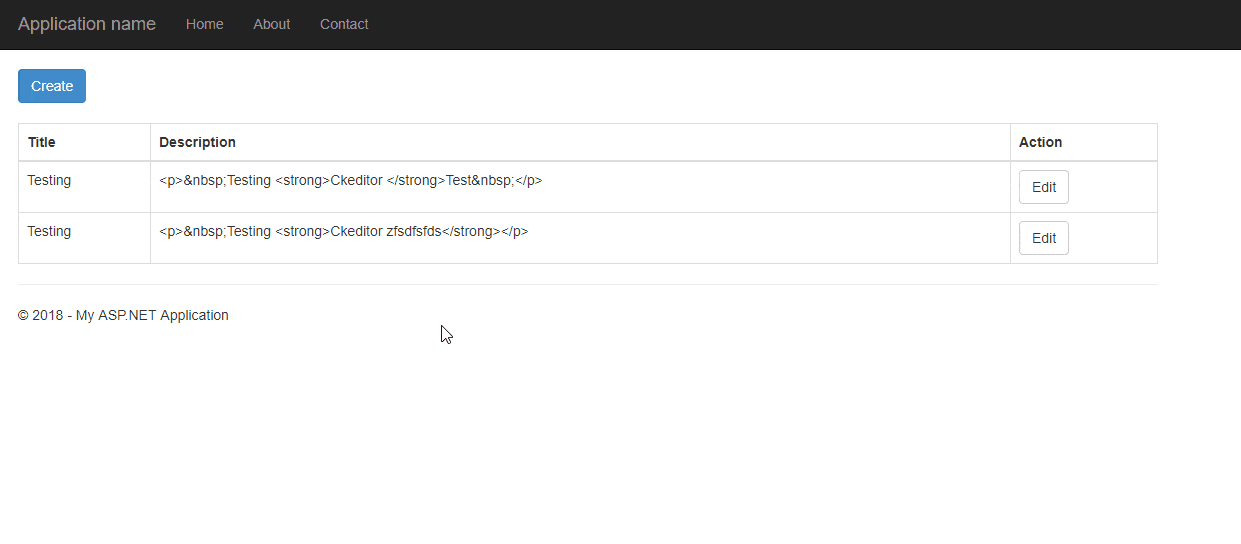
Output of the above code page will be as below
Let's create the Edit view now, to update the database, there isn't much difference in both
@model CKEditorMVC.Models.BlogTable
@{

    ViewBag.Title = "Edit";
}

<h2>Edit</h2>

@using (Html.BeginForm("Edit", "Home", FormMethod.Post, new { @id = "UpdateForm" }))
{
    <div class="col-lg-12">
        Title
    </div>
    <div class="col-lg-12">
        @Html.TextBoxFor(a => a.BlogTitle, new { @class = "form-control " })
    </div>
    <div class="col-lg-12">
        Description
    </div>
    <div class="col-lg-12">
        @Html.TextBoxFor(a => a.BlogDescription)
    </div>
    <br />

    <div class="col-lg-12">
        <input type="submit" class="btn btn-primary" value="Update" id="submit" />
    </div>
}

@section scripts{
    <script>
        $(document).ready(function () {
            //initialize CKEditor by givin id of textarea
            CKEDITOR.replace('BlogDescription');

             //set ckEditor value using jQuery
            CKEDITOR.instances['BlogDescription'].setData($("#BlogDescription").val());
            //call on form submit
            $('#UpdateForm').on('submit', function () {

                //get each instance of ckeditor
                for (instance in CKEDITOR.instances) {
                    //update element
                    CKEDITOR.instances[instance].updateElement();
                }

                //set updated value in textarea
                $('#BlogDescription').val(CKEDITOR.instances["BlogDescription"].getData());
            });
        })
    </script>
}
basically, we have just added a new jQuery code to set data on page load
//set ckEditor value using jQuery
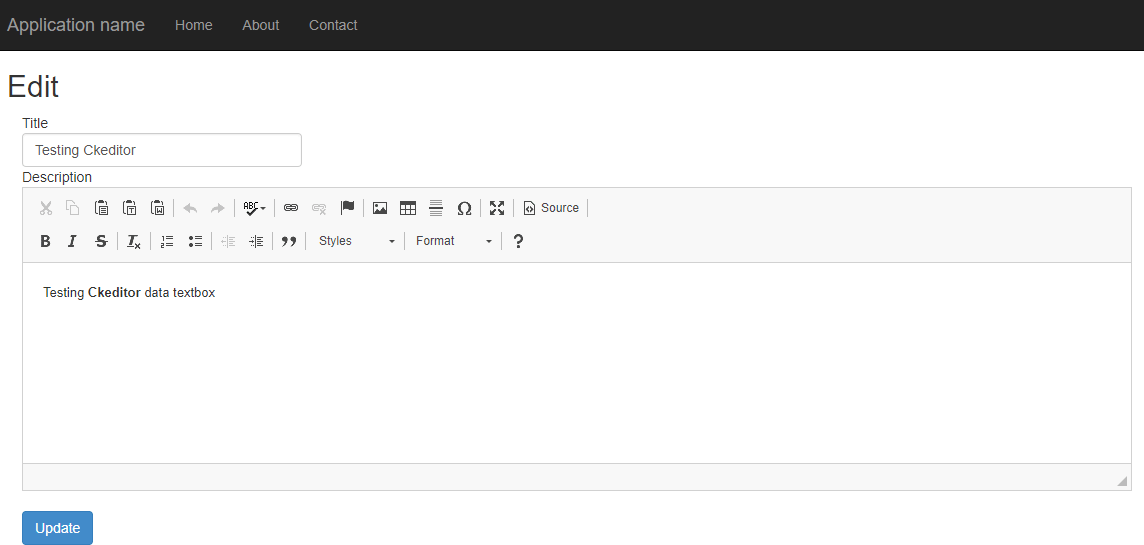
CKEDITOR.instances['BlogDescription'].setData($("#BlogDescription").val());While editing the data output will be as below
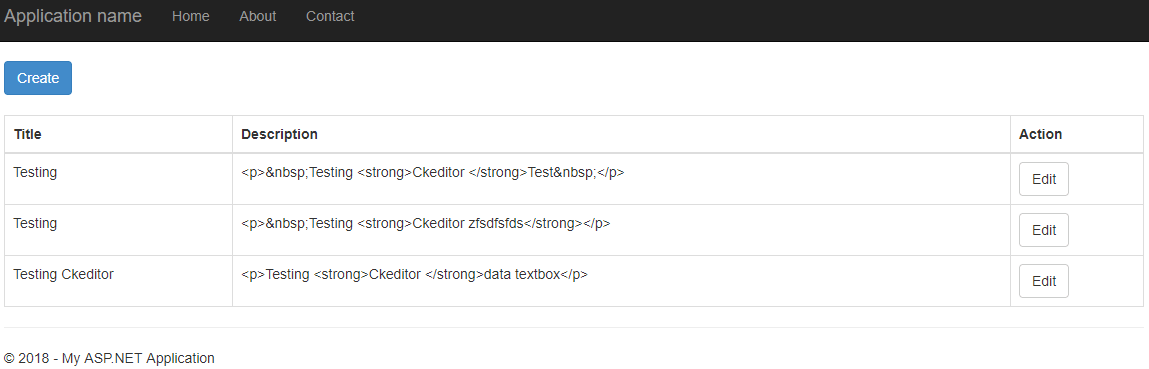
That's it, we are done, we can build the application and run it in the browser, the output will be as below
Here is the complete demo using gif image.
Feel free to ask any questions related to this in comment's section below or in the questions sections.
You may also like to read:
 Buy us a coffee
 Become a Patron
vikas_jk
Images are visible as data-to-image.
OR
if you want to upload images on server and get's url back
Add JS settings as below
and in C# Controller
That should work.