
Whether you are working on Windows or on Web or on Console application, at one stage we need to process data and excel file is widely used for it, so in previous article, we have explained about creating excel in C# without interop but in this article, I am going to provide you code to open and read excel file (.xls or .xlsx) in C# line by line in Console application using OLEDB or EPPlus or Interop (all 3 methods), you can use the same code C# code to fill ASP.NET GridView or MVC application table.
So, let's get started with it.
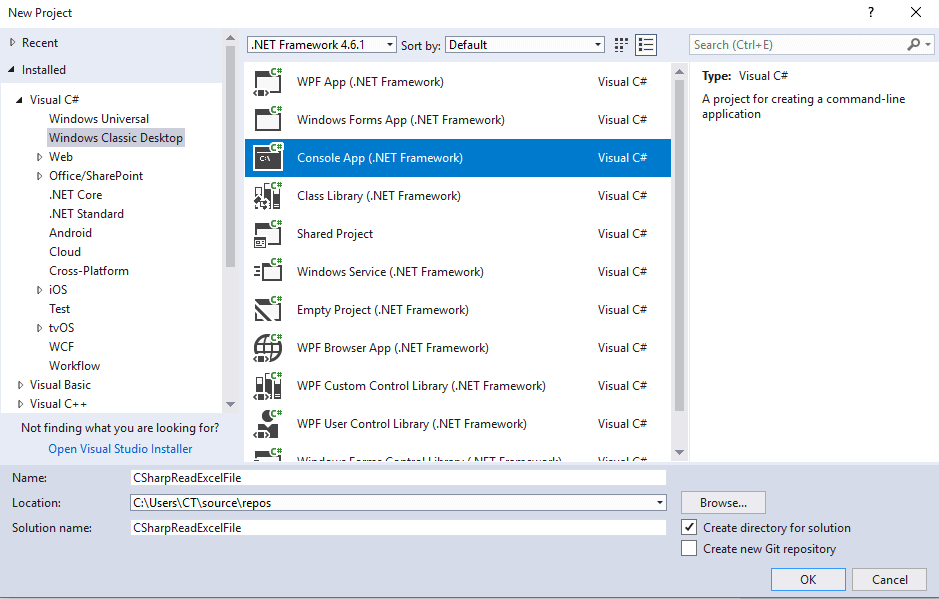
Step 1: Create a new Console applicaiton in your Visual Studio, by navigating to File->New->Project-> Select "Windows Classic dekstop" from left-pane & "Console-App" from right-pane -> Provide a name to your application "CSharpReadExcelFile" -> Click "OK"
Step 2: Now we have our Console application and we need to add C# code using OLEDB to read excel file, for that we would need connection string with the source URL of excel file.
In the given example as I am using .XLS excel file, here is my connection string
string connString = "Provider=Microsoft.Jet.OLEDB.4.0;Data Source=D:\\Sample1.xls; Extended Properties='Excel 8.0;HDR=NO;IMEX=1;'";For Excel 97-2003 Format we can use “Microsoft Jet OLEDB Driver 4.0”, while for the Connection String for Excel 2007 Format (.XLSX), we can use “Microsoft Ace OLEDB Driver 12.0” and it's connection string would be as below
string connString = "Provider= Microsoft.ACE.OLEDB.12.0;" + "Data Source=Sample1.xlsx" + ";Extended Properties='Excel 8.0;HDR=Yes'";In the above Connection string's you may see extended properties HDR=Yes & HDR =No
Use HDR=YES if first excel row contains headers, alternatively,use HDR=NO when your excel's first row is not headers and it's data.
Now, we have connection string , we need to create connection using OLEDB and open it
             // Create the connection object
            OleDbConnection oledbConn = new OleDbConnection(connString);

            // Open connection
            oledbConn.Open();
Read the excel file using OLEDB connection and fill it in dataset
  //here sheet name is Sample-spreadsheet-file, usually it is Sheet1, Sheet2 etc..
                OleDbCommand cmd = new OleDbCommand("SELECT * FROM [Sample-spreadsheet-file$]", oledbConn);

                // Create new OleDbDataAdapter
                OleDbDataAdapter oleda = new OleDbDataAdapter();

                oleda.SelectCommand = cmd;

                // Create a DataSet which will hold the data extracted from the worksheet.
                DataSet ds = new DataSet();

                // Fill the DataSet from the data extracted from the worksheet.
                oleda.Fill(ds, "Employees");
in the above code Sample-spreadsheet-file is the name of Sheet.
Note: With the help of sheet name, you can refer to Excel data, you need to use '$' with sheet name, e.g. Select * from [Sheet1$]
Now loop through each row of excel sheet and print it in Console app
 //loop through each row
                foreach(var m in ds.Tables[0].DefaultView)
                {
                    Console.WriteLine(((System.Data.DataRowView)m).Row.ItemArray[0] +" "+((System.Data.DataRowView)m).Row.ItemArray[1] +" "+((System.Data.DataRowView)m).Row.ItemArray[2]);

                }
If you are using ASP.NET, you can bind it with Grid View using below code instead of printing it
// Bind the data to the GridView
GridView1.DataSource = ds.Tables[0].DefaultView;
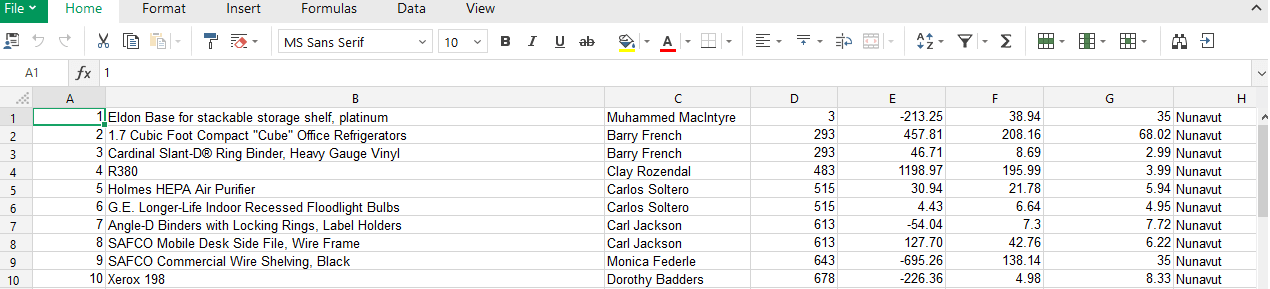
GridView1.DataBind();Now, we have discussed each step, suppose this is out Excel file
and ese the code below in your Console application, build and execute it.
using System;
using System.Data;
using System.Data.OleDb;


namespace CSharpReadExcelFile
{
    class Program
    {
        static void Main(string[] args)
        {
            //this is the connection string which has OLDB 4.0 Connection and Source URL of file
            //use HDR=YES if first excel row contains headers, HDR=NO means your excel's first row is not headers and it's data.
            string connString = "Provider=Microsoft.Jet.OLEDB.4.0;Data Source=D:\\Sample1.xls; Extended Properties='Excel 8.0;HDR=NO;IMEX=1;'";


            // Create the connection object
            OleDbConnection oledbConn = new OleDbConnection(connString);
            try
            {
                // Open connection
                oledbConn.Open();

                // Create OleDbCommand object and select data from worksheet Sample-spreadsheet-file
                //here sheet name is Sample-spreadsheet-file, usually it is Sheet1, Sheet2 etc..
                OleDbCommand cmd = new OleDbCommand("SELECT * FROM [Sample-spreadsheet-file$]", oledbConn);

                // Create new OleDbDataAdapter
                OleDbDataAdapter oleda = new OleDbDataAdapter();

                oleda.SelectCommand = cmd;

                // Create a DataSet which will hold the data extracted from the worksheet.
                DataSet ds = new DataSet();

                // Fill the DataSet from the data extracted from the worksheet.
                oleda.Fill(ds, "Employees");

                //loop through each row
                foreach(var m in ds.Tables[0].DefaultView)
                {
                    Console.WriteLine(((System.Data.DataRowView)m).Row.ItemArray[0] +" "+((System.Data.DataRowView)m).Row.ItemArray[1] +" "+((System.Data.DataRowView)m).Row.ItemArray[2]);

                }

            }
            catch (Exception e)
            {
                Console.WriteLine("Error :" + e.Message);
            }
            finally
            {
                // Close connection
                oledbConn.Close();
            }
        }
    }
}
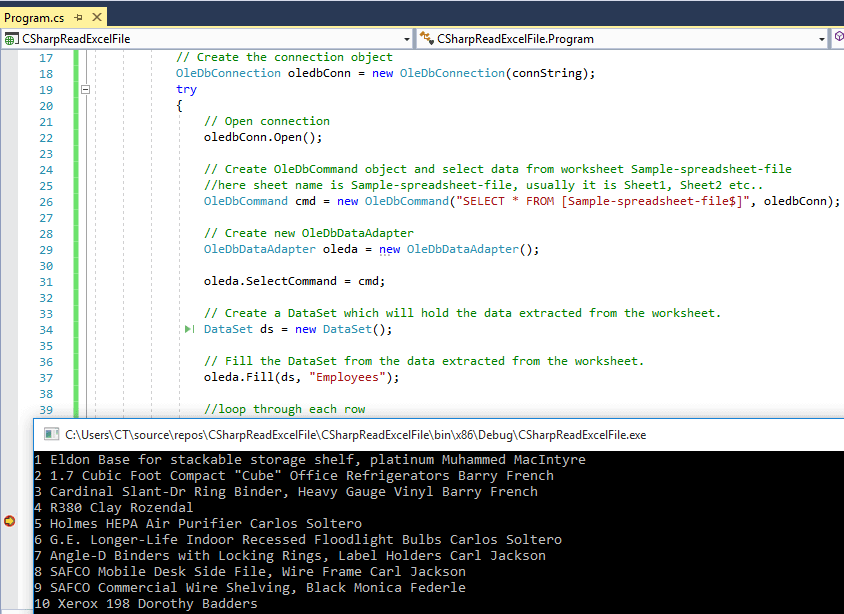
Output of the above code will be as below
Now, if you are working on 64 bit operating system, you may get this error "The 'Microsoft.Jet.OLEDB.4.0' provider is not registered on the local machine.".
Resolving this error: If your application is Desktop based, compile your EXE with x86 CPU (Menu Tools, Options, select Projects And Solutions, check the show advanced build configurations. Now in the Build Menu you will be able to go to the Config Manager and set output to x86.)
If your application is web based, then Enable '32-Bit Applications' in application pool.
On IIS, change the "Enable 32-bit Applications" setting to True, in the Advanced Settings for the Application Pool.
Disadvantage of using OLEDB for Excel
With OLEDB, you cannot format data that you inserted/updated in EXCEL sheet but Interop can do it efficiently. You cannot perform any mathematical operation or working on graphs using OLEDB, but it is really a good way to insert/update data in EXCEL where no Excel application is installed.
Reading Excel file using EPPlus
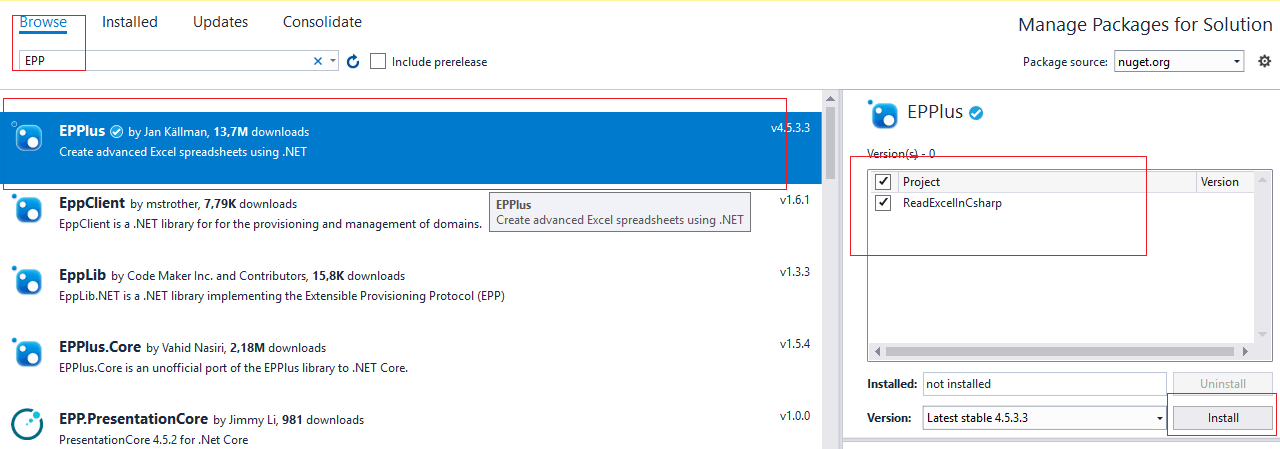
If you don't want to use OleDb, you can try using EPPlus Nuget package based solution.
For this, you would have to install EPPlus, so navigate to "Tools"-> "Nuget package manager"-> "Manage Nuget for this solution" -> Select "Browse" tab and search for "EPPlus", then install the nuget package.
Once you have installed the package, in your Console application "Program.cs", you can use the code below
using OfficeOpenXml;
using System;
using System.IO;


namespace ReadExcelInCsharp
{
    class Program
    {
        static void Main(string[] args)
        {
            //provide file path
            FileInfo existingFile = new FileInfo(@"D:\sample_XLSX.xlsx");
            //use EPPlus
            using (ExcelPackage package = new ExcelPackage(existingFile))
            {
                //get the first worksheet in the workbook
                ExcelWorksheet worksheet = package.Workbook.Worksheets[1];
                int colCount = worksheet.Dimension.End.Column;  //get Column Count
                int rowCount = worksheet.Dimension.End.Row;     //get row count
                for (int row = 1; row <= rowCount; row++)
                {
                    for (int col = 1; col <= colCount; col++)
                    {
                        //Print data, based on row and columns position
                        Console.WriteLine(" Row:" + row + " column:" + col + " Value:" + worksheet.Cells[row, col].Value?.ToString().Trim());
                    }
                }
            }
        }
    }
}
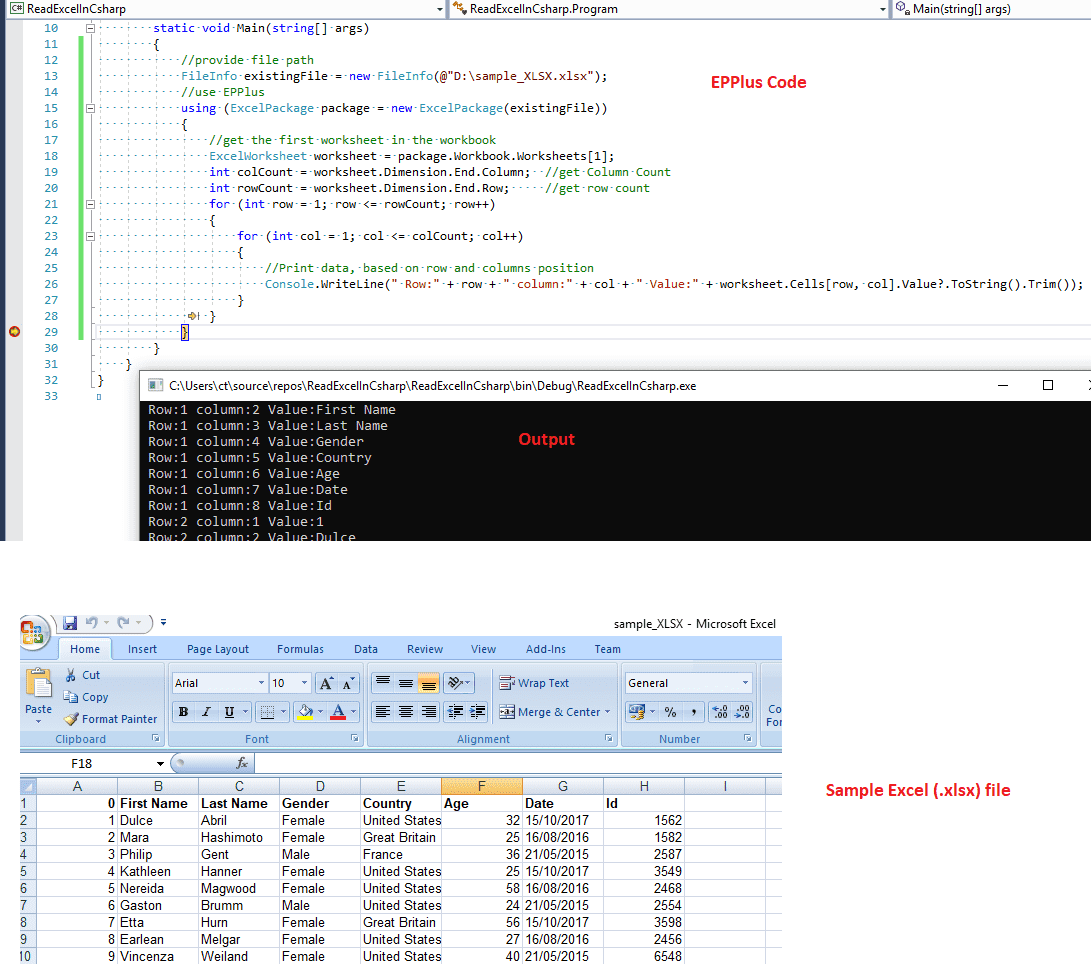
Here is the image, which shows console application output with sample excel file (.xlsx), we are using .xlsx file here for reading in C# using EPPlus
You can use above EPPlus example to work in .NET Core C# also, to read excel file in .NET Core.
Read Excel using MS Office Interop
You can also read Excel file in C# using MS Office Interop easily.
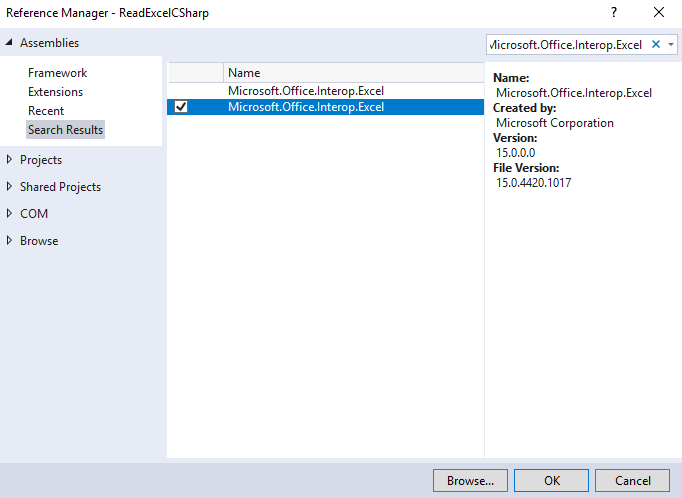
First you will have to add reference for "Microsoft.Office.Interop.Excel", so in your Console, Windows or Web-Application, right-click on "Reference" and then in "Assemblies" search for "Microsoft.Office.Interop.Excel"
So, here is the C# Code for it, considering we have sample XLSX file as above
using Microsoft.Office.Interop.Excel;
using System;

namespace ReadExcelCSharp
{
    class Program
    {
        static void Main(string[] args)
        {
            Application excelApp = new Application();
            if (excelApp != null)
            {
                Workbook excelWorkbook = excelApp.Workbooks.Open(@"D:\sample_XLSX.xlsx", 0, true, 5, "", "", true, XlPlatform.xlWindows, "\t", false, false, 0, true, 1, 0);
                Worksheet excelWorksheet = (Worksheet)excelWorkbook.Sheets[1];

                Range excelRange = excelWorksheet.UsedRange;
                int rowCount = excelRange.Rows.Count;
                int colCount = excelRange.Columns.Count;
                //get an object array of all of the cells in the worksheet (their values)
                object[,] valueArray = (object[,])excelRange.get_Value(
                            XlRangeValueDataType.xlRangeValueDefault);

                for (int i = 1; i <= rowCount; i++)
                {
                    for (int j = 1; j <= colCount; j++)
                    {


                        Console.WriteLine(valueArray[i, j].ToString());
                    }
                }

                excelWorkbook.Close();
                excelApp.Quit();
            }
        }
    }
}
Output:
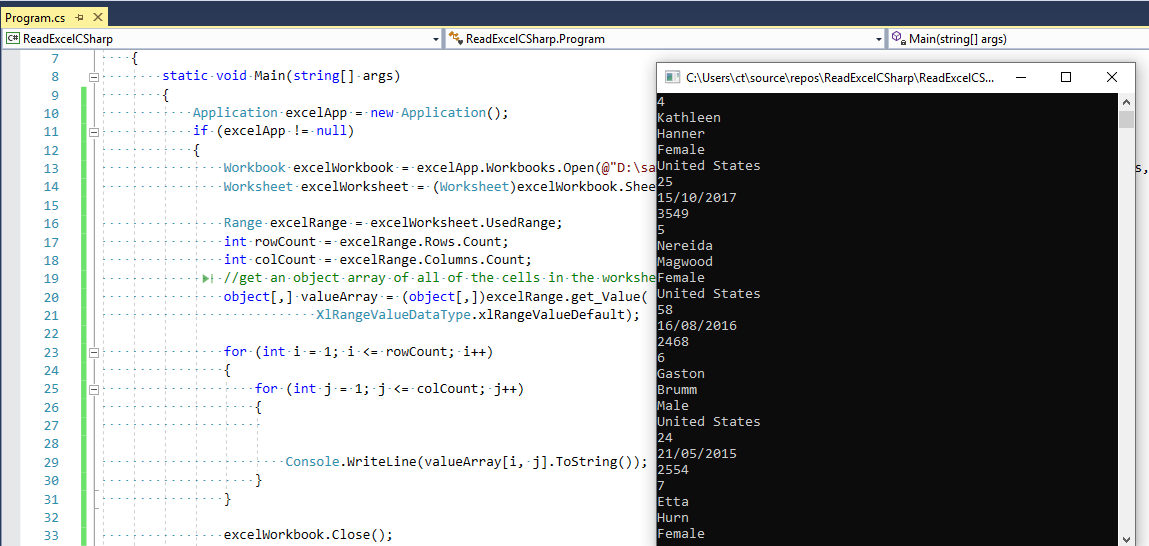
As you can see we have used Interop to open and read excel rows/columns, one of the drawbacks of using MS office Interop is that you need it installed on Server also.
You may also like to read:
Read Excel file and import data into GridView using Datatable in ASP.NET
Read file in C# ( Text file example using Console Application )
That's it, feel free to provide your feedback in the below comment's section.
 Buy us a coffee
 Become a Patron