
What is ASP.NET Web API?
ASP.NET Web API is a framework that makes it easy to build HTTP services that reach a broad range of clients, including browsers and mobile devices. ASP.NET Web API is an ideal platform for building RESTful applications on the .NET Framework.
When you're building APIs on the Web, there are several ways you can build APIs on the Web. These include HTTP/RPC, and what this means is using HTTP in Remote Procedure Call to call into things, like Methods, across the Web.
The verbs themselves are included in the APIs, like Get Customers, Insert Invoice, Delete Customer, and that each of these endpoints end up being a separate URI.
Why use the Web API?
Currently most mobile devices, browsers and tablets are the medium for accessing most of the internet and in this also people are using mobile apps the most and to provide data to apps we are now going to use the Microsoft new technology called Web API.
When to use it
If you want to expose the data/information of your application to your clients and other people then that other people can use your data and interact with the data/information you expose to them.
For example, a mobile application requires a service.
HTML 5 requires a service.
Desktop PC and tablets require services.
Currently most device apps require Web API services.
The ASP.Net Framework leverages both web standards such as HTTP, JSON and XML and it provides a simple way to build and expose REST-based data services.
ASP.NET Web API Characteristics:
- ASP.NET Web API is an ideal platform for building RESTful services.
- ASP.NET Web API is built on top of ASP.NET and supports ASP.NET request/response pipeline
- ASP.NET Web API maps HTTP verbs to method names.
- ASP.NET Web API supports different formats of response data. Built-in support for JSON, XML, BSON format.
- ASP.NET Web API can be hosted in IIS, Self-hosted or other web server that supports .NET 4.0+.
- ASP.NET Web API framework includes new HttpClient to communicate with Web API server. HttpClient can be used in ASP.MVC server side, Windows Form application, Console application or other apps.
Some core concepts of ASP.Net MVC are similar to the ASP.Net Web API such as routing and controllers.
Web API with MVC Project:
Visual Studio 2013 for Web includes Web API template which creates a new Web API project with ASP.NET MVC application and includes all the necessary references to get started.
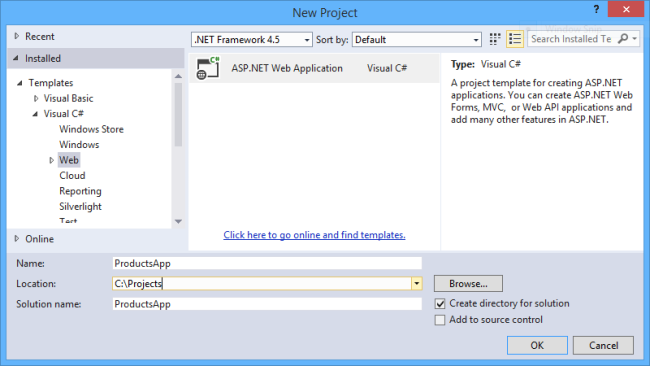
For this, open Visual Studio for Web and click on File menu and click on New Project. This will open New Project popup as below.
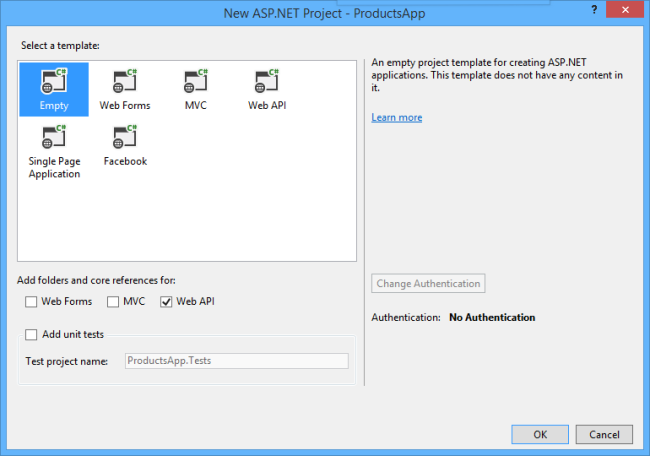
In the New ASP.NET Project dialog, select the Empty template. Under "Add folders and core references for", check Web API. Click OK.
Note:
You can also create a Web API project using the "Web API" template. The Web API template uses ASP.NET MVC to provide API help pages. I'm using the Empty template for this tutorial because I want to show Web API without MVC. In general, you don't need to know ASP.NET MVC to use Web API.
Adding a Model
A model is an object that represents the data in your application. ASP.NET Web API can automatically serialize your model to JSON, XML, or some other format, and then write the serialized data into the body of the HTTP response message. As long as a client can read the serialization format, it can deserialize the object. Most clients can parse either XML or JSON. Moreover, the client can indicate which format it wants by setting the Accept header in the HTTP request message.
Let's start by creating a simple model that represents a product.
If Solution Explorer is not already visible, click the View menu and select Solution Explorer. In Solution Explorer, right-click the Models folder. From the context menu, select Add then select
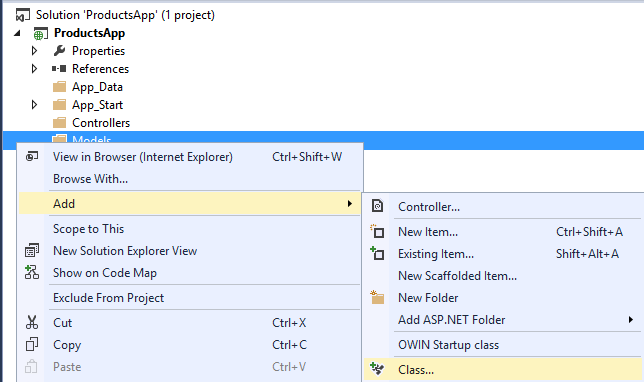
Name the class "Product". Add the following properties to the Product class.
namespace ProductsApp.Models
{
    public class Product
    {
        public int Id { get; set; }
        public string Name { get; set; }
        public string Category { get; set; }
        public decimal Price { get; set; }
    }
}
Adding a Controller
In Web API, a controller is an object that handles HTTP requests. We'll add a controller that can return either a list of products or a single product specified by ID.
Note
If you have used ASP.NET MVC, you are already familiar with controllers. Web API controllers are similar to MVC controllers, but inherit the ApiController class instead of the Controller class.
In Solution Explorer, right-click the Controllers folder. Select Add and then select Controller.
In the Add Scaffold dialog, select Web API Controller - Empty. Click Add.
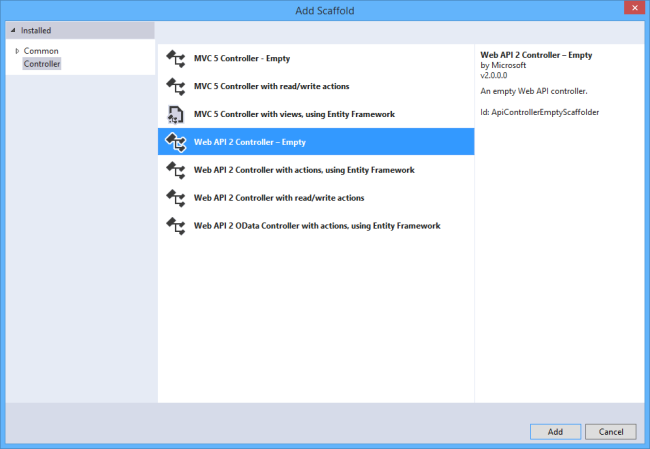
In the Add Controller dialog, name the controller "ProductsController". Click Add.The scaffolding creates a file named ProductsController.cs in the Controllers folder.
Now open the "ProductsController" and write the code below
using ProductsApp.Models;
using System;
using System.Collections.Generic;
using System.Linq;
using System.Net;
using System.Web.Http;

namespace ProductsApp.Controllers
{
    public class ProductsController : ApiController
    {
 // Here we are adding products by creating Products Class Array
        Product[] products = new Product[]
        {
            new Product { Id = 1, Name = "Tomato Soup", Category = "Groceries", Price = 1 },
            new Product { Id = 2, Name = "Yo-yo", Category = "Toys", Price = 3.75M },
            new Product { Id = 3, Name = "Hammer", Category = "Hardware", Price = 16.99M }
        };

        //This method will return All the products
        public IEnumerable<Product> GetAllProducts()
        {
            return products;
        }
        //This method will return product by Id
        public IHttpActionResult GetProduct(int id)
        {
            var product = products.FirstOrDefault((p) => p.Id == id);
            if (product == null)
            {
                return NotFound();
            }
            return Ok(product);
        }
    }
}
To keep the example simple, products are stored in a fixed array inside the controller class. Of course, in a real application, you would query a database or use some other external data source.
The controller defines two methods that return products:
- The
GetAllProductsmethod returns the entire list of products as an IEnumerable<Product> type. - The
GetProductmethod looks up a single product by its ID.
Now, You have a working web API. Each method on the controller corresponds to one or more URIs:
| Controller Method | URI |
|---|---|
| GetAllProducts | /api/products |
| GetProduct | /api/products/id |
For the GetProduct method, the id in the URI is a placeholder. For example, to get the product with ID of 5, the URI is api/products/5.
Calling the Web API with Javascript and jQuery
In this section, we'll add an HTML page that uses AJAX to call the web API. We'll use jQuery to make the AJAX calls and also to update the page with the results.
In Solution Explorer, right-click the project and select Add, then select New Item.In the Add New Item dialog, select the Web node under Visual C#, and then select the HTML Page item. Name the page "index.html".
Place this code in index.html
<!DOCTYPE html>
<html xmlns="http://www.w3.org/1999/xhtml">
<head>
  <title>Product App</title>
</head>
<body>

  <div>
    <h2>All Products</h2>
    <ul id="products" />
  </div>
  <div>
    <h2>Search by ID</h2>
    <input type="text" id="prodId" size="5" />
    <input type="button" value="Search" onclick="find();" />
    <p id="product" />
  </div>

  <script src="http://ajax.aspnetcdn.com/ajax/jQuery/jquery-2.0.3.min.js"></script>
  <script>
    var uri = 'api/products';

    $(document).ready(function () {
      // Send an AJAX request
      $.getJSON(uri)
          .done(function (data) {
            // On success, 'data' contains a list of products.
            $.each(data, function (key, item) {
              // Add a list item for the product.
              $('<li>', { text: formatItem(item) }).appendTo($('#products'));
            });
          });
    });

    function formatItem(item) {
      return item.Name + ': $' + item.Price;
    }

    function find() {
      var id = $('#prodId').val();
      $.getJSON(uri + '/' + id)
          .done(function (data) {
            $('#product').text(formatItem(data));
          })
          .fail(function (jqXHR, textStatus, err) {
            $('#product').text('Error: ' + err);
          });
    }
  </script>
</body>
</html>
Getting a List of Products
To get a list of products, send an HTTP GET request to "/api/products".
The jQuery getJSON function sends an AJAX request. For response contains array of JSON objects. The done function specifies a callback that is called if the request succeeds. In the callback, we update the DOM with the product information.
$(document).ready(function () {
    // Send an AJAX request
    $.getJSON(apiUrl)
        .done(function (data) {
            // On success, 'data' contains a list of products.
            $.each(data, function (key, item) {
                // Add a list item for the product.
                $('<li>', { text: formatItem(item) }).appendTo($('#products'));
            });
        });
});
Getting a Product By ID
To get a product by ID, send an HTTP GET request to "/api/products/id", where id is the product ID.
function find() {
    var id = $('#prodId').val();
    $.getJSON(apiUrl + '/' + id)
        .done(function (data) {
            $('#product').text(formatItem(data));
        })
        .fail(function (jqXHR, textStatus, err) {
            $('#product').text('Error: ' + err);
        });
}
We still call getJSON to send the AJAX request, but this time we put the ID in the request URI. The response from this request is a JSON representation of a single product.
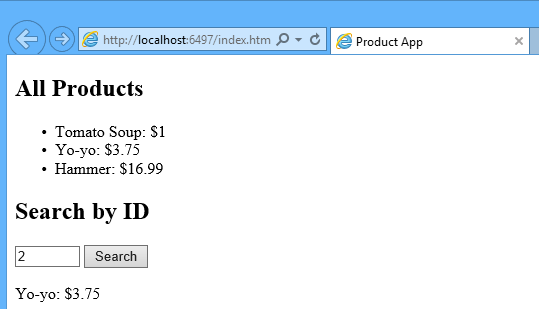
Running the project in browser give's results
 Buy us a coffee
 Become a Patron