
In previous article, I have mentioned Difference between AddTransient, AddScoped and AddSingleton in ASP.NET Core but now in this article, I have provided working example for razorpay api integration in c# using ASP.NET Core MVC as an example.
Step 1: Let's create a new ASP.NET Core MVC project in your Visual Studio 2019, by opening Visual Studio and selecting "Create new project" -> Select ASP.NET Core Web-application MVC template -> Name your project -> Select .Net Core version (I am using 5) and click on "Create"
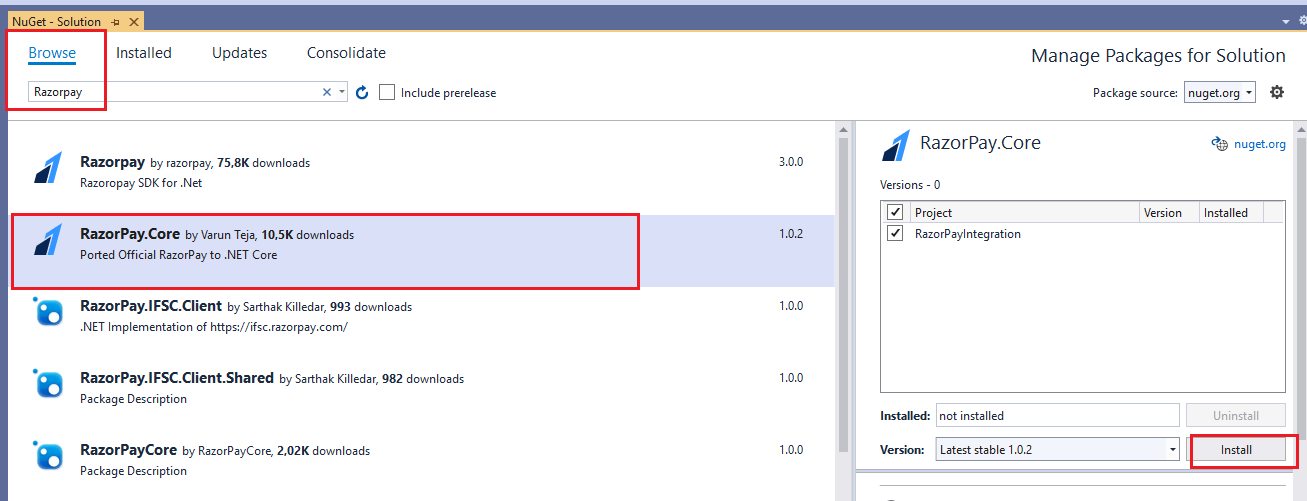
Step 2: Install Nuget package of Razorpay, inside Visual Studio, navigate to "Tools" -> "Nuget Package Manager" -> Select "Manage package for solution..."-> Select "Browse" and search for "Razorpay", select "RazorPay.Core" package and install it in your solution
Step 3: Now, we will need a secret key/id which you can get using Dashboard so for that we need to create a new account on razorpay.com, you will need an email and a mobile number to register on razorpay.com, if you are not registered with them otherwise you can login into your razorpay account.
Navigate to Settings -> API Keys -> Generate Key to generate the key for the selected mode.
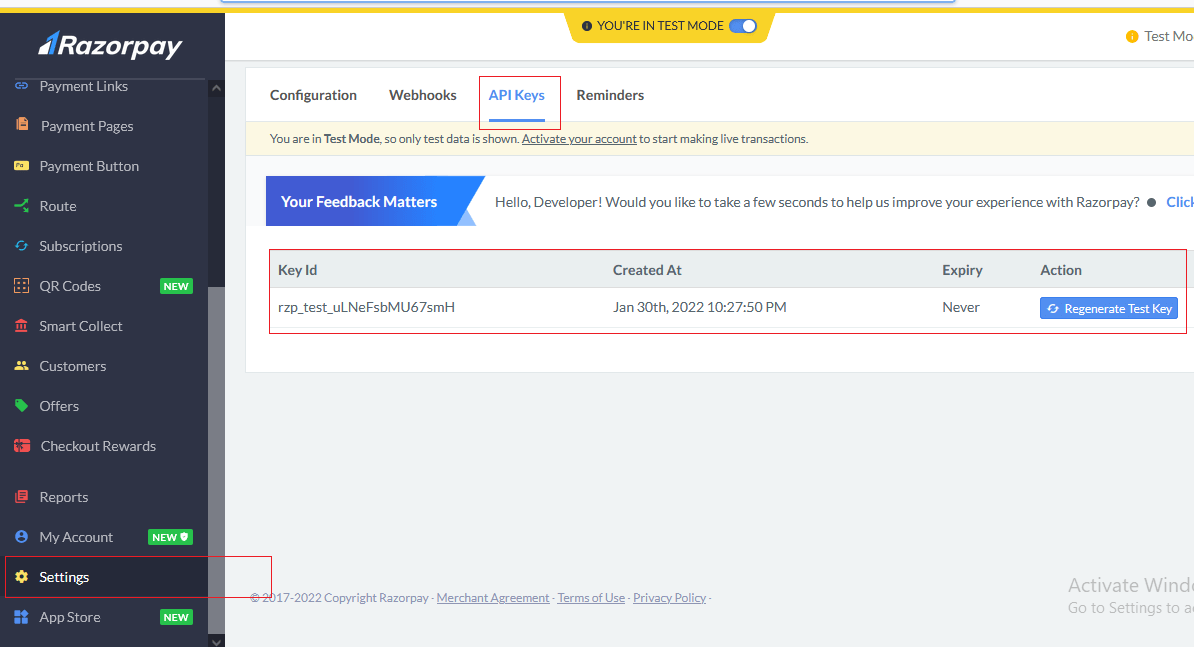
The Key Id and Key Secret appear in a pop-out window, you can save it, as we will use it in out code.
Step 4: Let's create 2 class one for creating order and second for payment request, so right-click on your Models Folder and then select "Add" -> select "Class" -> Create "Order.cs" (For testing purpose, I have created classes in same file, but we should usually create seperate class files for good practice.)
using System.ComponentModel.DataAnnotations;

namespace RazorPayIntegration.Models
{
    public class RazorPayOrder
    {
        public string OrderId { get; set; }
        public string RazorPayAPIKey { get; set; }
        public int Amount { get; set; }
        public string Currency { get; set; }
        public string Name { get; set; }
        public string Email { get; set; }
    }

    public class PaymentRequest
    {
        [Required]
        public string Name { get; set; }
        [Required]
        public string Email { get; set; }
        [Required]
        public int Amount { get; set; }
    }
}
Using the above Class we will capture user details.
Step 5: Navigate to HomeController.cs and use the below code
using Microsoft.AspNetCore.Mvc;
using Microsoft.Extensions.Logging;
using Razorpay.Api;
using RazorPayIntegration.Models;
using System;
using System.Collections.Generic;
using System.Diagnostics;

namespace RazorPayIntegration.Controllers
{
    public class HomeController : Controller
    {
        private readonly ILogger<HomeController> _logger;

        public HomeController(ILogger<HomeController> logger)
        {
            _logger = logger;
        }

        public IActionResult Index()
        {
            return View();
        }

        [HttpPost]
        public ActionResult CreateOrder(PaymentRequest _requestData)
        {
            // Generate random receipt number for order
            Random randomObj = new Random();
            string transactionId = randomObj.Next(10000000, 100000000).ToString();
            RazorpayClient client = new Razorpay.Api.RazorpayClient("rzp_test_uLNeFs5566smH", "z3HfG3DCPNr2XXXN4OuJb2Vk");
            Dictionary<string, object> options = new Dictionary<string, object>();
            options.Add("amount", _requestData.Amount * 100);  // Amount will in paise
            options.Add("receipt", transactionId);
            options.Add("currency", "INR");
            options.Add("payment_capture", "0"); // 1 - automatic  , 0 - manual
            //options.Add("notes", "-- You can put any notes here --");
            Order orderResponse = client.Order.Create(options);
            string orderId = orderResponse["id"].ToString();
            // Create order model for return on view
            RazorPayOrder orderModel = new RazorPayOrder
            {
                OrderId = orderResponse.Attributes["id"],
                RazorPayAPIKey = "rzp_test_uLNeFs5566smH",
                Amount = _requestData.Amount * 100,
                Currency = "INR",
                Name = _requestData.Name,
                Email = _requestData.Email,
            };
            // Return on PaymentPage with Order data
            return View("PaymentPage", orderModel);
        }

        [HttpPost]
        public ActionResult Complete()
        {
            // Payment data comes in url so we have to get it from url
            // This id is razorpay unique payment id which can be use to get the payment details from razorpay server
            string paymentId = HttpContext.Request.Form["rzp_paymentid"].ToString();
            // This is orderId
            string orderId = HttpContext.Request.Form["rzp_orderid"].ToString();
            RazorpayClient client = new Razorpay.Api.RazorpayClient("rzp_test_uLNeFs5566smH", "z3HfG3DCPNr2XXXN4OuJb2Vk");
            Payment payment = client.Payment.Fetch(paymentId);
            // This code is for capture the payment
            Dictionary<string, object> options = new Dictionary<string, object>();
            options.Add("amount", payment.Attributes["amount"]);
            Payment paymentCaptured = payment.Capture(options);
            string amt = paymentCaptured.Attributes["amount"];
            //// Check payment made successfully
            if (paymentCaptured.Attributes["status"] == "captured")
            {
                // Create these action method
                ViewBag.Message = "Paid successfully";
                ViewBag.OrderId = paymentCaptured.Attributes["id"];
                return View("Result");
            }
            else
            {
                ViewBag.Message = "Payment failed, something went wrong";
                return View("Result");
            }
        }
    }
}
Note: I have added comments in above important lines of code, you can read them to understand working.
In CreateOrder ActionMethod, we are capturing payee(user) email, name, and amount to be paid, once we have that, code will be redirected to PaymentPage which has below JS and Razor code
@model RazorPayIntegration.Models.RazorPayOrder
<!-- // Click this button automatically when this page load using javascript -->
<!-- You can hide this button -->
<button id="rzp-button1" hidden>Pay</button>
<script src="https://checkout.razorpay.com/v1/checkout.js"></script>
<script>
var options = {
    "key": "@Html.DisplayFor(model => model.RazorPayAPIKey)", // Enter the Key ID generated from the Dashboard
    "amount": "@Html.DisplayFor(model => model.Amount)", // Amount is in currency subunits.
    "currency": "@Html.DisplayFor(model => model.Currency)",
    "name": "@Html.DisplayFor(model => model.Name)",
    "description": "Sample description here",
   // "image": "yourLogo_URL", // You can give your logo url
    "order_id": "@Html.DisplayFor(model => model.OrderId)",
    "handler": function (response){
        // After payment successfully made response will come here
        // Set the data in hidden form
        document.getElementById('rzp_paymentid').value = response.razorpay_payment_id;
        document.getElementById('rzp_orderid').value = response.razorpay_order_id;
        // // Let's submit the form automatically
        document.getElementById('rzp-paymentresponse').click();
    },
    "prefill": {
        "name": "@Html.DisplayFor(model => model.Name)",
        "email": "@Html.DisplayFor(model => model.Email)",
        "contact": "9090974785" //pre-filled sample number
    },
    "notes": {
        "address": "You can add notes here"
    },
    "theme": {
        "color": "#F37254"
    }
};
var rzp1 = new Razorpay(options);
//<!-- onload function -->
window.onload = function(){
    document.getElementById('rzp-button1').click();
};
document.getElementById('rzp-button1').onclick = function(e){
    rzp1.open();
    e.preventDefault();
}
</script>

<!-- This form is hidden, and submit when payment successfully made -->
@using (Html.BeginForm("Complete", "Home", FormMethod.Post))
{
    @Html.AntiForgeryToken()

    @Html.Hidden("rzp_paymentid")
    @Html.Hidden("rzp_orderid")
    <button type="submit" id="rzp-paymentresponse" class="btn btn-primary" hidden>Submit</button>
}
In the above code, we are calling RazorPay client using JS and it will open RazorPay pop-up, where user need to enter Phone and UPI or Credit Card details for payment.
Once successfully payment is done, JS handler is called
 "handler": function (response){
        // After payment successfully made response will come here
        // Set the data in hidden form
        document.getElementById('rzp_paymentid').value = response.razorpay_payment_id;
        document.getElementById('rzp_orderid').value = response.razorpay_order_id;
        // // Let's submit the form automatically
        document.getElementById('rzp-paymentresponse').click();
    },
Which will trigger hidden HTML Form and submit details in C# Controller ActionMethod "Complete", where we are checking if payment was successfully made or not.
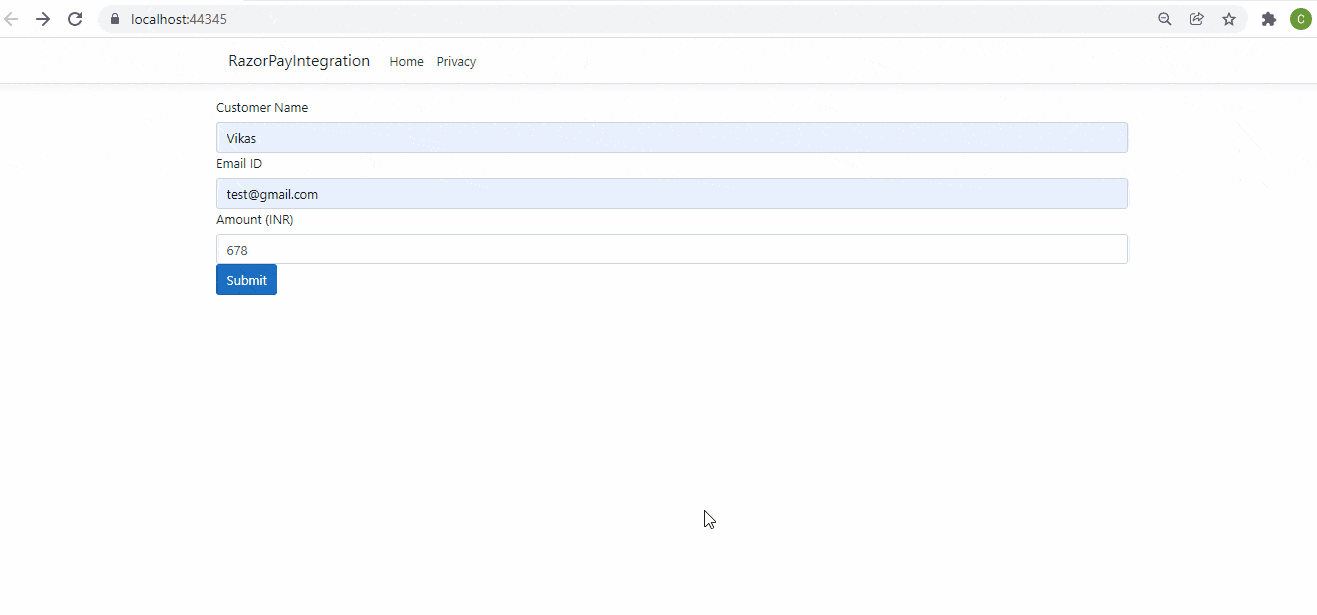
Now, we need to create extra Views, one
Index.cshtml
@model RazorPayIntegration.Models.PaymentRequest
@{
    ViewData["Title"] = "Home Page";
}

@using (Html.BeginForm("CreateOrder", "Home", FormMethod.Post))
{
    @Html.AntiForgeryToken()

    <div class="row">
        <label for="name">Customer Name</label>
        @Html.TextBoxFor(x => x.Name, new { @class = "form-control" })
    </div>
    <div class="row">
        <label for="email">Email ID</label>
        @Html.TextBoxFor(x => x.Email, new { @class = "form-control" })
    </div>
    <div class="row">
        <label for="amount">Amount (INR)</label>
        @Html.TextBoxFor(x => x.Amount, new { @class = "form-control" })
    </div>
    <div class="row">
        <br/>
        <button type="submit" class="btn btn-primary">Submit</button>
    </div>
}
and another Result.cshtml, where we are showing status and Order Id
@ViewBag.Message<br/>
Order Id: @ViewBag.OrderId
Output in the browser after successfully building above project
I have used test number in JS, you can also leave it blank and ask user to fill it and have used test UPI id (success@razorpay).
That's it, as you can see payment was made succesfully in Razorpay Dashboard.
You may also like to read:
Difference between AddTransient, AddScoped and AddSingleton in ASP.NET Core
How can I set JSON Serializer in ASP.NET Core (.NET 5)?
What is the difference between ASP.NET MVC and ASP.NET Core?
How can I convert string to time in C#?
Encrypt and Decrypt files in C#
 Buy us a coffee
 Become a Patron