
When we are developing projects, the requirements of the projects keep on changing and we have to keep changing our Model, before Entity Framework 4.3 developers used to manually drop and re-create database, when model was changed, but in Entity Framework 4.3 Microsoft included a new Code First Migrations feature that allows you to incrementally evolve the database schema as your model changes over time.
The Entity Framework Code first migration feature enables us to change the entity or data model and deploy these changes to the database server by updating the database schema without having to drop and re-create the database.
Code-based migration is useful when you want more control on the migration:
-
When you add, remove, or change entity classes or change your DbContext class, the next time you run the application it automatically deletes your existing database, creates a new one that matches the model, and seeds it with test data.
-
The Code First Migrations feature solves this problem by enabling Code First to update the database schema instead of dropping and re-creating the database.
Steps to enable Code First migration in your application
1. Create a new CodeFirstDemo Web/Console application (I am creating Web application)
2. Install latest Entity framework Nuget package for the application, you can install it
- Tools –> Library Package Manager –> Package Manager Console
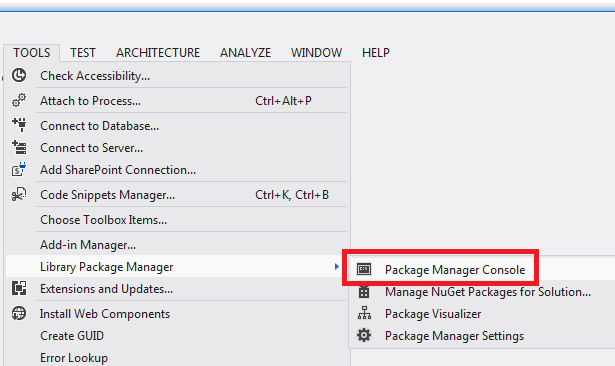
- Run the Install-Package EntityFramework command
3. Now create a Model class, to create table using that class in database
using System;
using System.Collections.Generic;
using System.Data.Entity;
using System.Linq;
using System.Web;

namespace CodeFirstDemo.Models
{
    public class BlogContext : DbContext
    {
        // here default is connection string name in web.config
        public BlogContext(): base("Default")
        {

        }
        public DbSet<Blog> Blogs { get; set; }
    }

    public class Blog
    {
        public int BlogId { get; set; }
        public string Name { get; set; }
    }
}
Connection String in web.config file
<connectionStrings>
    <add name="Default"
         connectionString="Server=Server-Name; Database=CodeFirst ; Integrated Security=True"
         providerName="System.Data.SqlClient" />
  </connectionStrings>
4. Now at the PM> of package manager console prompt enter the following commands:
enable-migrations
add-migration InitialCreate
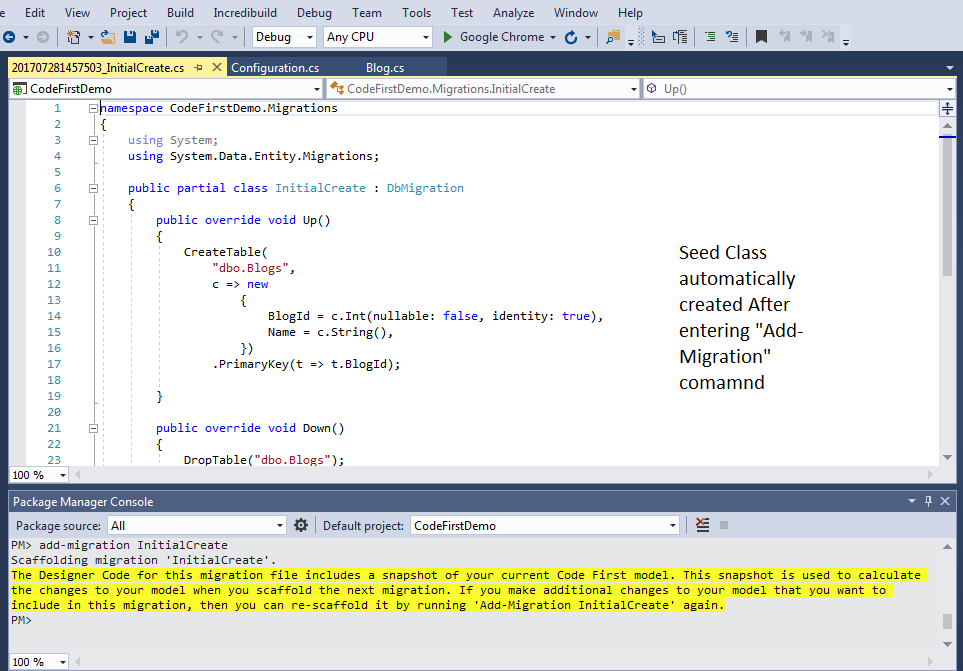
The enable-migrations command creates a Migrations folder in the CodeFirstDemo project, and it puts in that folder a Configuration.cs file that you can edit to configure Migrations.
The Configuration class also includes a Seed method
namespace CodeFirstDemo.Migrations
{
    using System;
    using System.Data.Entity;
    using System.Data.Entity.Migrations;
    using System.Linq;

    internal sealed class Configuration : DbMigrationsConfiguration<CodeFirstDemo.Models.BlogContext>
    {
        public Configuration()
        {
            AutomaticMigrationsEnabled = false;
        }

        protected override void Seed(CodeFirstDemo.Models.BlogContext context)
        {
            //  This method will be called after migrating to the latest version.

            //  You can use the DbSet<T>.AddOrUpdate() helper extension method
            //  to avoid creating duplicate seed data. E.g.
            //
            //    context.People.AddOrUpdate(
            //      p => p.FullName,
            //      new Person { FullName = "Andrew Peters" },
            //      new Person { FullName = "Brice Lambson" },
            //      new Person { FullName = "Rowan Miller" }
            //    );
            //
        }
    }
}
The purpose of the above Seed Method is to let you add test data or to update it after Code First creates or updates the database. The method is called when the database is created and every time the database schema is updated after a data model change.
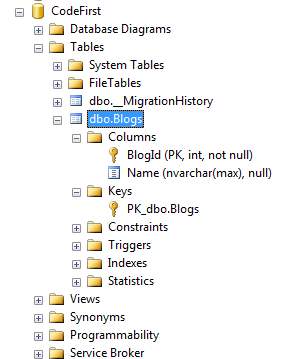
Run your application and you will see that a CodeFirst named database is created for you, in your local database or in your specified server database, something like this
Note: You will not find any data in Blogs table, as we haven't added any data using Code First approach in it if you want to add any data you can do it using Seed Method and then run Update-Database command in NuGet package manager console
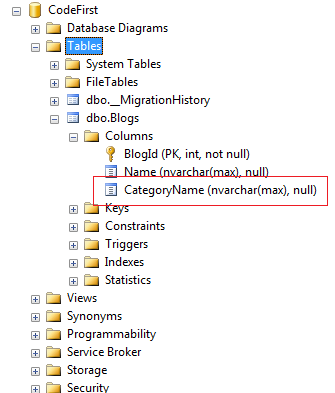
Now suppose you want to add a new column in your table, you can do it by changing the Model(here Blog.cs) class.Let's add a new column "CategoryName" in database, so your class will look like this now
using System;
using System.Collections.Generic;
using System.Data.Entity;
using System.Linq;
using System.Web;

namespace CodeFirstDemo.Models
{
    public class BlogContext : DbContext
    {
        public BlogContext(): base("Default")
        {

        }
        public DbSet<Blog> Blogs { get; set; }
    }

    public class Blog
    {
        public int BlogId { get; set; }
        public string Name { get; set; }
        public string CategoryName { get; set; }
    }
}
In NuGet Package manager console run the command, "Add-Migration" first, you will have to enter the name of migration(Let's say NewColumn), give it any name, you will new migration is added, but your database still doesn't have the new column.
So, to add it in database, run "Update-Database" command

After running the above commands you can check your database, it will show you new column also there now
Let's try to add some test data in the table now, using the Seed Method of Confugration.cs, code would be
protected override void Seed(CodeFirstDemo.Models.BlogContext context)
        {
            //  This method will be called after migrating to the latest version.

            //  You can use the DbSet<T>.AddOrUpdate() helper extension method
            //  to avoid creating duplicate seed data. E.g.
            //
            context.Blogs.AddOrUpdate(
              p => p.Name,
              new Blog { Name = "Test 1",CategoryName="test" },
              new Blog { Name = "Test 2", CategoryName = "test" },
              new Blog { Name = "Test 3", CategoryName = "test" }
            );

        }
as you can see in the above method, we are using AddOrUpdate Method to add demo data in the table, the AddOrUpdate method is used to perform an "upsert" operation. Because the Seed method runs every time you execute the update-database command, typically after each migration, you can't just insert data, because the rows you are trying to add will already be there after the first migration that creates the database. The "upsert" operation prevents errors that would happen if you try to insert a row that already exists, but it overrides any changes to data that you may have made while testing the application.
The first parameter passed to the AddOrUpdate method specifies the property to use to check if a row already exists. For the test student data that you are providing, the Name property can be used for this purpose.
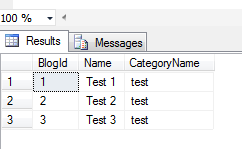
You can check the database now, you will find 3 new rows added using Seed method.
 Buy us a coffee
 Become a Patron