
In one of the previous articles, I have explained how you can read excel file in C# using EPPlus or OleDB, in this article, I have provided sample code to create excel file (.xlsx) and write data into it using EPPlus, also provided code sample to add images in excel using C# and EPPlus.
You can directly your MVC Razor view into excel file using Controller but it will give your warning message "the file you are trying to open is in different format" when opening that excel file, this is because it is not in proper format, so it is always better to use external library like EPPlus to write to excel in C#.
Create new project in Visual Studio to Write in Excel
Let's create a a new console application, in which we will install Epplus library, open Visual Studio, navigate to "File"-> "New"-> "Project"-> Select "Windows Classic desktop" from left pane and "Console application" from right pane, give a name "WriteInExcelCsharp" and click "Ok"
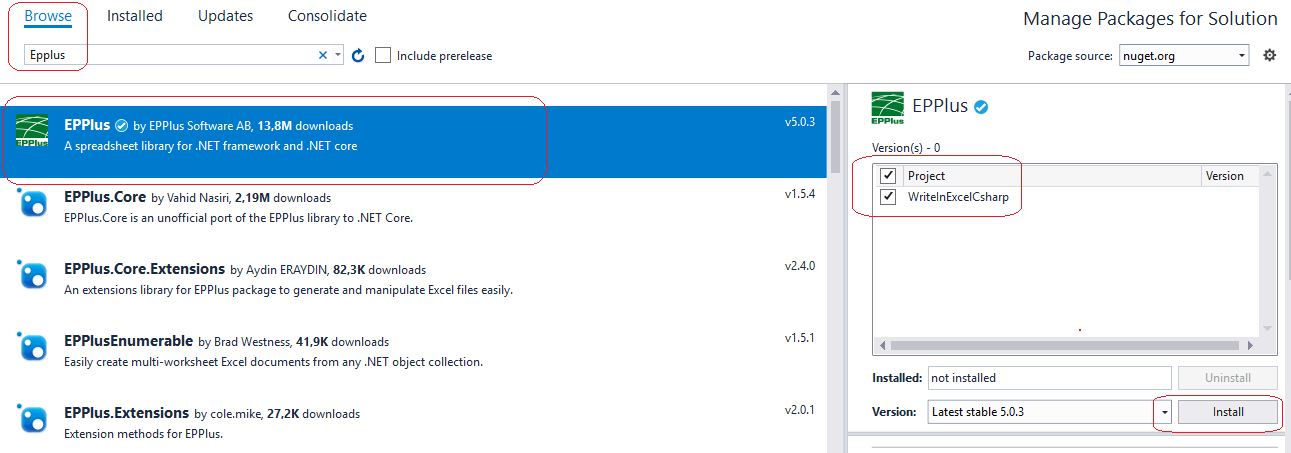
Install Epplus using Nuget
Now, install EPPlus library using Nuget package manager, so navigate to "Tools"-> "Nuget package manager"-> "Manage Nuget for this solution" -> Select "Browse" tab and search for "EPPlus", then install the nuget package.
Create Excel (.XLSX) and write data into it using Epplus
First we will create excel file and add worksheet in it using C#
           //path to save file
            var path= @"D:\WriteToExcel.xlsx";

            using (ExcelPackage excelPackage = new ExcelPackage())
            {
                //Set some properties of the Excel document
                excelPackage.Workbook.Properties.Author = "Qawithexperts";
                excelPackage.Workbook.Properties.Title = "test Excel";
                excelPackage.Workbook.Properties.Subject = "Write in Excel";
                excelPackage.Workbook.Properties.Created = DateTime.Now;

                //Create the WorkSheet
                ExcelWorksheet worksheet = excelPackage.Workbook.Worksheets.Add("Sheet 1");

                //Save your file
                FileInfo fi = new FileInfo(path);
                excelPackage.SaveAs(fi);
            }
In the above code, we are creating a new .xlsx file and adding a Worksheet with name "Sheet 1", after adding Worksheet with same properties of Excel like subject, title etc., we are saving it in a path "D:\WriteToExcel.xlsx".
Let's add some data into the excel file. When working with Epplus, you can directly write into Cells using Columns and Row reference as a number or as a name, for example, if you want to add data in Column 1, and row 3 of the excel sheet, you can do it like this in C#
worksheet.Cells[1, 3].Value = "Some text"; // Column= 1, Row =3OR
worksheet.Cells["A3"].Value = "Some text"; // Save value in Column A, 3rd rowBoth of the above code are similar and points to sample Cell in Excel, i.e., Columns first and third row.
Adding image in Excel sheet using Epplus C#
We can also add image in excel sheet using Epplus in C#, suppose we want to add a image and file path =""D:\sampleimage.png", then sample code will be like below:
 // add image inside excel,D:\sampleimage.png is where file exists
                System.Drawing.Bitmap image = new System.Drawing.Bitmap(@"D:\sampleimage.png");
                ExcelPicture excelImage = null;
                if (image != null)
                {

                    //note, image name must be unique if you are using multiple images in same excel
                    excelImage = worksheet.Drawings.AddPicture("image", image);

                     // In .SetPosition, we are using 8th Column and 8th Row, with 0 Offset
                    excelImage.SetPosition(8,0, 8, 0);


                    //set size of image, 100= width, 100= height
                    excelImage.SetSize(100, 100);

                }
Merging and styling Cells in Epplus C#
Suppose, you want to merge column cells in excel, then you can do it using Epplus in C#, for example, in the below code, I will merge row 1, column 1 to row 2, column3 :
                //row 1, column 1 to row 2, column3 will get merge
                worksheet.Cells[1, 1, 2, 3].Merge = true;
You can also give styling to cells like make the text bold, center the text or change the background color of cell, using Style attribute of Epplus cells.
   //text
                worksheet.Cells[1, 4, 2, 6].Value = "Checking background color and merge";

                //merge the columns and rows
                //we are merging here, rows 1-2, and columns 4-6
                worksheet.Cells[1, 4, 2, 6].Merge = true;
                //vertical align middle text
                worksheet.Cells[1, 4, 2, 6].Style.VerticalAlignment = ExcelVerticalAlignment.Center;
                //horizontally align middle text
                worksheet.Cells[1, 4, 2, 6].Style.HorizontalAlignment = ExcelHorizontalAlignment.Center;
                //make the text bold
                worksheet.Cells[1, 4, 2, 6].Style.Font.Bold = true;

                //change background color, you need to set pattern type also before changing BG color.
                worksheet.Cells[1, 4, 2, 6].Style.Fill.PatternType = ExcelFillStyle.Solid;
                worksheet.Cells[1, 4, 2, 6].Style.Fill.BackgroundColor.SetColor(System.Drawing.Color.DarkBlue);

                //set font color white
                worksheet.Cells[1, 4, 2, 6].Style.Font.Color.SetColor(System.Drawing.Color.White);
So the complete C# code to create and write in excel file with images using Epplus would be:
using OfficeOpenXml;
using OfficeOpenXml.Drawing;
using OfficeOpenXml.Style;
using System;
using System.IO;

namespace WriteInExcelCsharp
{
    class Program
    {
        static void Main(string[] args)
        {
            //path to save file
            var path= @"D:\WriteToExcel.xlsx";

            // If you use EPPlus in a noncommercial context
            // according to the Polyform Noncommercial license:
            ExcelPackage.LicenseContext = LicenseContext.NonCommercial;

            using (ExcelPackage excelPackage = new ExcelPackage())
            {
                //Set some properties of the Excel document
                excelPackage.Workbook.Properties.Author = "Qawithexperts";
                excelPackage.Workbook.Properties.Title = "test Excel";
                excelPackage.Workbook.Properties.Subject = "Write in Excel";
                excelPackage.Workbook.Properties.Created = DateTime.Now;

                //Create the WorkSheet
                ExcelWorksheet worksheet = excelPackage.Workbook.Worksheets.Add("Sheet 1");

                //add data in Excel Sheet
                worksheet.Cells["A1"].Value = "Some text";

                // add image inside excel,D:\sampleimage.png is where file exists
                System.Drawing.Bitmap image = new System.Drawing.Bitmap(@"D:\sampleimage.png");
                ExcelPicture excelImage = null;
                if (image != null)
                {

                    //note, image name must be unique if you are using multiple images in same excel
                    excelImage = worksheet.Drawings.AddPicture("image", image);

                    // In .SetPosition, we are using 8th Column and 8th Row, with 0 Offset
                    excelImage.SetPosition(8,0, 8, 0);

                    //set size of image, 100= width, 100= height
                    excelImage.SetSize(100, 100);

                }

                //text
                worksheet.Cells[1, 4, 2, 6].Value = "Checking background color and merge";

                //merge the columns and rows
                //we are merging here, rows 1-2, and columns 4-6
                worksheet.Cells[1, 4, 2, 6].Merge = true;
                //vertical align middle text
                worksheet.Cells[1, 4, 2, 6].Style.VerticalAlignment = ExcelVerticalAlignment.Center;
                //horizontally align middle text
                worksheet.Cells[1, 4, 2, 6].Style.HorizontalAlignment = ExcelHorizontalAlignment.Center;
                //make the text bold
                worksheet.Cells[1, 4, 2, 6].Style.Font.Bold = true;

                //change background color, you need to set pattern type also before changing BG color.
                worksheet.Cells[1, 4, 2, 6].Style.Fill.PatternType = ExcelFillStyle.Solid;
                worksheet.Cells[1, 4, 2, 6].Style.Fill.BackgroundColor.SetColor(System.Drawing.Color.DarkBlue);

                //set font color white
                worksheet.Cells[1, 4, 2, 6].Style.Font.Color.SetColor(System.Drawing.Color.White);

                //Save your file
                FileInfo fi = new FileInfo(path);
                excelPackage.SaveAs(fi);
            }
        }
    }
}
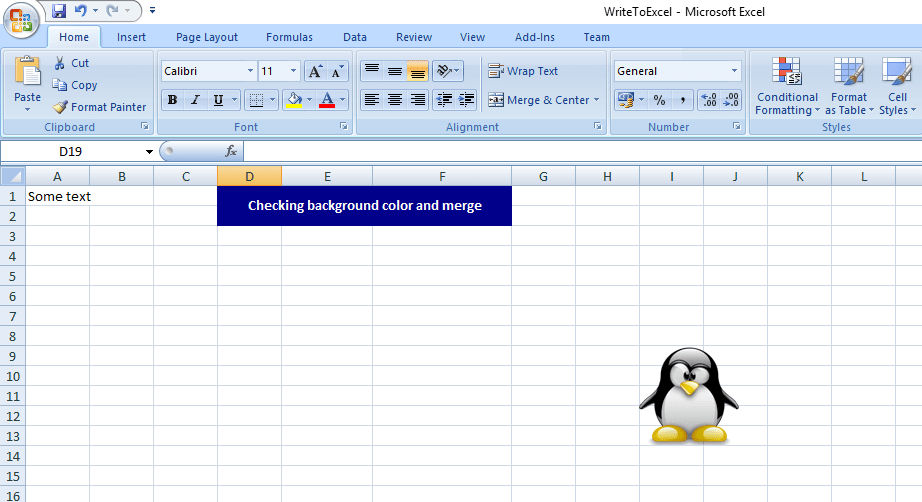
Output of Excel file:
Appending data to already created excel sheet using Epplus C#
Yes, you can add more data to already created Excel (.xlsx) file in your folder, using Epplus and C#, here is the sample code
//the path of the file
string filePath = "D:\\ExcelDemo.xlsx";

//or if you use asp.net, get the relative path
//filePath = Server.MapPath("ExcelDemo.xlsx");

//create a fileinfo object of an excel file on the disk
FileInfo file = new FileInfo(filePath);

//create a new Excel package from the file
using (ExcelPackage excelPackage = new ExcelPackage(file))
{
    //create an instance of the the first sheet in the loaded file
    ExcelWorksheet worksheet = excelPackage.Workbook.Worksheets[1];

    //add some data
    worksheet.Cells[4, 1].Value = "New data in Cell A4";
    worksheet.Cells[4, 2].Value = "new data in Cell B4";

    //save the changes
    excelPackage.Save();
}
You may also like to read:
Read excel file in C# (.XLSX or .XLS using OLEDB / EPPlus)
Read file in C# ( Text file example using Console Application )
Read Excel file and import data into GridView using Datatable in ASP.NET
 Buy us a coffee
 Become a Patron