
This article explains how to implement client-side validation in an ASP.NET MVC application. The validation is implemented using jQuery Validate plugin, download it directly using the link or install it using NuGet command
Install-Package jQuery.Validation
About jQuery Validation Plugin
This jQuery plugin makes simple clientside form validation easy, while still offering plenty of customization options. It makes a good and simpler choice if you’re building something new from scratch, but also when you’re trying to integrate something into an existing application with lots of existing markup.The plugin comes bundled with a useful set of validation methods, including URL and email validation while providing an API to write your own methods.
Let's try to validate a form using jQuery validation by going through these steps:-
Step 1: Create form HTML using Razor
Suppose we need a user to "Sign up" on our website, so razor can have following code:
<h2>Sign Up</h2>


@using (Html.BeginForm("SignUp", "Home", FormMethod.Post))
{

    @Html.AntiForgeryToken()

    @Html.ValidationSummary("", new { @class = "text-danger" })
    <div class="form-group">
        @Html.LabelFor(m => m.Email, new { @class = "col-md-2 control-label" })
        <div class="col-md-10">
            @Html.TextBoxFor(m => m.Email, new { @class = "form-control" })
        </div>
    </div>

    <div class="clearfix"></div>
    <br />
    <div class="form-group">
        @Html.LabelFor(m => m.Password, new { @class = "col-md-2 control-label" })
        <div class="col-md-10">
            @Html.PasswordFor(m => m.Password, new { @class = "form-control" })
        </div>
    </div>

    <div class="clearfix"></div>
    <br />
    <div class="form-group">
        @Html.LabelFor(m => m.ConfirmPassword, new { @class = "col-md-2 control-label" })
        <div class="col-md-10">
            @Html.PasswordFor(m => m.ConfirmPassword, new { @class = "form-control" })
        </div>
    </div>

    <div class="clearfix"></div>
    <br />
    <div class="form-group">
        <div class="col-md-offset-2 col-md-10">
            <input type="submit" class="btn btn-default" value="Sign Up" />
        </div>
    </div>

}
Step 2: Add jQuery Validate in your page
  <script src="//code.jquery.com/jquery-1.9.1.js"></script>
  <script src="//ajax.aspnetcdn.com/ajax/jquery.validate/1.9/jquery.validate.min.js"></script>
Step 3: Create the Validation Rules
<script>
    // Wait for the DOM to be ready
    $(function () {
        // Initialize form validation on the registration form.
        // It has the name attribute "registration"
        $("form").validate({
            // Specify validation rules
            rules: {
                // The key name on the left side is the name attribute
                // of an input field. Validation rules are defined
                // on the right side
                Email: {
                    required: true,
                    // Specify that email should be validated
                    // by the built-in "email" rule
                    email: true
                },
                Password: {
                    required: true,
                    minlength: 5
                },
                ConfirmPassword: {
                    minlength: 5,
                    equalTo: "#Password"
                }
            },
            // Specify validation error messages
            messages: {
                email: "Please enter a valid email address",
                password: {
                    required: "Please provide a password",
                    minlength: "Your password must be at least 5 characters long"
                },


            },
            // Make sure the form is submitted to the destination defined
            // in the "action" attribute of the form when valid
            submitHandler: function (form) {
                form.submit();
            }
        });
    });


</script>
Step 4: Test output now
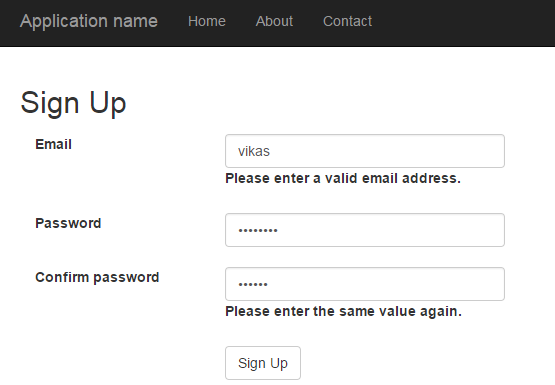
Now if you will look into the image, validation's are automatically done by Jquery Validate plugin, based on the fields and it's properties.
As email wasn't correct it showed the error, checking image shows clearly, password length and value are also not same so again validation error appears.
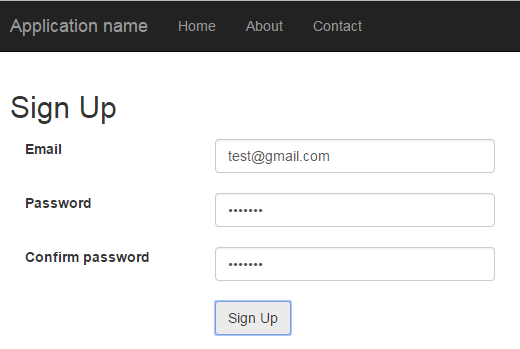
Now after placing the correct values, error message's will disappear automatically
That's it we are done, you can add or delete properties according to your need, you can also change error messages location in jquery validate.
 Buy us a coffee
 Become a Patron