
In this article, I will help you to perform CRUD (Create, read, Update , Delete) operations in ASP.NET MVC using Entity Framework.
So here are the details step by step:
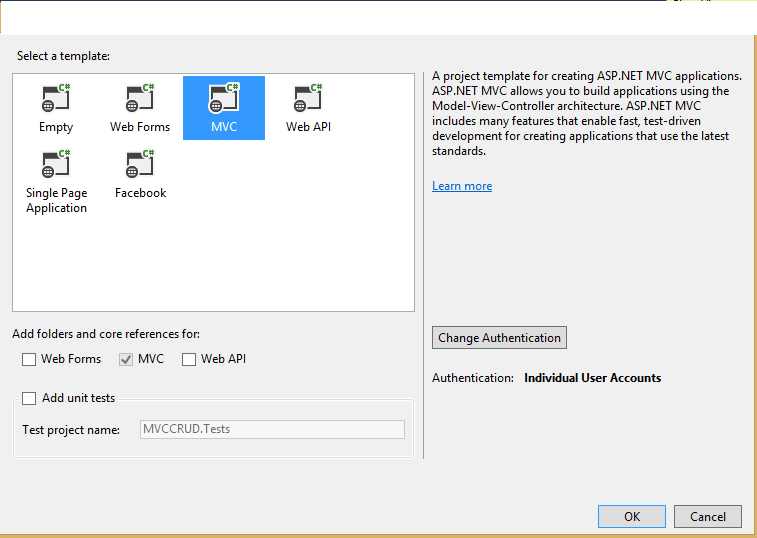
Step 1: Create a new project in your Visual Studio(File-> New->Project->From web (Left pane)-> Select "Asp.Net Web Application"(right pane)) .
a) Enter a Name, Click "Ok"
b) Select "MVC" template from project and click "Ok"
Step 2: I will be using a EmployeeDetails Database in my local SQL server, which has some data already in it.
You can create this table in your local database by executing the below script :
USE [SNE] -- Change it to your database name
GO

SET ANSI_NULLS ON
GO
SET QUOTED_IDENTIFIER ON
GO
SET ANSI_PADDING ON
GO
CREATE TABLE [dbo].[EmployeeDetails](
	[EmployeeId] [int] IDENTITY(1,1) NOT NULL,
	[EmployeeName] [varchar](100) NOT NULL,
	[EmployeeOfficeLocation] [varchar](100) NOT NULL,
	[EmployeePostion] [varchar](100) NOT NULL,
PRIMARY KEY CLUSTERED
(
	[EmployeeId] ASC
)WITH (PAD_INDEX = OFF, STATISTICS_NORECOMPUTE = OFF, IGNORE_DUP_KEY = OFF, ALLOW_ROW_LOCKS = ON, ALLOW_PAGE_LOCKS = ON) ON [PRIMARY]
) ON [PRIMARY]

GO
SET ANSI_PADDING OFF
GO
SET IDENTITY_INSERT [dbo].[EmployeeDetails] ON

INSERT [dbo].[EmployeeDetails] ([EmployeeId], [EmployeeName], [EmployeeOfficeLocation], [EmployeePostion]) VALUES (1, N'Priya', N'Mumbai', N'Senior Analyst')
INSERT [dbo].[EmployeeDetails] ([EmployeeId], [EmployeeName], [EmployeeOfficeLocation], [EmployeePostion]) VALUES (2, N'Sanvi', N'Mumbai', N'Team Lead')
INSERT [dbo].[EmployeeDetails] ([EmployeeId], [EmployeeName], [EmployeeOfficeLocation], [EmployeePostion]) VALUES (3, N'Rohit', N'Pune', N'Analyst')
INSERT [dbo].[EmployeeDetails] ([EmployeeId], [EmployeeName], [EmployeeOfficeLocation], [EmployeePostion]) VALUES (4, N'Raj', N'Banglore', N'Senior Analyst')
INSERT [dbo].[EmployeeDetails] ([EmployeeId], [EmployeeName], [EmployeeOfficeLocation], [EmployeePostion]) VALUES (5, N'Siddhi', N'Chennai', N'Associate Manager')
INSERT [dbo].[EmployeeDetails] ([EmployeeId], [EmployeeName], [EmployeeOfficeLocation], [EmployeePostion]) VALUES (6, N'Anil', N'Pune', N'Senior Manager')
INSERT [dbo].[EmployeeDetails] ([EmployeeId], [EmployeeName], [EmployeeOfficeLocation], [EmployeePostion]) VALUES (7, N'Sayali', N'Hydrabad', N'Associate Analyst')
INSERT [dbo].[EmployeeDetails] ([EmployeeId], [EmployeeName], [EmployeeOfficeLocation], [EmployeePostion]) VALUES (8, N'Satish', N'Chennai', N'Tech Head')
INSERT [dbo].[EmployeeDetails] ([EmployeeId], [EmployeeName], [EmployeeOfficeLocation], [EmployeePostion]) VALUES (9, N'Om', N'Banglore', N'UI Designer')
INSERT [dbo].[EmployeeDetails] ([EmployeeId], [EmployeeName], [EmployeeOfficeLocation], [EmployeePostion]) VALUES (10, N'Jay', N'Mumbai', N'Analyst')
SET IDENTITY_INSERT [dbo].[EmployeeDetails] OFF
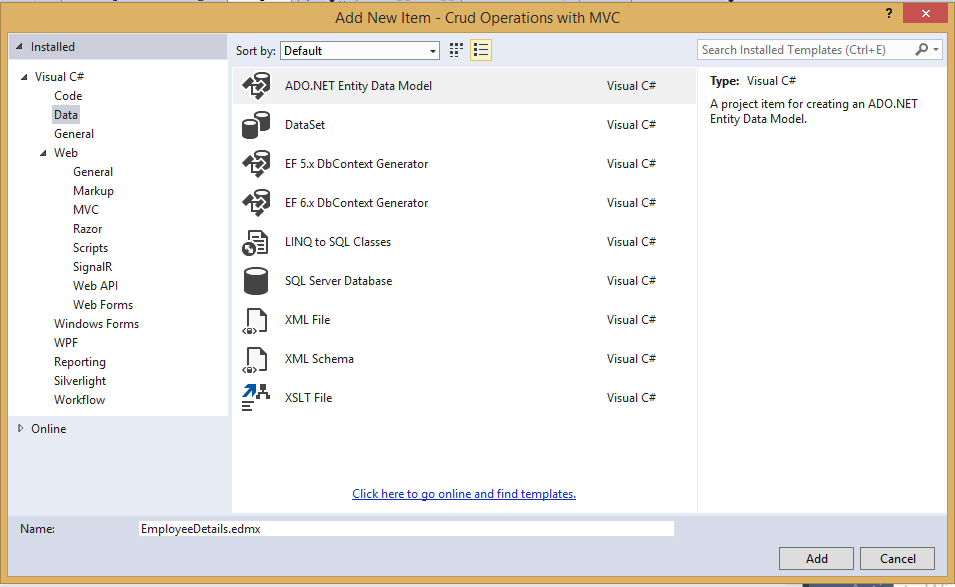
Step 3: Adding ADO.NET Entity Data Model :
- a) Right- click on your project -> Add new item -> Add Ado.net Entity Data Mdoel - > Give a name to the .edmx file and click "Add"
As shown below :
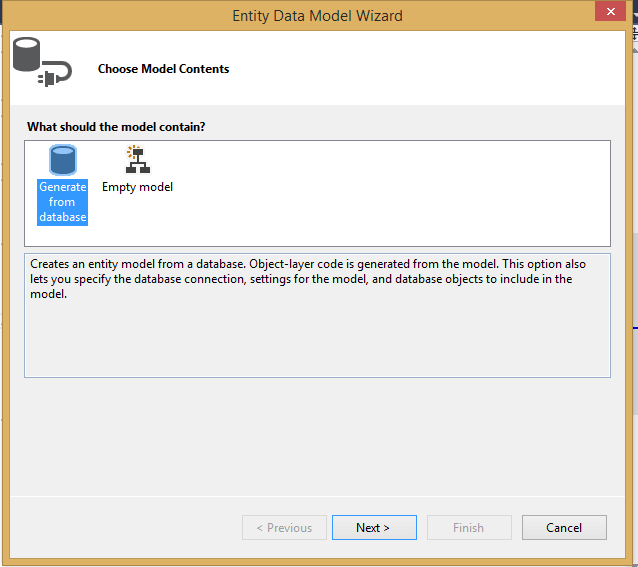
After adding Entity framework's .edmx file, select "Generate from database"
b) Now we need to connect our Entity framework file to database using .edmx so, click "Next"
Select "New Connection string", connect to your database by adding details, once you have connected to your database and selected table, you will see output like below
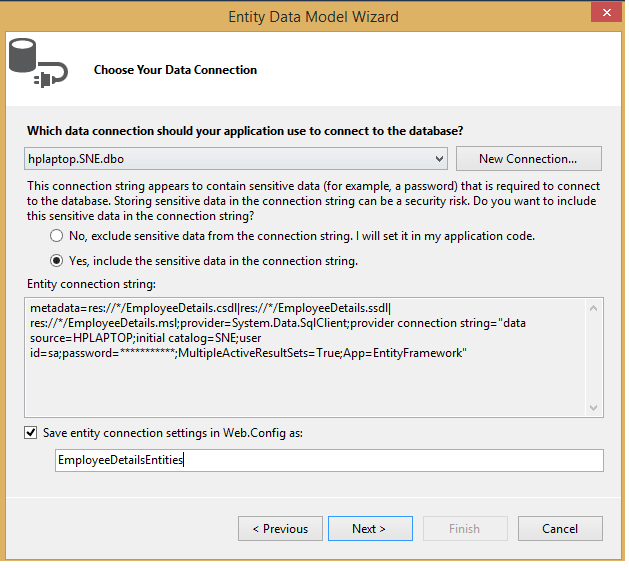
the connection string is automatically added to the web.config.
c) Select the table “EmployeeDetails” to be added to the model as shown below :
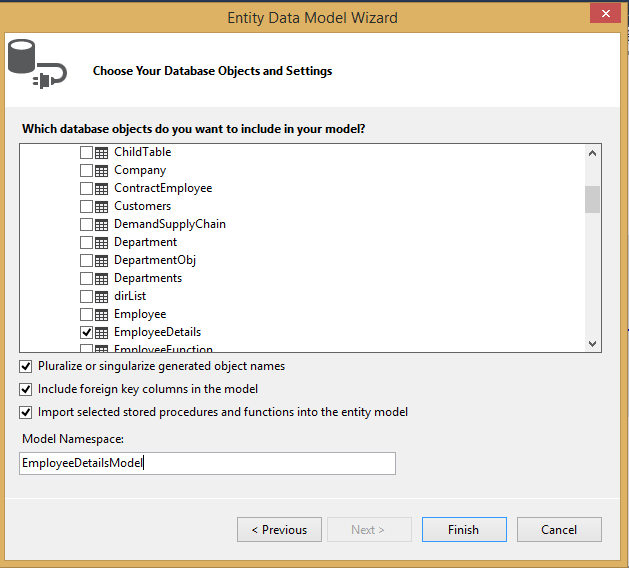
In the above .edmx file, we are only using "EmployeeDetails" only, so selected it, you can add as many tables as you want in your Entity framework by selecting them.
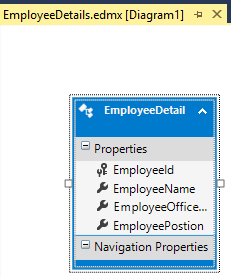
d) The model will be generated and opened in “EDM Designer” as below :
e) The generated "Edmx file" is as below :
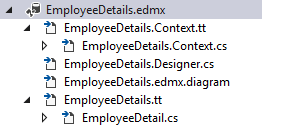
.edmx is basically an XML file which is generated when we added Entity Framework model. It is Entity Data Model Xml which contains designer (Model) and code file(.cs).
Step 4: To Add new controller ( You can create new "HomeController.cs" in your Controller's folder if it already doesn't exists)
a) Right-click the Controller -> Add Controller -> Select “MVC5 Empty Controller” -> Add "HomeController.cs"
If it already exists, add the code below in "HomeController" :
using System;
using System.Collections.Generic;
using System.Linq;
using System.Web;
using System.Web.Mvc;

namespace Crud_Operations_with_MVC.Controllers
{
    public class HomeController : Controller
    {
        private EmployeeDetailsEntities db = new EmployeeDetailsEntities();
        public ActionResult Index()
        {
            return View(db.EmployeeDetails.ToList());
        }

        [HttpGet]
        public ActionResult Create(int id = 0)
        {
            if (id > 0)
            {
                var c = db.EmployeeDetails.Where(a => a.EmployeeId == id).FirstOrDefault();
                return View(c);
            }
            else
            {
                return View();
            }
        }

        [HttpPost]
        [ValidateAntiForgeryToken]
        [ActionName("Create")]
        public ActionResult CreateUpdate(EmployeeDetail emp)
        {
            if (ModelState.IsValid)
            {
                try
                {
                    if(emp.EmployeeId > 0)
                    {
                        var empData = db.EmployeeDetails.Where(a => a.EmployeeId == emp.EmployeeId).FirstOrDefault();
                        if(empData != null)
                        {
                            empData.EmployeeName = emp.EmployeeName;
                            empData.EmployeeOfficeLocation = emp.EmployeeOfficeLocation;
                            empData.EmployeePostion = emp.EmployeePostion;
                        }
                    }
                    else
                    {
                        db.EmployeeDetails.Add(emp);
                    }
                    db.SaveChanges();
                }
                catch (Exception e)
                {
                    return RedirectToAction("Index");
                }
            }
            return RedirectToAction("Index");
        }

        [HttpGet]
        public ActionResult Delete(int id)
        {
            if (id == null)
            {
                return HttpNotFound();
            }
            var emptoDelete = db.EmployeeDetails.Where(a => a.EmployeeId == id).FirstOrDefault();

            if (emptoDelete != null)
            {
                return View(emptoDelete);
            }
            else
            {
                return HttpNotFound();
            }
        }

        [HttpPost]
        [ValidateAntiForgeryToken]
        [ActionName("Delete")]
        public ActionResult DeleteEmployeeDetails(int id)
        {
            try
            {
                var emptoDelete = db.EmployeeDetails.Where(a => a.EmployeeId == id).FirstOrDefault();
                db.Entry(emptoDelete).State = System.Data.Entity.EntityState.Deleted;
                db.SaveChanges();
                return RedirectToAction("Index");
            }
            catch (Exception e)
            {
                return RedirectToAction("Index");
            }
        }
In this ,
Index() - GET method returns list of all employee details present in DB.
db.EmployeeDetails.Where(a => a.EmployeeId == id).FirstOrDefault();
this lambda expression returns the details of particular employee id which is passed as a parameter.
Create(int id = 0)- GET Method accepts parameter for employee id which is by default 0.
In this method, if parameter passed to method is “0” it will return the page for create employee(i.e. “create view”) otherwise it will return the page for updating the employee
Details(i.e. “Edit view”).
[ActionName("Create")]
CreateUpdate(EmployeeDetail emp) – POST Method
This method hits Create Action method.
If employee id which is passed as parameter is “0” , it will simply add new employee to
Table.
Otherwise, it will fetch particular employee details and update the data accordingly.
db.SaveChanges(); - is called to save the changes to DB, like whatever we add/edit, it is called to save the changes in database. Where "db" is content name.
[ValidateAntiForgeryToken] – This attribute is added to prevent cross site forgery in application.
And in View i.e. @Html.AntiForgeryToken() generates __RequestVerificationToken on load time.
Delete(int id) - GET Method accepts parameter parameter for employee id and returns the page for particular employee details which are going to be deleted.
[ActionName("Delete")]

public ActionResult DeleteEmployeeDetails(int id) - POST Method
This method hits Delete Action method.
It fetches the particular employee details and delete it from table.
Step 5: Now we will create Views to show data, and add/edit data, you can add a new View, by Right-clicking inside the action method and select "Add View", for example, to add a view for Index.cshtml, right-click inside "Index" ActionMethod of your HomeController.cs and Select "Add View", then select "Use a layout page", means we will be using _Layout.cshtml for basic layout of header/footer
a) Index.cshtml : Used to show list of the Employee's, here is the code for it.
@model IEnumerable<Crud_Operations_with_MVC.EmployeeDetail>


<div style="margin-top:10px">
    @Html.ActionLink("Add New Employee", "Create", null, new { @class = "btn btn-primary" })
</div>

<div style="margin-top:20px">
    <table id="tblEmpData" class="table table-bordered table-hover">
        <thead>
            <tr>
                <th>Name</th>
                <th>Office Location</th>
                <th>Postion</th>
                <th>Action</th>
            </tr>
        </thead>
        <tbody>
            @foreach (var data in Model)
            {
                <tr>
                    <td>@data.EmployeeName</td>
                    <td>@data.EmployeeOfficeLocation</td>
                    <td>@data.EmployeePostion</td>
                    <td>
                        @Html.ActionLink("Edit", "Create", new { id = data.EmployeeId }, new { @class = "btn btn-primary" }) |
                        @Html.ActionLink("Delete", "Delete", new { id = data.EmployeeId }, new { @class = "btn btn-primary" })
                    </td>
                </tr>
            }
        </tbody>
    </table>
</div>
In the above Razor code, we are looping the Model passed IEnumerable<Crud_Operations_with_MVC.EmployeeDetail> inside tbody of table and printing data
b) Create.cshtml, right-click inside "Create" ActionMethod of HomeController.cs and add view
We will be using this view in two way, as discussed above, if id=0, then it will be used to create new Employee otherwise it will be used to Edit Employee data
@model Crud_Operations_with_MVC.EmployeeDetail

@using (Html.BeginForm())
{
    @Html.AntiForgeryToken()
     <hr />
    if(Model != null && Model.EmployeeId > 0)
    {
       @Html.HiddenFor(model => model.EmployeeId)

    }
    <div class="form-horizontal" style="margin-top:20px">
        @Html.ValidationSummary(true)

        <div class="form-group">
            <label class="control-label col-md-2">Name</label>
        <div class="col-md-10">
        @Html.EditorFor(model => model.EmployeeName)
        @Html.ValidationMessageFor(model => model.EmployeeName, "Name is required", new { @class = "text-danger" })
        </div>
        </div>

        <div class="form-group">
            <label class="control-label col-md-2">Office Location</label>
            <div class="col-md-10">
                @Html.EditorFor(model => model.EmployeeOfficeLocation)
                @Html.ValidationMessageFor(model => model.EmployeeOfficeLocation, "Location is required.", new { @class = "text-danger" })
            </div>
        </div>

        <div class="form-group">
            <label class="control-label col-md-2">Position</label>
            <div class="col-md-10">
                @Html.EditorFor(model => model.EmployeePostion)
                @Html.ValidationMessageFor(model => model.EmployeePostion, "Position is required.", new { @class = "text-danger" })
            </div>
        </div>

        <div class="form-group">
            <div class="col-md-offset-2 col-md-10">
                @if (Model != null && Model.EmployeeId > 0)
                {
                  <input type="submit" value="Create" class="btn btn-primary" />
                }
                else
                {
                     <input type="submit" value="Save Changes" class="btn btn-primary" />
                }
            </div>
        </div>
    </div>
}

<div>
    @Html.ActionLink("Back to List", "Index")
</div>

@section Scripts {
    @Scripts.Render("~/bundles/jqueryval")
}
@Html.ValidationMessageFor is used to display validation messages to html page.
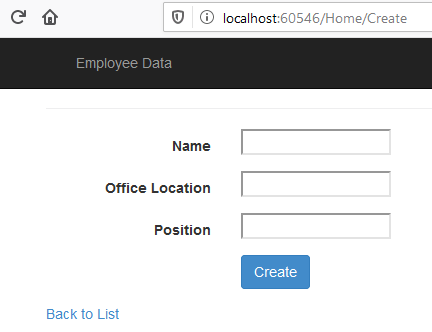
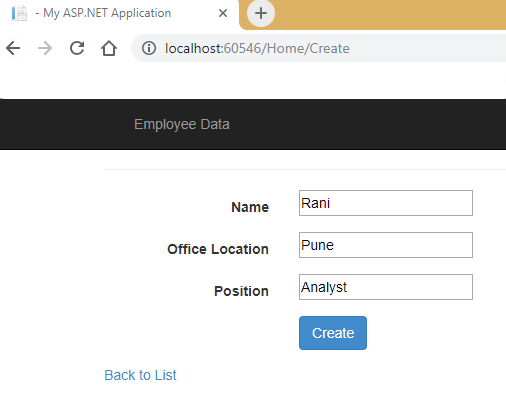
Step 7: Now build and run your project in browser, try to create New Employee Data by navigating to http://localhost:60546/Home/Create :
You can try to click "Create" button without entering any data in textbox, you will get validation errors

Once, we enter the details and click "Create", data will added in the list
Similarly, for editing the existing data, in the list view (Index.cshtml), click on "Edit" button of the list, suppose we are editing data for "Rohit"
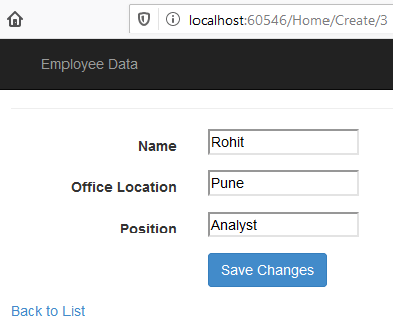
Here, edit anything like position, and click "Save changes", your data will be updated using C# code in Controller
  [HttpPost]
        [ValidateAntiForgeryToken]
        [ActionName("Create")]
        public ActionResult CreateUpdate(EmployeeDetail emp)
        {
            if (ModelState.IsValid)
            {
                try
                {
                    //if data is edited and EmployeeId > 0
                    if(emp.EmployeeId > 0)
                    {
                        var empData = db.EmployeeDetails.Where(a => a.EmployeeId == emp.EmployeeId).FirstOrDefault();
                        if(empData != null)
                        {
                            empData.EmployeeName = emp.EmployeeName;
                            empData.EmployeeOfficeLocation = emp.EmployeeOfficeLocation;
                            empData.EmployeePostion = emp.EmployeePostion;
                        }
                    }
                    //executed if data is added
                    else
                    {
                        db.EmployeeDetails.Add(emp);
                    }
                    db.SaveChanges();
                }
                catch (Exception e)
                {
                    return RedirectToAction("Index");
                }
            }
            return RedirectToAction("Index");
        }
In the above code, "ActionName=Create" attribute is used to call it using name "Create" from front-end.
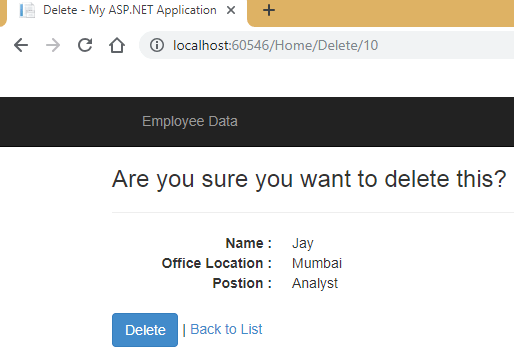
Similarly, if you will try to click on "Delete" button for any item from the Employee List, you will get confirmation View
If you will click on "Delete", item will be removed from list, you can check database table also
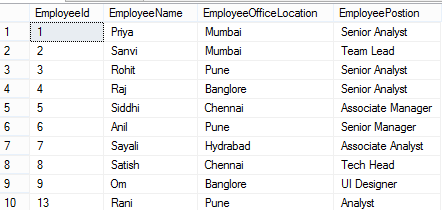
That's it, we are done as you can see we were able to save/edit/delete data from database or get data using Entity framework in ASP.NET MVC, you can also download Sample Project With Scripts
You may also like to read
CRUD Operations in ASP.NET MVC using Inline Edit/Delete (With Validations)
ASP.NET MVC tutorial part-2 connecting to database (reading and saving data)
 Buy us a coffee
 Become a Patron