
If you are new to MVC and want to learn important points of MVC, to create a new application, then you have landed on the right place. I have already written a basic tutorial of C# MVC, I assume you have read it, if not please go through it quickly, to understand basics of MVC, it should not take more than 5-10 minutes.
Understanding the MVC Pattern
In high-level terms, the MVC pattern means that an MVC application will be split into at least three pieces:
- Models, which contain or represent the data that users work with. These can be simple view models, which just represent data being transferred between views and controllers; or they can be domain models, which contain the data in a business domain as well as the operations, transformations, and rules for manipulating that data.
- Views, which are used to render some part of the model as a user interface.
- Controllers, which process incoming requests, perform operations on the model, and select views to render to the user.
The ASP.NET Implementation of MVC
In MVC, controllers are C# classes, usually derived from the System.Web.Mvc.Controller class. Each public method in a class derived from Controller is an action method, which is associated with a configurable URL through the ASP.NET routing system. When a request is sent to the URL associated with an action method, the statements in the controller class are executed in order to perform some operation on the domain model and then select a view to display to the client. Below figure shows the interactions between the controller, model, and view.
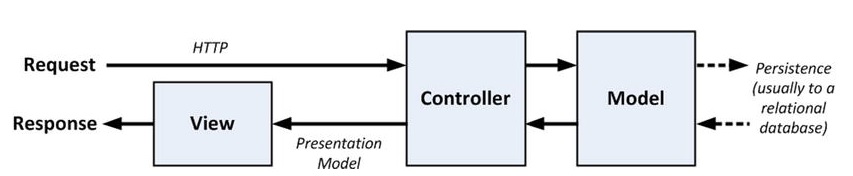
The interactions in an MVC application
The ASP.NET MVC Framework uses a view engine, which is the component responsible for processing a view in order to generate a response for the browser. Earlier versions of MVC used the standard ASP.NET view engine, which processed ASPX pages using a streamlined version of the Web Forms markup syntax. MVC 3 introduced the Razor view engine, which was refined in MVC 4 (and unchanged in MVC5) and that uses a different syntax entirely.
Understanding Classic Three-Tier Architectures
To address the problems of the model-view architecture, the three-tier or three-layer pattern separates the persistence code from the domain model and places it in a new component called the ddata access layer (DAL)

The three-tier architecture is the most widely used pattern for business applications. It has no constraints on how the UI is implemented and provides good separation of concerns without being too complicated. And, with some care, the DAL can be created so that unit testing is relatively easy. You can see the obvious similarities between a classic three-tier application and the MVC pattern. The difference is that when the UI layer is directly coupled to a click-and-event GUI framework (such as Windows Forms or ASP.NET Web Forms), it becomes almost impossible to perform automated unit tests. And because the UI part of a three-tier application can be complex, there’s a lot of code that can’t be rigorously tested.
Now please read this tutorial if you haven't done it till now, to understand implmentation of basic MVC pattern in .NET.
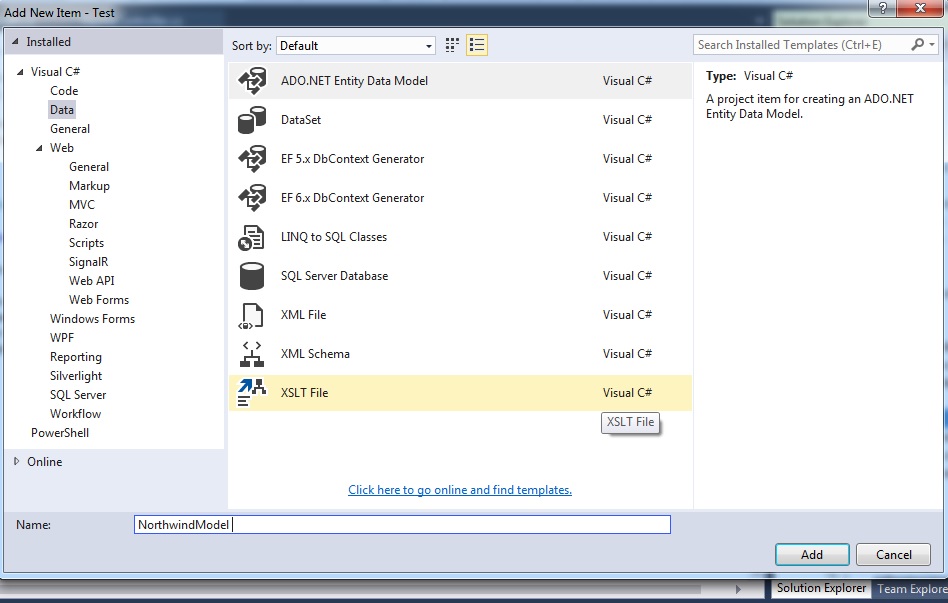
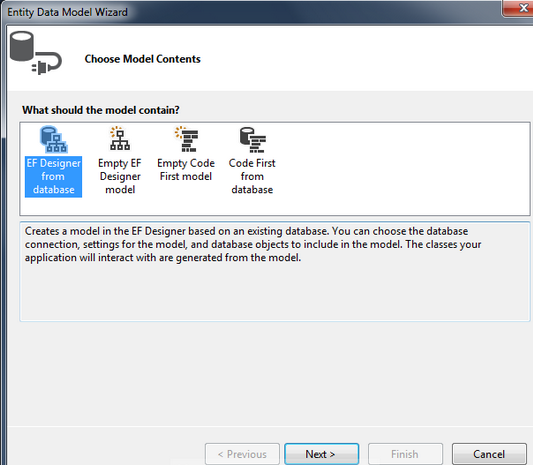
Connecting to database in MVC
Here I am making use of Microsoft’s Northwind Database.
Now the wizard will ask you to connect and configure the Connection String to the database, click on "New Connection" button on top right side, select
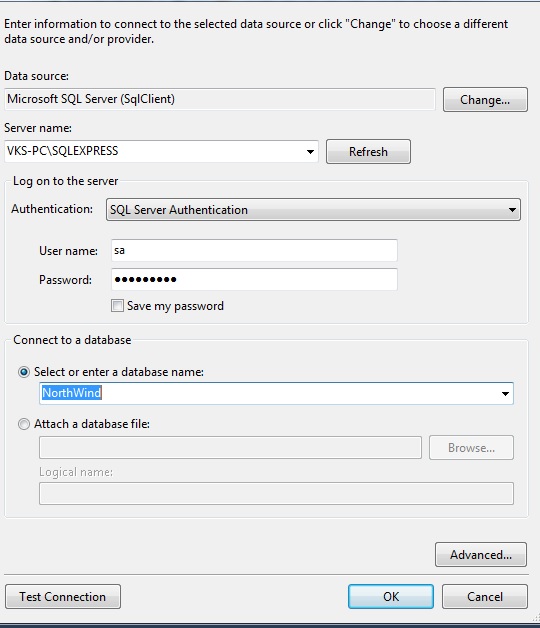

Note:
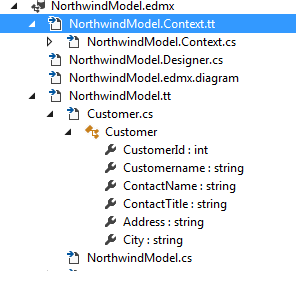
To see your tables and it''s column, expand Edmx_name.edmx , then expand Edmx_name.tt file , check your database table and it's coumn
Controller
public class HomeController : Controller
{
    // GET: Home
    public ActionResult Index()
    {
        NorthwindEntities entities = new NorthwindEntities();
        return View(from customer in entities.Customers.Take(10)
                    select customer);
    }
}
View
@model IEnumerable<Entity_Framework_MVC.Customer>

@{
    Layout = null;
}

<!DOCTYPE html>

<html>
<head>
    <meta name="viewport" content="width=device-width"/>
    <title>Index</title>
</head>
<body>
    <h4>Customers</h4>
    <hr/>
    <table cellpadding="0" cellspacing="0">
        <tr>
            <th>CustomerId</th>
            <th>ContactName</th>
            <th>City</th>
        </tr>
        // Foreach loop through each customer and print's customer properties
        @foreach (Customer customer in Model)
        {
            <tr>
                <td>@customer.CustomerID</td>
                <td>@customer.ContactName</td>
                <td>@customer.City</td>

            </tr>
        }
    </table>
</body>
</html>
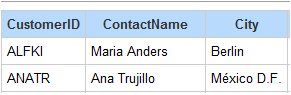
Output :-
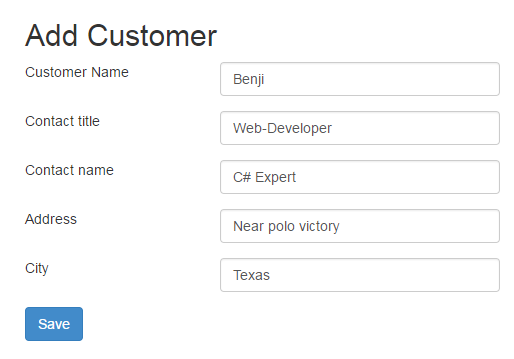
Inserting Data in database
Create a ActionMethod in controller and it's view name it as "AddCustomer"
      public ActionResult AddCustomer()
        {
            return View();
        }
Right click inside action method and click 'Add View', now in this view we will write code to save new customer, i will explain code line with comments
<!--Describes the model of this view-->
@model Test.Models.Customer

<!--@ charatcer represents the razor code, here we have written title tag value-->
@{
    ViewBag.Title = "AddCustomer";
}

<h2>Add Customer</h2>

<!--this is start of Form in razor syntax, "NewCustomer" is action , "Home" is controller and form type is "POST"-->
@using (Html.BeginForm("NewCustomer", "Home", FormMethod.Post))
{

<!--This is for security purpose, use to protect application against cross-site request forgery-->
@Html.AntiForgeryToken()

<div class="form-group">
   <div class="row">
    <div class="col-lg-2">
        Customer Name
    </div>
    <div class="col-lg-10">}
<!--here we can write normal html or use razor html helpers, this is razor syntax to create textbox with name and id as Customername-->
        @Html.TextBoxFor(a=>a.Customername, new {@class="form-control" })
    </div>
</div>
</div>
<div class="form-group">
    <div class="row">
        <div class="col-lg-2">
           Contact title
        </div>
        <div class="col-lg-10">
            @Html.TextBoxFor(a => a.ContactTitle, new { @class = "form-control" })
        </div>
    </div>
</div>
<div class="form-group">
    <div class="row">
        <div class="col-lg-2">
            Contact name
        </div>
        <div class="col-lg-10">
            @Html.TextBoxFor(a => a.ContactName, new { @class = "form-control" })
        </div>
    </div>
</div>
<div class="form-group">
    <div class="row">
        <div class="col-lg-2">
            Address
        </div>
        <div class="col-lg-10">
            @Html.TextBoxFor(a => a.Address, new { @class = "form-control" })
        </div>
    </div>
</div>
<div class="form-group">
    <div class="row">
        <div class="col-lg-2">
           City
        </div>
        <div class="col-lg-10">
            @Html.TextBoxFor(a => a.City, new { @class = "form-control" })
        </div>
    </div>
</div>

<!--Button to submit form values-->
    <input type="submit" class="btn btn-primary" value="Save" />
}
Now we need to create a Post method to save values of customer
[HttpPost] //method type
[ValidateAntiForgeryToken] //validate antiforgery token
public ActionResult NewCustomer(Customer Cs) //get customer Model values in actionmethod
{
//Initialize the database connection
using (var context = new NorthWindEntities())
{
//Add customer values in database
context.Customers.Add(Cs);
//save the values in database
context.SaveChanges();
}
//Redirect to ActionMethod 'Index' in same controller
return RedirectToAction("Index");
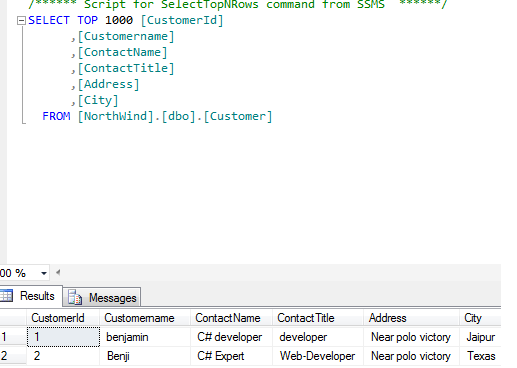
}Check Database for values:-
That's it we are done.
In the Next post, I have described about Paging, sorting and filtering in ASP.NET MVC C#.
Recommended MVC Articles:
What is .NET framework and understanding .NET framework architecture
Paging, Sorting and Filtering Table data in MVC
OutputCache in ASP.NET MVC ( Caching in MVC)
How to Create login & registration page in MVC with database (ASP.NET)
File Upload in ASP.NET MVC (Single and Multiple files upload example)
 Buy us a coffee
 Become a Patron