
There can be many occasions where you need to upload files using drag and drop functionality of HTML5, so here I will provide you a quick example to use DropZone Js to create Drag and drop functionality in HTML using ASP.NET MVC razor form and submit it to C# controller on button click, to upload files in MVC.
What is DropZone JS?
DropzoneJS is an open source library that provides drag ’n’ drop file uploading library with image previews. It’s lightweight, doesn’t depend on any other library (like jQuery) and is highly customizable.
How to get it?
You can download the latest version of DropZoneJS from the official site here http://www.dropzonejs.com/ and also you can install using the NuGet package manager console by the following command Package Manager Console (You can find Package manager console in Visual Studio -> Tools -> NuGet Package manager -> NuGet Package Manager Console and then run code below)
PM> Install-Package dropzone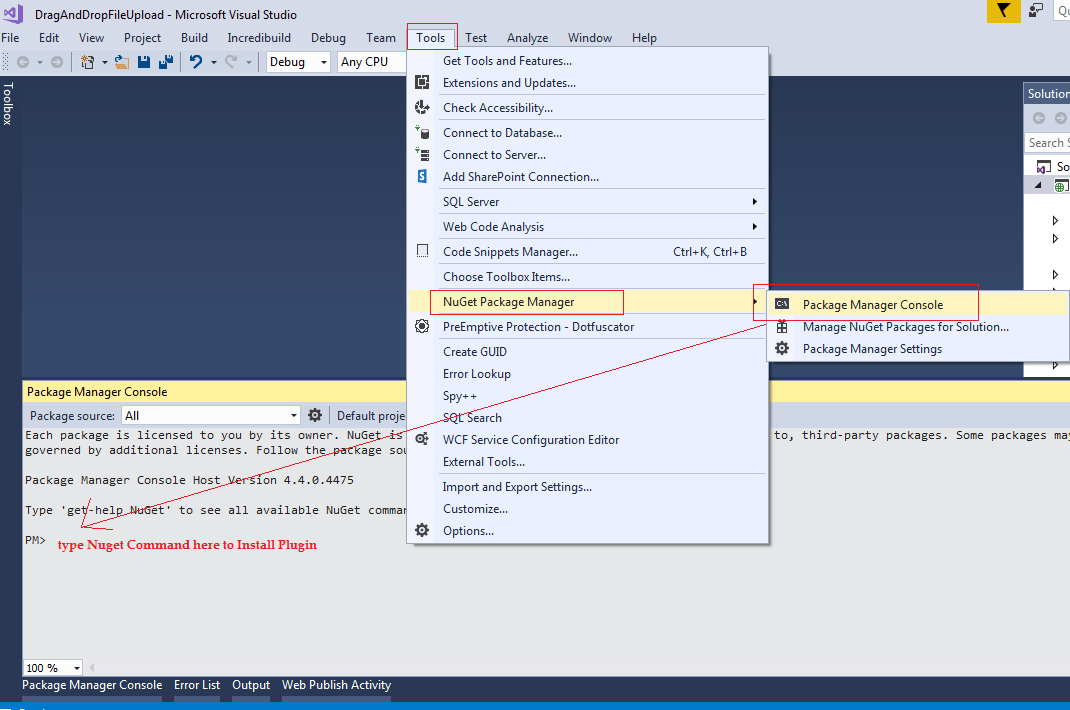
Using DropZone in ASP.NET MVC
Step 1: You can include it in your bundles by opening your BundleConfig.cs
bundles.Add(new ScriptBundle("~/bundles/dropzonejs").Include(
                     "~/Scripts/dropzone/dropzone.js"));
Now add the dropzone stylesheet in the BundleConfig.cs
bundles.Add(new StyleBundle("~/Content/dropzonecss").Include(
                     "~/Scripts/dropzone/css/basic.css",
                     "~/Scripts/dropzone/css/dropzone.css"));
So your Complete file would look like this
 public class BundleConfig
    {
        // For more information on bundling, visit https://go.microsoft.com/fwlink/?LinkId=301862
        public static void RegisterBundles(BundleCollection bundles)
        {
            bundles.Add(new ScriptBundle("~/bundles/jquery").Include(
                        "~/Scripts/jquery-{version}.js"));

            bundles.Add(new ScriptBundle("~/bundles/jqueryval").Include(
                        "~/Scripts/jquery.validate*"));

            //Add DropZone Scripts
            bundles.Add(new ScriptBundle("~/bundles/dropzonejs").Include(
                     "~/Scripts/dropzone/dropzone.js"));

            // Use the development version of Modernizr to develop with and learn from. Then, when you're
            // ready for production, use the build tool at https://modernizr.com to pick only the tests you need.
            bundles.Add(new ScriptBundle("~/bundles/modernizr").Include(
                        "~/Scripts/modernizr-*"));

            bundles.Add(new ScriptBundle("~/bundles/bootstrap").Include(
                      "~/Scripts/bootstrap.js",
                      "~/Scripts/respond.js"));

            bundles.Add(new StyleBundle("~/Content/css").Include(
                      "~/Content/bootstrap.css",
                      "~/Content/site.css"));

            //Add DropZone CSS
            bundles.Add(new StyleBundle("~/Content/dropzonecss").Include(
                     "~/Scripts/dropzone/css/basic.css",
                     "~/Scripts/dropzone/css/dropzone.css"));
        }
    }
Step 2: Now add this bundle reference link in your _layout.cshtml page, so your page will be like this
<!DOCTYPE html>
<html>
<head>
<meta charset="utf-8" />
<meta name="viewport" content="width=device-width, initial-scale=1.0">
<title>@ViewBag.Title - My ASP.NET Application</title>
@Styles.Render("~/Content/css")
<!--DropZone CSS-->
@Styles.Render("~/Content/dropzonecss")
@Scripts.Render("~/bundles/modernizr")
</head>
<body>
<div class="navbar navbar-inverse navbar-fixed-top">
<div class="container">
<div class="navbar-header">
<button type="button" class="navbar-toggle" data-toggle="collapse" data-target=".navbar-collapse">
<span class="icon-bar"></span>
<span class="icon-bar"></span>
<span class="icon-bar"></span>
</button>
@Html.ActionLink("Application name", "Index", "Home", new { area = "" }, new { @class = "navbar-brand" })
</div>
<div class="navbar-collapse collapse">
<ul class="nav navbar-nav">
<li>@Html.ActionLink("Home", "Index", "Home")</li>
<li>@Html.ActionLink("About", "About", "Home")</li>
<li>@Html.ActionLink("Contact", "Contact", "Home")</li>
</ul>
</div>
</div>
</div>
<div class="container body-content">
@RenderBody()
<hr />
<footer>
<p>© @DateTime.Now.Year - My ASP.NET Application</p>
</footer>
</div>
@Scripts.Render("~/bundles/jquery")
@Scripts.Render("~/bundles/bootstrap")
<!--DropZone JS-->
@Scripts.Render("~/bundles/dropzonejs")
@RenderSection("scripts", required: false)
</body>
</html>
As you can see, I have Commented out, newly added bundled link(you may find some of default bundles links already)
Step 3: Create a form in your Index.cshtml (HomeController) here page (If you haven't got one, create Controller by right Clicking on Controller folder and select Add, then Select MVC empty Controller, then give a name, in the already created Index ActionMethod, right click and Select "Add View")
Now in your Index.cshtml page, we will create form using HTML.BeginForm
<script src="~/Scripts/jquery-1.10.2.min.js"></script>
@using (Html.BeginForm("SaveUploadedFile", "Home", FormMethod.Post, new { @name = "myDropzone",  id = "myDropzone", @enctype = "multipart/form-data" }))
{

    <br/>

<div>
    <div id="previews" class="dz-default dz-message box__input dropzone">
        <div style="text-align:center">
            <i class="fa fa-cloud-upload" style="font-size:23px;position:relative;top:4px;"></i> <span style="margin-left:20px">Drop files  to attach or browse</span>
        </div>
        </div>
    <div id="previewFiles"></div>
</div>
<br />
 <div>
<input type="submit" id="Submit" name="Submit" class="btn btn-success m-t-5" value="Submit" />
</div>


}
@ViewBag.Message
Now jQuery part to initialize DropZone and it's settings, please include it in section as given below
@section scripts{

<script>

    $(document).ready(function () {
        Dropzone.autoDiscover = false;
        $('#myDropzone').dropzone({
           //parameter name value
            paramName: "files",
            //clickable div id
            clickable: '#previews',
           //preview files container Id
            previewsContainer: "#previewFiles",
            autoProcessQueue: false,
            uploadMultiple: true,
            parallelUploads: 100,
            maxFiles: 100,
          //  url:"/", // url here to save file
            maxFilesize: 100,//max file size in MB,
            addRemoveLinks: true,
            dictResponseError: 'Server not Configured',
            acceptedFiles: ".png,.jpg,.gif,.bmp,.jpeg,.pdf",// use this to restrict file type
            init: function () {
                var self = this;
                // config
                self.options.addRemoveLinks = true;
                self.options.dictRemoveFile = "Delete";
                //New file added
                self.on("addedfile", function (file) {
                    console.log('new file added ', file);
                    $('.dz-success-mark').hide();
                    $('.dz-error-mark').hide();
                });
                // Send file starts
                self.on("sending", function (file) {
                    console.log('upload started', file);
                    $('.meter').show();
                });

                // File upload Progress
                self.on("totaluploadprogress", function (progress) {
                    console.log("progress ", progress);
                    $('.roller').width(progress + '%');
                });

                self.on("queuecomplete", function (progress) {
                    $('.meter').delay(999).slideUp(999);
                });

                // On removing file
                self.on("removedfile", function (file) {
                    console.log(file);
                });

                $('#Submit').on("click", function (e) {
                    e.preventDefault();
                    e.stopPropagation();
                      // Validate form here if needed

                        if (self.getQueuedFiles().length > 0) {
                            self.processQueue();


                        } else {
                            self.uploadFiles([]);
                            $('#myDropzone').submit();
                        }

                });


                self.on("successmultiple", function (files, response) {
                    // Gets triggered when the files have successfully been sent.
                    // Redirect user or notify of success.

                });
            }
        });


    })

</script>
}
I have explained code using comments, please read it to learn more about it.
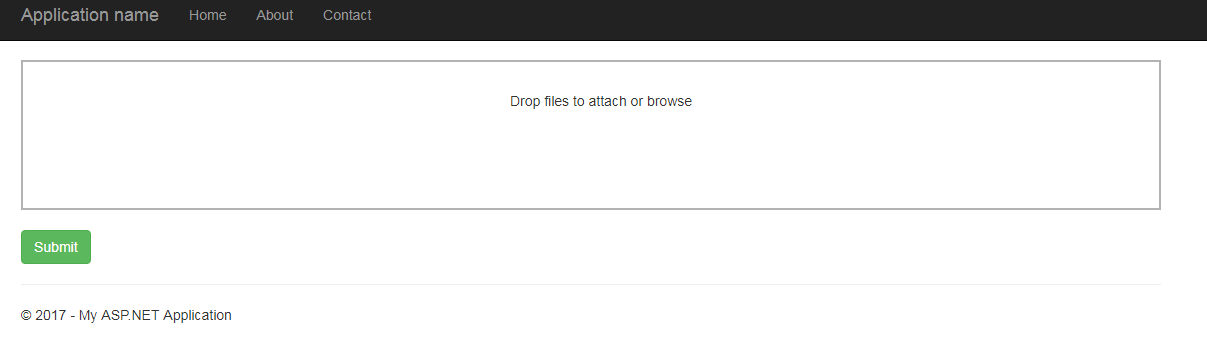
Now, build project and run it in browser it should look like this
Step 4: In your Controller(HomeController here), add the method to upload files using C#, here is the complete code for Controller
 public class HomeController : Controller
    {
        public ActionResult Index(string Message)
        {
            ViewBag.Message = Message;
            return View();
        }

        public ActionResult SaveUploadedFile(IEnumerable<HttpPostedFileBase> files)
        {
            bool SavedSuccessfully = true;
            string fName = "";
            try
            {
                //loop through all the files
                foreach (var file in files)
                {

                    //Save file content goes here
                    fName = file.FileName;
                    if (file != null && file.ContentLength > 0)
                    {

                        var originalDirectory = new DirectoryInfo(string.Format("{0}Images\\", Server.MapPath(@"\")));

                        string pathString = System.IO.Path.Combine(originalDirectory.ToString(), "imagepath");

                        var fileName1 = Path.GetFileName(file.FileName);

                        bool isExists = System.IO.Directory.Exists(pathString);

                        if (!isExists)
                            System.IO.Directory.CreateDirectory(pathString);

                        var path = string.Format("{0}\\{1}", pathString, file.FileName);
                        file.SaveAs(path);

                    }

                }

            }
            catch (Exception ex)
            {
                SavedSuccessfully = false;
            }


            if (SavedSuccessfully)
            {
                return RedirectToAction("Index",new { Message = "All files saved successfully" });
            }
            else
            {
                return RedirectToAction("Index",new { Message = "Error in saving file" });
            }
        }
    }
Now build your project, and run it in the browser
Step 5: Drop multiple files, i am dropping one .pdf and one image in the drag and drop area.
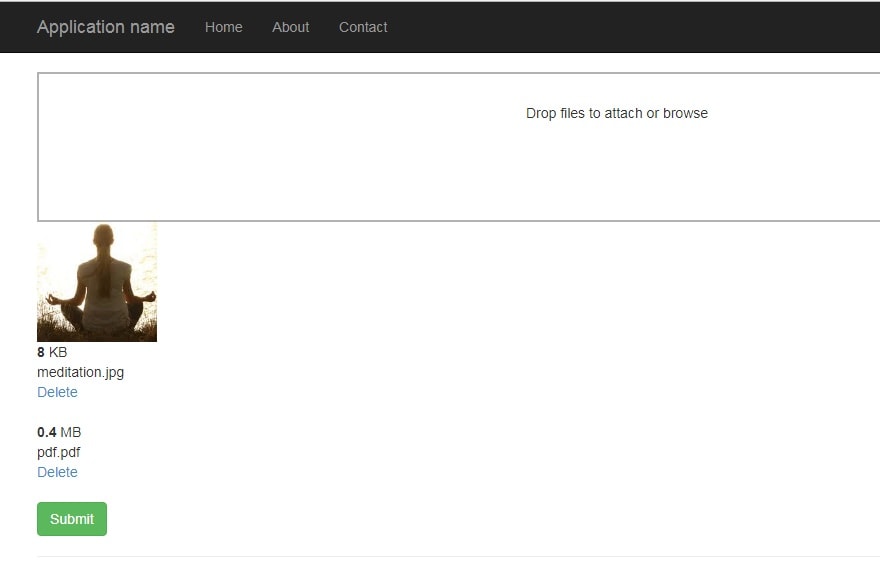
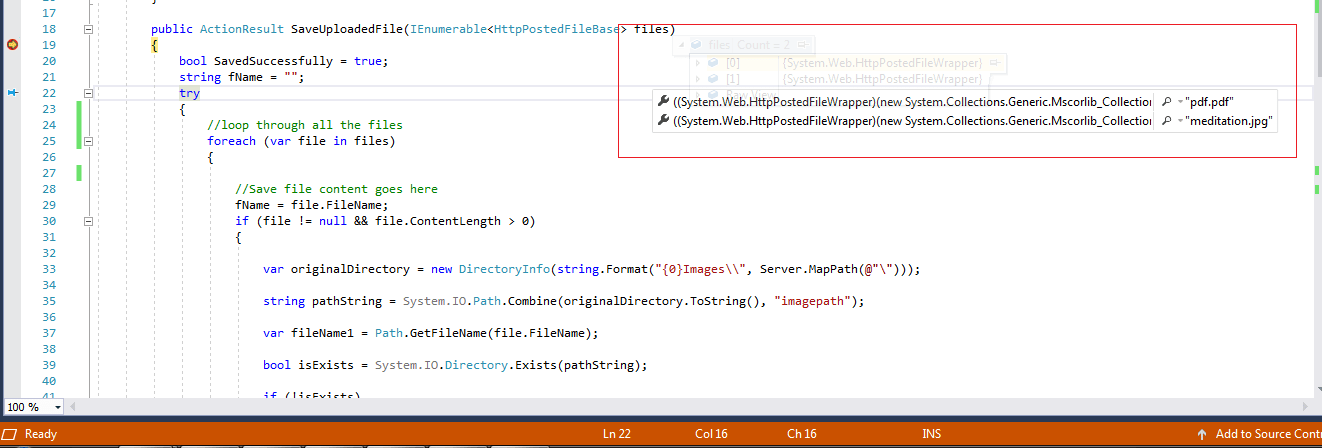
Now, Click on Submit button, to submit form (you can add more more values), you will receive files in your controller, take a look at the below image, which shows that two files name "pdf.pdf" and "meditation.jpg" has been posted to C# Controller from Dropzone.
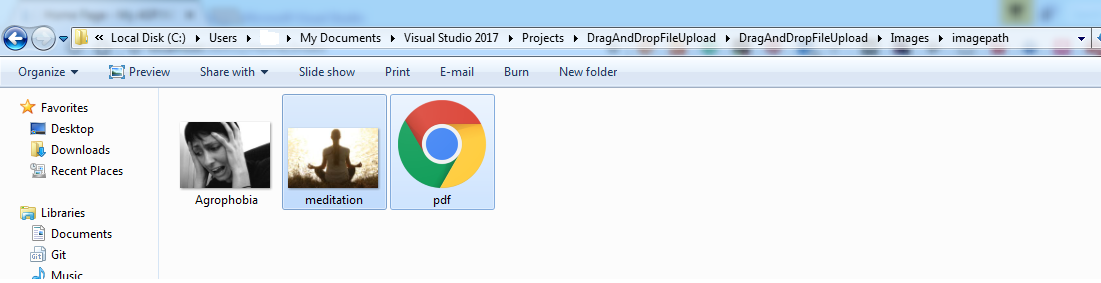
These are files are successfully saved, in your Project-> Images-> imagepath folder, take a look here
What if we need to allow only one file to be uploaded at a time in Dropzone JS?
If you want to allow user to upload one file at a time only, then you can use Dropzon JS "MaxFiles" attribute in Configuration as shown below
Dropzone.options.YourDropZoneId= {
  maxFiles: 1,
  accept: function(file, done) {
    console.log("uploaded");

  },
  init: function() {
    this.on("maxfilesexceeded", function(file){
        alert("Only one file is allowed");
    });
  }
};
Take a look at all answers here regarding question: How to allow only one file to upload in dropzone js?
That's it, your are done.
You might also like to read:
Best Javascript Drag and Drop Library
 Buy us a coffee
 Become a Patron