
If you have just started learning ASP.NET MVC or you are going start using it, then you would have to create Login & registration form in your ASP.NET MVC application connecting it to SQL server database, so this article, provides you complete steps to learn, how you can create Login / Logout and registration page easily and quickly in your ASP.NET MVC application with proper Validations. So, in this article, we will be using Data Annotations for validations with Entity Framework (ADO.NET) to connect C# application to database.
Before we begin if you are absolute beginner you can take a look on basic tutorial for your first MVC application.
Now, let's begin with creating Login and registration form in MVC with sample database.
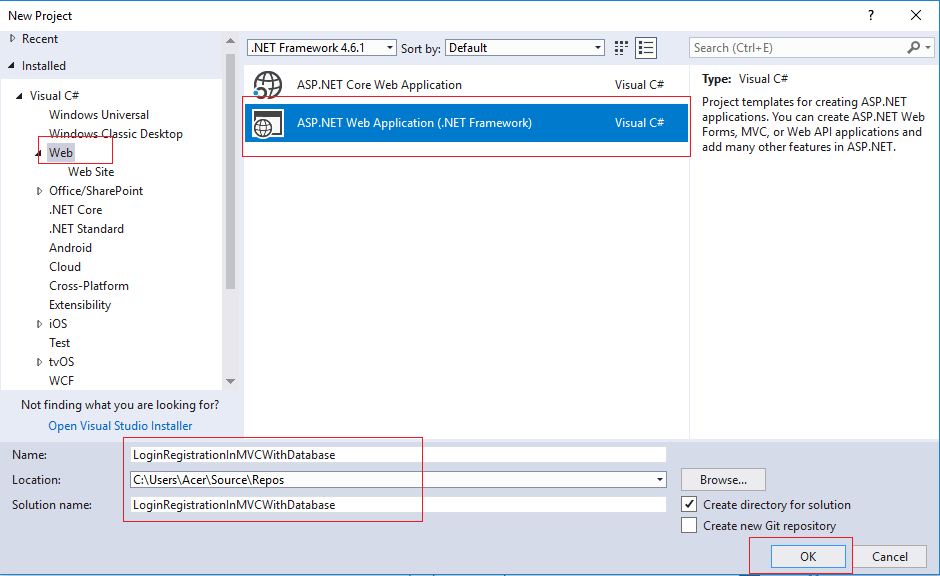
Step 1: Create a new Project in your Visual Studio(Using 2017 community edition here) by Navigating to File-> New -> Project-> Select "Web" from Left pane & Select "ASP.NET Web Application" from right-pane & click "OK"
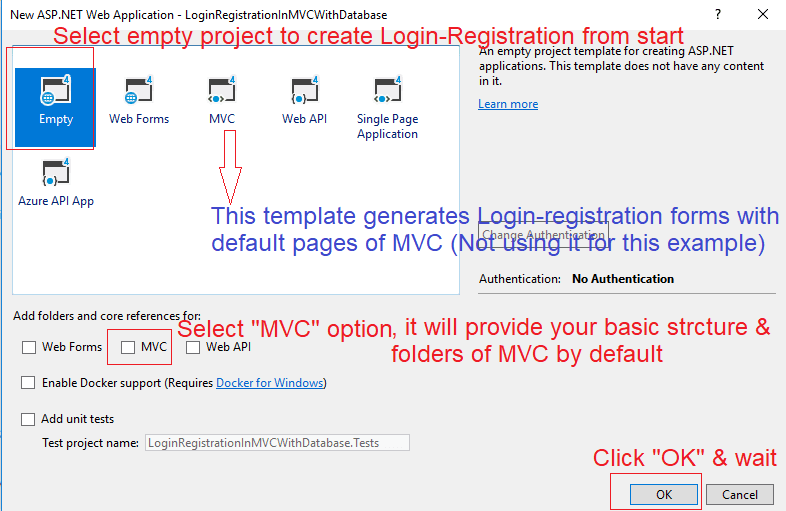
As soon as you click "OK", a new window will appear, select "Empty" template from it & mark check-box "MVC"
Step 2: Now, leave your Project as it is, let's start by creating simple database & a table to save values in it.
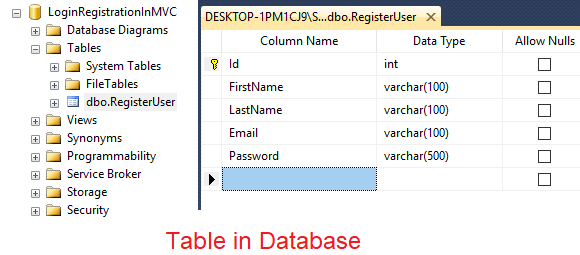
You can create the table & database in your Local SQL Server management studio using the script below
USE [master]
GO
/****** Object:  Database [LoginRegistrationInMVC]    Script Date: 7/16/2018 7:45:32 PM ******/
CREATE DATABASE [LoginRegistrationInMVC]
 CONTAINMENT = NONE
 ON  PRIMARY
( NAME = N'LoginRegistrationInMVC', FILENAME = N'C:\Program Files\Microsoft SQL Server\MSSQL11.SQLEXPRESS2\MSSQL\DATA\LoginRegistrationInMVC.mdf' , SIZE = 3072KB , MAXSIZE = UNLIMITED, FILEGROWTH = 1024KB )
 LOG ON
( NAME = N'LoginRegistrationInMVC_log', FILENAME = N'C:\Program Files\Microsoft SQL Server\MSSQL11.SQLEXPRESS2\MSSQL\DATA\LoginRegistrationInMVC_log.ldf' , SIZE = 1024KB , MAXSIZE = 2048GB , FILEGROWTH = 10%)
GO
ALTER DATABASE [LoginRegistrationInMVC] SET COMPATIBILITY_LEVEL = 110
GO
IF (1 = FULLTEXTSERVICEPROPERTY('IsFullTextInstalled'))
begin
EXEC [LoginRegistrationInMVC].[dbo].[sp_fulltext_database] @action = 'enable'
end
GO
ALTER DATABASE [LoginRegistrationInMVC] SET ANSI_NULL_DEFAULT OFF
GO
ALTER DATABASE [LoginRegistrationInMVC] SET ANSI_NULLS OFF
GO
ALTER DATABASE [LoginRegistrationInMVC] SET ANSI_PADDING OFF
GO
ALTER DATABASE [LoginRegistrationInMVC] SET ANSI_WARNINGS OFF
GO
ALTER DATABASE [LoginRegistrationInMVC] SET ARITHABORT OFF
GO
ALTER DATABASE [LoginRegistrationInMVC] SET AUTO_CLOSE OFF
GO
ALTER DATABASE [LoginRegistrationInMVC] SET AUTO_CREATE_STATISTICS ON
GO
ALTER DATABASE [LoginRegistrationInMVC] SET AUTO_SHRINK OFF
GO
ALTER DATABASE [LoginRegistrationInMVC] SET AUTO_UPDATE_STATISTICS ON
GO
ALTER DATABASE [LoginRegistrationInMVC] SET CURSOR_CLOSE_ON_COMMIT OFF
GO
ALTER DATABASE [LoginRegistrationInMVC] SET CURSOR_DEFAULT  GLOBAL
GO
ALTER DATABASE [LoginRegistrationInMVC] SET CONCAT_NULL_YIELDS_NULL OFF
GO
ALTER DATABASE [LoginRegistrationInMVC] SET NUMERIC_ROUNDABORT OFF
GO
ALTER DATABASE [LoginRegistrationInMVC] SET QUOTED_IDENTIFIER OFF
GO
ALTER DATABASE [LoginRegistrationInMVC] SET RECURSIVE_TRIGGERS OFF
GO
ALTER DATABASE [LoginRegistrationInMVC] SET  DISABLE_BROKER
GO
ALTER DATABASE [LoginRegistrationInMVC] SET AUTO_UPDATE_STATISTICS_ASYNC OFF
GO
ALTER DATABASE [LoginRegistrationInMVC] SET DATE_CORRELATION_OPTIMIZATION OFF
GO
ALTER DATABASE [LoginRegistrationInMVC] SET TRUSTWORTHY OFF
GO
ALTER DATABASE [LoginRegistrationInMVC] SET ALLOW_SNAPSHOT_ISOLATION OFF
GO
ALTER DATABASE [LoginRegistrationInMVC] SET PARAMETERIZATION SIMPLE
GO
ALTER DATABASE [LoginRegistrationInMVC] SET READ_COMMITTED_SNAPSHOT OFF
GO
ALTER DATABASE [LoginRegistrationInMVC] SET HONOR_BROKER_PRIORITY OFF
GO
ALTER DATABASE [LoginRegistrationInMVC] SET RECOVERY SIMPLE
GO
ALTER DATABASE [LoginRegistrationInMVC] SET  MULTI_USER
GO
ALTER DATABASE [LoginRegistrationInMVC] SET PAGE_VERIFY CHECKSUM
GO
ALTER DATABASE [LoginRegistrationInMVC] SET DB_CHAINING OFF
GO
ALTER DATABASE [LoginRegistrationInMVC] SET FILESTREAM( NON_TRANSACTED_ACCESS = OFF )
GO
ALTER DATABASE [LoginRegistrationInMVC] SET TARGET_RECOVERY_TIME = 0 SECONDS
GO
USE [LoginRegistrationInMVC]
GO
/****** Object:  Table [dbo].[RegisterUser]    Script Date: 7/16/2018 7:45:32 PM ******/
SET ANSI_NULLS ON
GO
SET QUOTED_IDENTIFIER ON
GO
SET ANSI_PADDING ON
GO
CREATE TABLE [dbo].[RegisterUser](
	[Id] [int] IDENTITY(1,1) NOT NULL,
	[FirstName] [varchar](100) NOT NULL,
	[LastName] [varchar](100) NOT NULL,
	[Email] [varchar](100) NOT NULL,
	[Password] [varchar](500) NOT NULL,
 CONSTRAINT [PK_RegisterUser] PRIMARY KEY CLUSTERED
(
	[Id] ASC
)WITH (PAD_INDEX = OFF, STATISTICS_NORECOMPUTE = OFF, IGNORE_DUP_KEY = OFF, ALLOW_ROW_LOCKS = ON, ALLOW_PAGE_LOCKS = ON) ON [PRIMARY]
) ON [PRIMARY]

GO
SET ANSI_PADDING OFF
GO
SET IDENTITY_INSERT [dbo].[RegisterUser] ON

INSERT [dbo].[RegisterUser] ([Id], [FirstName], [LastName], [Email], [Password]) VALUES (1, N'Test', N'Lastname', N'test@test.com', N'Test123')
SET IDENTITY_INSERT [dbo].[RegisterUser] OFF
USE [master]
GO
ALTER DATABASE [LoginRegistrationInMVC] SET  READ_WRITE
GO
Now, we have the table and it's design, in which we have to save User Email,Password, First and last name.
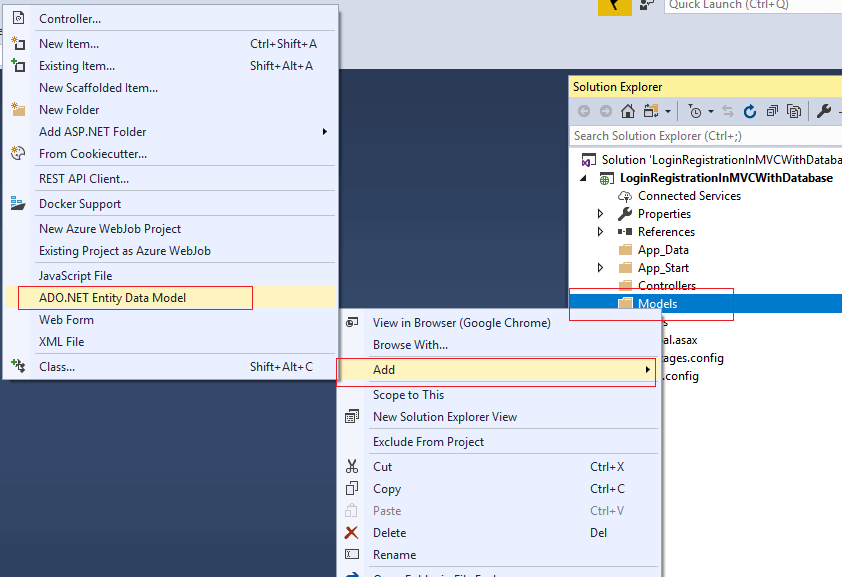
Step 3: In this step, we will connect to our above created database using ADO.NET and Entity framework, go to your project solution, right click on "Models" folder & select "Add", then select "ADO.NET Entity data Model" as shown in the below image.
Provide a name & click OK
Now, in the next screen Select "EF Designer database" option.
- SQL Server Instance
- Database
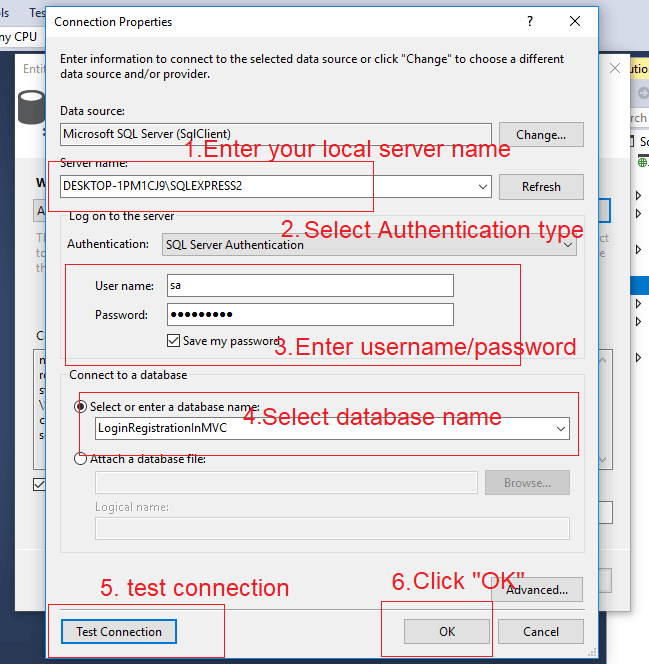
Click "Ok", then select "Yes, include sensitive data in the connection string", Click"Next", now slect specific table or all tables

Click "Finish" and your .edmx file is created , and your project is now connected with database, we can use Entity Framework in C# code to query database or save data in database.
Step 4: Now we need to work on our C# logic and code which will take data from user and save it in database, for that, we need to create a Controller in our Solution's "Controllers" folder.
So, right-click on Controllers Folder, select "Add"-> Select "Controller", name (AccountController) it and click "OK"
In the Account Controller, we will create Login & Registration ActionMethod to retrun View for it, another one ActionMethod to save Register form posted values and fourth ActionMethod to verify, the login details of user is correct as in database or not.
Here is the Register ActionMethod to return Registration view and Save values in Database.
//Return Register view
        public ActionResult Register()
        {
            return View();
        }

        //The form's data in Register view is posted to this method.
        //We have binded the Register View with Register ViewModel, so we can accept object of Register class as parameter.
        //This object contains all the values entered in the form by the user.
        [HttpPost]
        public ActionResult SaveRegisterDetails(Register registerDetails)
        {
            //We check if the model state is valid or not. We have used DataAnnotation attributes.
            //If any form value fails the DataAnnotation validation the model state becomes invalid.
            if (ModelState.IsValid)
            {
                //create database context using Entity framework
                using (var databaseContext = new LoginRegistrationInMVCEntities())
                {
                    //If the model state is valid i.e. the form values passed the validation then we are storing the User's details in DB.
                    RegisterUser reglog = new RegisterUser();

                    //Save all details in RegitserUser object

                    reglog.FirstName = registerDetails.FirstName;
                    reglog.LastName = registerDetails.LastName;
                    reglog.Email = registerDetails.Email;
                    reglog.Password = registerDetails.Password;


                    //Calling the SaveDetails method which saves the details.
                    databaseContext.RegisterUsers.Add(reglog);
                    databaseContext.SaveChanges();
                }

                ViewBag.Message = "User Details Saved";
                return View("Register");
            }
            else
            {

                //If the validation fails, we are returning the model object with errors to the view, which will display the error messages.
                return View("Register", registerDetails);
            }
        }
Note: We are saving Password values without encryption to make this example simple, read this article to implemnt Ecrypt & decrypt string using C#.
Here is the Login ActionMethod and When tried to login we verify user, in POST ActionMethod
  public ActionResult Login()
        {
            return View();
        }

        //The login form is posted to this method.
        [HttpPost]
        public ActionResult Login(LoginViewModel model)
        {
            //Checking the state of model passed as parameter.
            if (ModelState.IsValid)
            {

                //Validating the user, whether the user is valid or not.
                var isValidUser = IsValidUser(model);

                //If user is valid & present in database, we are redirecting it to Welcome page.
                if (isValidUser != null)
                {
                    FormsAuthentication.SetAuthCookie(model.Email, false);
                    return RedirectToAction("Index");
                }
                else
                {
                    //If the username and password combination is not present in DB then error message is shown.
                    ModelState.AddModelError("Failure", "Wrong Username and password combination !");
                    return View();
                }
            }
            else
            {
                //If model state is not valid, the model with error message is returned to the View.
                return View(model);
            }
        }

        //function to check if User is valid or not
        public RegisterUser IsValidUser(LoginViewModel model)
        {
            using (var dataContext = new LoginRegistrationInMVCEntities())
            {
                //Retireving the user details from DB based on username and password enetered by user.
                RegisterUser user = dataContext.RegisterUsers.Where(query => query.Email.Equals(model.Email) && query.Password.Equals(model.Password)).SingleOrDefault();
                //If user is present, then true is returned.
                if (user == null)
                    return null;
                //If user is not present false is returned.
                else
                    return user;
            }
        }
as you can see in the above code, we are checking If user is valid or not using another function "IsValidUser", as soon as user is verified, we are redirecting user to Welcome ActionMethod with Model to show Welcome.cshtml page.
So here is our Complete AccountController.cs code.
using LoginRegistrationInMVCWithDatabase.Models;
using LoginRegistrationInMVCWithDatabase.ViewModel;
using System;
using System.Collections.Generic;
using System.Linq;
using System.Web;
using System.Web.Mvc;
using System.Web.Security;

namespace LoginRegistrationInMVCWithDatabase.Controllers
{
    public class AccountController : Controller
    {

        // Return Home page.
        public ActionResult Index()
        {
            return View();
        }

        //Return Register view
        public ActionResult Register()
        {
            return View();
        }

        //The form's data in Register view is posted to this method.
        //We have binded the Register View with Register ViewModel, so we can accept object of Register class as parameter.
        //This object contains all the values entered in the form by the user.
        [HttpPost]
        public ActionResult SaveRegisterDetails(Register registerDetails)
        {
            //We check if the model state is valid or not. We have used DataAnnotation attributes.
            //If any form value fails the DataAnnotation validation the model state becomes invalid.
            if (ModelState.IsValid)
            {
                //create database context using Entity framework
                using (var databaseContext = new LoginRegistrationInMVCEntities())
                {
                    //If the model state is valid i.e. the form values passed the validation then we are storing the User's details in DB.
                    RegisterUser reglog = new RegisterUser();

                    //Save all details in RegitserUser object

                    reglog.FirstName = registerDetails.FirstName;
                    reglog.LastName = registerDetails.LastName;
                    reglog.Email = registerDetails.Email;
                    reglog.Password = registerDetails.Password;


                    //Calling the SaveDetails method which saves the details.
                    databaseContext.RegisterUsers.Add(reglog);
                    databaseContext.SaveChanges();
                }

                ViewBag.Message = "User Details Saved";
                return View("Register");
            }
            else
            {

                //If the validation fails, we are returning the model object with errors to the view, which will display the error messages.
                return View("Register", registerDetails);
            }
        }


        public ActionResult Login()
        {
            return View();
        }

        //The login form is posted to this method.
        [HttpPost]
        public ActionResult Login(LoginViewModel model)
        {
            //Checking the state of model passed as parameter.
            if (ModelState.IsValid)
            {

                //Validating the user, whether the user is valid or not.
                var isValidUser = IsValidUser(model);

                //If user is valid & present in database, we are redirecting it to Welcome page.
                if (isValidUser != null)
                {
                    FormsAuthentication.SetAuthCookie(model.Email, false);
                    return RedirectToAction("Index");
                }
                else
                {
                    //If the username and password combination is not present in DB then error message is shown.
                    ModelState.AddModelError("Failure", "Wrong Username and password combination !");
                    return View();
                }
            }
            else
            {
                //If model state is not valid, the model with error message is returned to the View.
                return View(model);
            }
        }

        //function to check if User is valid or not
        public RegisterUser IsValidUser(LoginViewModel model)
        {
            using (var dataContext = new LoginRegistrationInMVCEntities())
            {
                //Retireving the user details from DB based on username and password enetered by user.
                RegisterUser user = dataContext.RegisterUsers.Where(query => query.Email.Equals(model.Email) && query.Password.Equals(model.Password)).SingleOrDefault();
                //If user is present, then true is returned.
                if (user == null)
                    return null;
                //If user is not present false is returned.
                else
                    return user;
            }
        }


        public ActionResult Logout()
        {
            FormsAuthentication.SignOut();
            Session.Abandon(); // it will clear the session at the end of request
            return RedirectToAction("Index");
        }
    }
}
Note: We are not saving encrypted password in the database to make this article simple, we can create a Encryption/Decryption helper class and save Encrypted string as password in database and then decrypt it while checking user credentials during login process. Check this article for encryption and decryption in C#.
Now, one of the Important step which is here to enable form authentication using Web.Config file, so go to your web.config file and inside <system.web> place the below configuration to enable form-authentication
 <authentication mode="Forms">
    <forms loginUrl="~/Account/Login" timeout="2880" />
  </authentication>
Step 5: In the Next steps, we will be creating ViewModels for Login and Registration
Create a new folder in your project, by right-clicking on the Project name & name it "ViewModel", here we will create two ViewModel one for login and another for Registration,in these view models we will implement Validation using Data Annotation.
Now, right-click on "ViewModel" folder, select "Add" and then select "Class" from right-pane, name it "Register.cs"
using System.ComponentModel.DataAnnotations;

namespace LoginRegistrationInMVCWithDatabase.ViewModel
{
    public class Register
    {
        [Required]
        [Display(Name ="First Name")]
        public string FirstName { get; set; }

        [Required]
        [Display(Name = "Last Name")]
        public string LastName { get; set; }

        //Required attribute implements validation on Model item that this fields is mandatory for user
        [Required]
        //We are also implementing Regular expression to check if email is valid like a1@test.com
        [RegularExpression("^[a-zA-Z0-9_\\.-]+@([a-zA-Z0-9-]+\\.)+[a-zA-Z]{2,6}$", ErrorMessage = "E-mail id is not valid")]
        public string Email { get; set; }

        [Required]
        [DataType(DataType.Password)]
        public string Password { get; set; }
    }
}
Similarly, create "LoginViewModel.cs"
using System.ComponentModel.DataAnnotations;


namespace LoginRegistrationInMVCWithDatabase.ViewModel
{
    public class LoginViewModel
    {
        [Required]
        [RegularExpression("^[a-zA-Z0-9_\\.-]+@([a-zA-Z0-9-]+\\.)+[a-zA-Z]{2,6}$", ErrorMessage = "E-mail id is not valid")]
        public string Email { get; set; }

        [Required]
        [DataType(DataType.Password)]
        public string Password { get; set; }
    }
}
You can also check more detailed Email Address validation in C# with or without Regex.
Step 6: Go to your AccountController.cs and right-click "Index" ActionMethod & Select "Add View", while generating view select "Use Layout page", if you are using Visual Studio 2015/17, it will automatically generate Layout.cshtml and some other related CSS,JS files.
Here is the Index.cshtml
@{
    ViewBag.Title = "Index";
}

<h2>Index</h2>

@if (Request.IsAuthenticated)
{

    <span>Welcome @Html.Encode(User.Identity.Name) </span>
}
else
{

    @Html.ActionLink("Login", "Login", "Account")<br />

    @Html.ActionLink("Register", "Register", "Account")
}
In the above code, we are showing Login/Register anchor links, if user is not authenticated or logged in else, we will show Welcome message with Username, for which we are using ASP.NET identity.
Similarly, add a new View for Login.cshtml as below
@model LoginRegistrationInMVCWithDatabase.ViewModel.LoginViewModel
@{
    ViewBag.Title = "Login";

}

<h2>Login</h2>


<div>
    @using (Html.BeginForm("Login", "Account"))
    {
        <div style="color:red;">@Html.ValidationSummary()</div>
        <div class="row">
            <!--Show details are saved successfully message-->
            <div class="col-lg-12">@ViewBag.Message</div>
        </div><br />

        <div class="row">
            <div class="col-lg-2">@Html.LabelFor(a => a.Email)</div>
            <div class="col-lg-10">@Html.TextBoxFor(a => a.Email, new { @class = "form-control" })</div>
        </div><br />
        <div class="row">
            <div class="col-lg-2">@Html.LabelFor(a => a.Password)</div>
            <div class="col-lg-10">@Html.TextBoxFor(a => a.Password, new { @class = "form-control", type="Password" })</div>
        </div><br />
        <input type="submit" value="Login" class="btn btn-primary" />
    }

</div>
And last Register.cshtml using Register ActionMethod
@model LoginRegistrationInMVCWithDatabase.ViewModel.Register
@{
    ViewBag.Title = "Register";
}

<h2>Register</h2>


<div>
    @using (Html.BeginForm("SaveRegisterDetails", "Account"))
    {
        <div style="color:red;">@Html.ValidationSummary()</div>
        <div class="row">
            <!--Show details are saved successfully message-->
            <div class="col-lg-12">@ViewBag.Message</div>
        </div><br/>
        <div class="row">
            <div class="col-lg-2">@Html.LabelFor(a => a.FirstName)</div>
            <div class="col-lg-10">@Html.TextBoxFor(a => a.FirstName, new { @class = "form-control" })</div>
        </div><br />
        <div class="row">
            <div class="col-lg-2">@Html.LabelFor(a => a.LastName)</div>
            <div class="col-lg-10">@Html.TextBoxFor(a => a.LastName, new { @class = "form-control" })</div>
        </div><br />
        <div class="row">
            <div class="col-lg-2">@Html.LabelFor(a => a.Email)</div>
            <div class="col-lg-10">@Html.TextBoxFor(a => a.Email, new { @class = "form-control" })</div>
        </div><br />
        <div class="row">
            <div class="col-lg-2">@Html.LabelFor(a => a.Password)</div>
            <div class="col-lg-10">@Html.TextBoxFor(a => a.Password, new { @class = "form-control", type = "Password" })</div>
        </div><br />
        <input type="submit" value="Register" class="btn btn-primary" />
    }

</div>
In _layout.cshtml, Add the below code with Bootstrap 3 classes, to display navigation bar
<div class="navbar navbar-inverse navbar-fixed-top">
        <div class="container">
            <div class="navbar-header">
                <button type="button" class="navbar-toggle" data-toggle="collapse" data-target=".navbar-collapse">
                    <span class="icon-bar"></span>
                    <span class="icon-bar"></span>
                    <span class="icon-bar"></span>
                </button>
                @Html.ActionLink("Application name", "Index", "Home", new { area = "" }, new { @class = "navbar-brand" })
            </div>
            <div class="navbar-collapse collapse">
                <ul class="nav navbar-nav">
                    <li>

                        @if (Request.IsAuthenticated)
                        {

                           @Html.ActionLink("Log Out", "Logout", "Account")
                        }
                        else
                        {

                            @Html.ActionLink("Login", "Login", "Account")
                        }
                    </li>
                   <li>
                      @if (!Request.IsAuthenticated)
                      {
                          @Html.ActionLink("Register", "Register", "Account")
                      }

                   </li>
                </ul>
            </div>
        </div>
    </div>
In the above code, we are showing, Login/Register links if user is not authenticated or logged in else show Logout button.
Here is the full _Layout.cshtml code
<!DOCTYPE html>
<html>
<head>
<meta charset="utf-8" />
<meta name="viewport" content="width=device-width, initial-scale=1.0">
<title>@ViewBag.Title - My ASP.NET Application</title>
<link href="~/Content/Site.css" rel="stylesheet" type="text/css" />
<link href="~/Content/bootstrap.min.css" rel="stylesheet" type="text/css" />
<script src="~/Scripts/modernizr-2.6.2.js"></script>
</head>
<body>
<div class="navbar navbar-inverse navbar-fixed-top">
<div class="container">
<div class="navbar-header">
<button type="button" class="navbar-toggle" data-toggle="collapse" data-target=".navbar-collapse">
<span class="icon-bar"></span>
<span class="icon-bar"></span>
<span class="icon-bar"></span>
</button>
@Html.ActionLink("Application name", "Index", "Home", new { area = "" }, new { @class = "navbar-brand" })
</div>
<div class="navbar-collapse collapse">
<ul class="nav navbar-nav">
<li>
@if (Request.IsAuthenticated)
{
@Html.ActionLink("Log Out", "Logout", "Account")
}
else
{
@Html.ActionLink("Login", "Login", "Account")
}
</li>
<li>
@if (!Request.IsAuthenticated)
{
@Html.ActionLink("Register", "Register", "Account")
}
</li>
</ul>
</div>
</div>
</div>
<div class="container body-content">
@RenderBody()
<hr />
<footer>
<p>© @DateTime.Now.Year - My ASP.NET Application</p>
</footer>
</div>
<script src="~/Scripts/jquery-1.10.2.min.js"></script>
<script src="~/Scripts/bootstrap.min.js"></script>
</body>
</html>One last step, change Default Route in your Route.Config to Point Account Controller instead of Home Controller.
public class RouteConfig
    {
        public static void RegisterRoutes(RouteCollection routes)
        {
            routes.IgnoreRoute("{resource}.axd/{*pathInfo}");

            routes.MapRoute(
                name: "Default",
                url: "{controller}/{action}/{id}",
                defaults: new { controller = "Account", action = "Index", id = UrlParameter.Optional }
            );
        }
    }
That's it, we are done, build your Project and run it in browser.
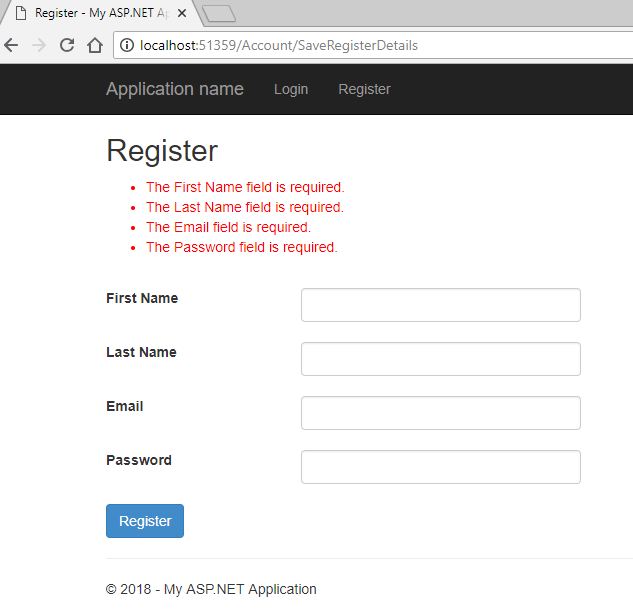
Here is the sample image of output
After entering No details in registration page
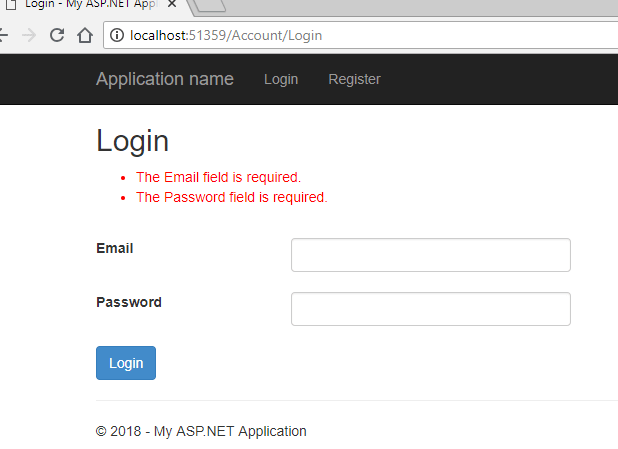
After entering no details in Login page
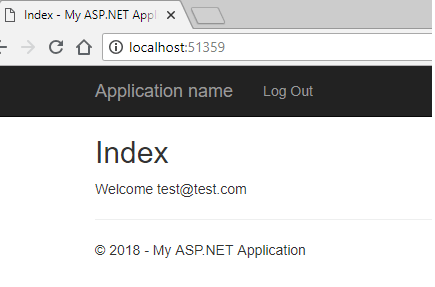
After Login
Complete example using Gif Image.
That's it, if you want you can also download sample MVC Login registation application code from Google Drive.
You maye also like:
 Buy us a coffee
 Become a Patron

vikas_jk
That's correct one should always Encrypt password, Writer has already mentioned the link for encryption.
As far as this post is concerned, encryption is another good topic and as this is for beginners, it is better to learn step by step, all the things, as I understand, to make article more easy to understand, encryption/decryption step of password is not included, as this is another good topic in itself.