
Previously I had provided a sample article about Form Submit in ASP.NET MVC using HTML.BeginForm, but if you are working in ASP.NET MVC and need to validate the form on the server-side other than client-side form validation using Javascript, then you have landed on the right place, as we can do this using data annotation in C# or you can say using ASP.NET MVC data annotation.
There is possible to validate the form using various jQuery plugins or custom jQuery/Javascript, but it is always essential to validate Model(form data) on the server-side as anyone disrupts/bypass client-side validation, so always make sure to implement server-side validations.
To make server-side validations possible in ASP.NET MVC we use Data Annotation while creating a Model, which help us in verifying if data input by user is correct and as per what we need.
What is Data Annotation in C#?
In ASP.NET MVC application we can do the Server Side Validation on the Model using Data Annotations.
Data Annotations is a namespace, providing attribute classes, which are used to define metadata for controls. Data Annotations allow us to describe the rules we want to be applied to our model properties, and ASP.NET MVC will take care of enforcing them and displaying appropriate messages to our users.
MVC Provides a large number of Data Annotations class. Some important ones are:
- [Required] – Indicates that the property is a required field
- [DisplayName] – Defines the text we want to be used on form fields and validation messages
- [StringLength] – Defines a maximum length for a string field
- [Range(int minimum, int maximum)]– Gives a maximum and minimum value for a numeric field
- [Bind] – Lists fields to exclude or include when binding parameter or form values to model properties
- [ScaffoldColumn] – Allows hiding fields from editor forms
- [RegularExpression(string pattern)] - Data field value must match the specified regular expression pattern.
- [EmailAddress] - The value must be an email address.
- [Phone] - The value must be phone number.
Validating form using Data Annotation in ASP.NET MVC
Let's create a simple form with basic details, to check how can we implement server-side validation in ASP.NET MVC using Data annotation.
Step 1: Create a MVC project in your Visual Studio, by navigating to File -> New -> Project (Select 'Web' from left pane & Select 'ASP.NET web application' from right pane)
Enter the name of your project(DataAnnotationMVC) and click "Ok"
Now select MVC template to generate default layout.
Step 2: Create Model with properties which we need to save in database(we will not consider saving details in the database in this article, just validating the Model)
Let's create a Student.cs Model by right-clicking on Models folders and add a new class.
using System;

namespace DataAnnotationMVC.Models
{
    public class Student
    {
        public string Name { get; set; }

        public int Age { get; set; }

        public string Email { get; set; }

        public DateTime Birthdate { get; set; }
    }
}
now in the above Model, we have just created the Model with properties, let's add some Data Annotation attributes(few of the above mentioned) to validate all the fields.
I will describe each field data annotation now.
Name: A required field, just provide Required attribute to it.
[Required]
public string Name { get; set; }
Age: Age field is also required, but we also need to impose range field as Age must be greater than 20 while it should be above 10
  [Required]
  [Range(10, 20, ErrorMessage = "Age must be from 10 to 20 years")]
  public int Age { get; set; }
Email: Making this field also as Required, but we will more data annotation in it, like Display(Name="Email address") which is used to display the label text in Razor form, another data annotation will be EmailAddress attribute with error message described
 [Display(Name = "Email address")]
 [Required(ErrorMessage = "The email address is required")]
 [EmailAddress(ErrorMessage = "Invalid Email Address")]
 public string Email { get; set; }
BirthDate: Must be a data and between 01-25-1998 & 01-25-2008. So, for this field, I have provided 2 attributes –
a. DataType for specifying it to be of date time.
[DataType(DataType.Date)]b. A custom attribute through which I do the manual server-side validation.
[ValidateBirthDate(ErrorMessage = "DOB Should be between 01-01-1998 & 01-01-2008")]Now before we proceed, let's create the Custom Validation
Creating Custom Validation in MVC
We can easily create custom validation data annotation in MVC by deriving ValidationAttribute class and then overriding IsValid method which returns ValidationResult for this example.
So, right-click on your projects Model Folder, create a new class, Name it "ValidateBirthDate"
using System;
using System.ComponentModel.DataAnnotations;

namespace DataAnnotationMVC.Models
{
    public  class ValidateBirthDate : ValidationAttribute
    {
        protected override ValidationResult IsValid(object value, ValidationContext validationContext)
        {
            DateTime _birthDate = Convert.ToDateTime(value);
            DateTime minDate = Convert.ToDateTime("01-01-1998");
            DateTime maxDate = Convert.ToDateTime("01-01-2008");

            if (_birthDate > minDate && _birthDate < maxDate)
                return ValidationResult.Success;
            else
                return new ValidationResult(ErrorMessage);
        }
    }
}
So, your complete Model with data annotation will look like below
using System;
using System.ComponentModel.DataAnnotations;

namespace DataAnnotationMVC.Models
{
    public class Student
    {
        [Required]
        public string Name { get; set; }

        [Required]
        [Range(10, 20, ErrorMessage = "Age must be from 10 to 20 years")]
        public int Age { get; set; }

        [Display(Name = "Email address")]
        [Required(ErrorMessage = "The email address is required")]
        [EmailAddress(ErrorMessage = "Invalid Email Address")]
        public string Email { get; set; }

        [DataType(DataType.Date)]
        [ValidateBirthDate(ErrorMessage = "DOB Should be between 01-01-1998 & 01-01-2008")]
        public DateTime Birthdate { get; set; }
    }
}
Now, we have created the Model and added all the validation, with one Custom Attribute also, let's use them in our Form now.
Step 3: Create a ActionMethod which returns Create's Student and another to validate and save Form data in the database or return the Create View with validation errors.
So navigate to HomeController.cs inside Controller folder and create the two ActionMethod as described above
//Get Student Create page
        public ActionResult Create()
        {
            return View();
        }

        //Post values of Student form
        [HttpPost]
        public ActionResult Create(Student student)
        {
            //check if Model value are valid and as required
            if (ModelState.IsValid)
            {
                //Yes Valid Model, Save values in database or do something
            }
            else
            {
                //if model is not valid return view
                return View();
            }
            return RedirectToAction("Create");
        }
Step 4: Add the Create View, right-click inside Create ActionMethod and select "Add View", now you need to add the proper Razor HTML to add fill form data and show Validation error message where required.
For showing validation of each method, we will use HTML helper @Html.ValidationMessageFor(), we can also show all form errors at once using @Html.ValidationSummary()
So, here is the Razor code for adding data in input field's which shows error message below the text box
@model DataAnnotationMVC.Models.Student
@{
    ViewBag.Title = "Create";
}

<h2>Create</h2>

@using (Html.BeginForm())
{

    <div class="row">
        <div class="col-lg-2">
            @Html.LabelFor(a => a.Name)
        </div>
        <div class="col-lg-10">
            @Html.TextBoxFor(a => a.Name)
            <div>@Html.ValidationMessageFor(a => a.Name)</div>
        </div>
    </div>
    <br />
    <div class="row">
        <div class="col-lg-2">
            @Html.LabelFor(a => a.Age)
        </div>
        <div class="col-lg-10">
            @Html.TextBoxFor(a => a.Age)
            <div> @Html.ValidationMessageFor(a => a.Age)</div>

        </div>
    </div>
    <br />
    <div class="row">
        <div class="col-lg-2">
            @Html.LabelFor(a => a.Email)
        </div>
        <div class="col-lg-10">
            @Html.TextBoxFor(a => a.Email)
            <div>@Html.ValidationMessageFor(a => a.Email)</div>

        </div>
    </div>
    <br />

    <div class="row">
        <div class="col-lg-2">
            @Html.LabelFor(a => a.Birthdate)
        </div>
        <div class="col-lg-10">
            @Html.TextBoxFor(a => a.Birthdate)
            <div> @Html.ValidationMessageFor(a => a.Birthdate)</div>

        </div>
    </div>
    <br />
    <div class="row">

        <div class="col-lg-offset-2">
            <input type="submit" id="Submit" value="Submit" class="btn btn-primary" />
        </div>
    </div>
}
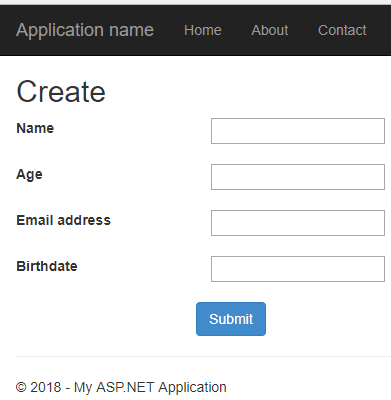
Step 5: Build your project and navigate to "http://localhost:50656/Home/Create" page to create Student and check Validation's, the output will be as below
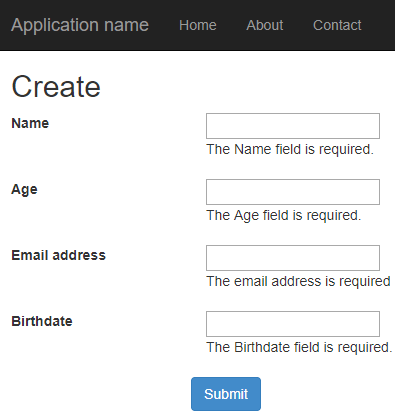
When I tried to submit form without adding any data
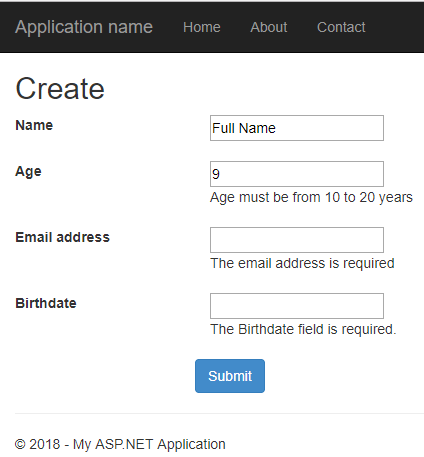
Now, When I tried to add some data and some with wrong details
Here is the Gif image which shows different errors.
I haven't added correct email, just to hide my email in gif(not a good gif editor), but you can test it on your own, it should work.
Feel free to add comment below or ask questions related this article in questions section by linking it.
You may also like to read:
Model Validation in ASP.NET Core MVC (With Custom validation example)
Creating Google charts in ASP.NET Core MVC
Best .NET APM tools to consider for your .NET application
Read OR Generate QR Code in ASP.NET Core
Export to Excel C# GridView in ASP.NET Web-Form
HTML to PDF using iTextSharp OR Rotativa in MVC C# (Examples)
 Buy us a coffee
 Become a Patron