In one of our previous posts, we have provided a complete source code with example for login and registration form in html with bootstrap and another example to create HTML form (login or registration) but without providing any form validation, so in this article, I am providing sample code for form validation in javascript as it is better to validate user data before submitting to server for processing. If you want to check just email validation, you can check Email validation using Javascript.
Table of Contents
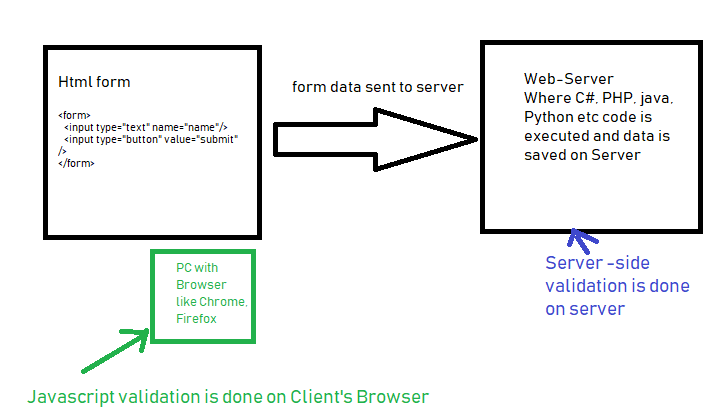
When you collect data from user using HTML form, you would like to validate if user has correctly filled all required form fields like First Name, Last Name, email etc or not, so in that case we use validation, which can be done on client-side (using jquery, javascript etc) or server-side (using C#, PHP, Java etc).
But it is always better to use Client-side validation, so you don't need to post-back the form with error to users, as client-side validations can be done without re-loading the page on user's browser, while Server side validations are done on server (after user submits form and data it sent to server, which consumes more time, as user has to wait until data is processes on server).
Simple form validation using JS
Let's create a basic HTML form, so we can validate it's input using Javascript
First, we will take simple example to validate on only input type text field, so here is the form code
<form name="SimpleForm" onsubmit="return validateForm()">
    <input type="text" name="firstname" id="firstname" />
    <input type="text" name="lastname" id="lastname">
     <input type="submit" value="Submit">
</form>
So, as you can see in above html code, we have two simple input field of text type, add a submit button.
As you can see we are calling "validateForm" function onsubmit of form, so here is the Javascript code to validate both of these fields
function validateForm()
{
 // get value using Id
   var firtsname =document.getElementById("firstname").value;
   var lastname =document.getElementById("lastname").value;

   if(!firtsname )
   {
     alert("Enter First name");
     // return false will not allow to submit form to server
      return false;
   }
   else if (!lastname)
   {
       alert("Enter last name");
       return false;
   }
}
We are using "return false;" when there is any empty field (First name or Last name), so that it prevents user from submitting form.
Here is the fiddle demo:
Validating Checkbox in Forms using Javascript
Now, we another field of type "checkbox", so we can validate if anyone of the checkbox is selected by user or not.
Let's add two new checkbox fields in the form,
<form name="SimpleForm" onsubmit="return validateForm()">
    <input type="text" name="firstname" id="firstname" />
    <input type="text" name="lastname" id="lastname" /><br/>

     <!--two checkboxes added-->
    <input type="checkbox" name="gender" value="Male"> Male <br/>
    <input type="checkbox" name="gender" value="Female"> Female <br/>


    <input type="submit" value="Submit">
</form>
so javascript code to validate checkbox from above form will be
 if(document.SimpleForm.gender[0].checked==false && document.SimpleForm.gender[1].checked==false)
    {
        alert('Select your gender');
        return false;
    }
If you will see in above javascript code, "document" = complete HTML document, "SimpleForm" is the name of the form, using "document.SimpleForm" you can refer to form in Javascript.
gender[0].checked refers to checkbox name "gender" and as there are two checkboxes in form so [0] refer to first element of checkbox.
So, document.SimpleForm.gender[0].checked gives you "false" when "Male" checkbox is not selected, similarly, document.SimpleForm.gender[1].checked gives you "false" when "Female" checkbox is not selected.
If both checkbox returns are false, then we cannot submit form,so we are showing "alert" message to user to select gender.
So, complete Javascript code including above validation will be
function validateForm()
{
 // get value using Id
   var firtsname =document.getElementById("firstname").value;
   var lastname =document.getElementById("lastname").value;

   if(!firtsname )
   {
     alert("Enter First name");
     // return false will not allow to submit form to server
      return false;
   }
   else if (!lastname)
   {
       alert("Enter last name");
       return false;
   }

   //checkbox validation starts here
    if(document.SimpleForm.gender[0].checked==false && document.SimpleForm.gender[1].checked==false)
    {
        alert('Select your gender');
        return false;
    }
}
Fiddle sample
Validating dropdown using Javascript
Now, we will add some more code in above form to validate dropdown using Javascript.
So, adding dropdown code in our HTML form, it will look like below
<form name="SimpleForm" onsubmit="return validateForm()">
    <input type="text" name="firstname" id="firstname" />
    <input type="text" name="lastname" id="lastname" /><br/>

     <!--two checkboxes added-->
    <input type="checkbox" name="gender" value="Male"> Male <br/>
    <input type="checkbox" name="gender" value="Female"> Female <br/>

    <!--dropdown added-->
    <select name="YourAge">
     <option value="">Select your age range:</option>
     <option value="0-18 years">0-18 years</option>
     <option value="18-25 years">18-25 years</option>
     <option value="26-45 years">26-45 years</option>
     <option value="46-60 years">46-60 years</option>
     <option value="60+ years">60+ years</option>
    </select>

    <input type="submit" value="Submit">
</form>
then to validate newly added dropdown, we will check it's selectedIndex
       if (document.SimpleForm.YourAge.selectedIndex == 0)
        {
             alert("Please select your age range.");
             return false;
        }
as you can see in the above code, we are selecting dropdown in same way, like we did in checkbox, getting form name(.SimpleForm) and then name of dropdown (.YourAge) and checking if selectedIndex = 0.
Here is the complete fiddle for final form with validations
ok that sums up, hope the examples helps you in validating HTML form using Javascript without using any external plugins.
You may also like to read:

