
In this article, I will explain different ways to export HTML to PDF in asp.net MVC C# using Rotativa and iTextSharp, step by step with an example.
Export HTML to PDF using Rotativa in MVC
Let's start with Rotativa to export HTML to pdf in MVC.Rotativa makes it very easy to generate pdf from an HTML. It is actually derived a version of wkhtmltopdf which converts HTML to pdf.
Step 1: Create a project in your Visual Studio(2017 in my example), by opening Visual Studio and clicking "File"-> "New"-> "Project".
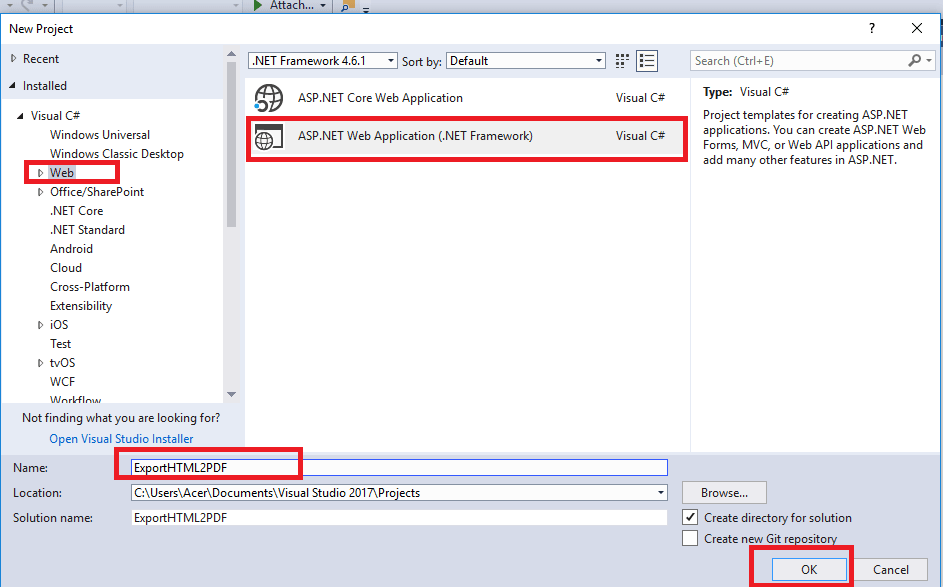
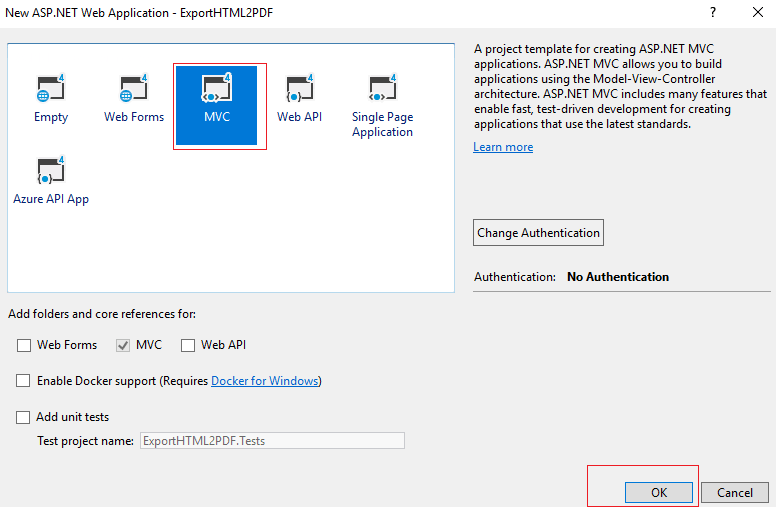
Select MVC template to generate basic HomeController and other details.
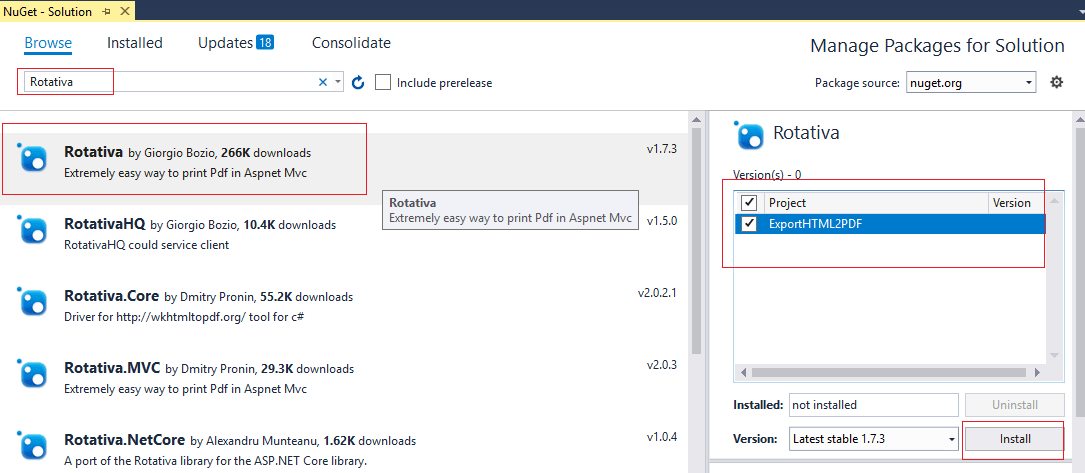
Step 2: Now you have generated basic MVC file template, now Right-click on your project(In Solution Explorer pane) -->Manage Nuget packages-->In "Nuget package manager window" select the "Browse" tab, then search for "Rotativa", Select and click install.
we can find the rotativa reference under the reference, with a separate folder named ‘Rotativa’ with the following contents.
Another folder named App_Browsers which has the contents required by the package Rotativa.
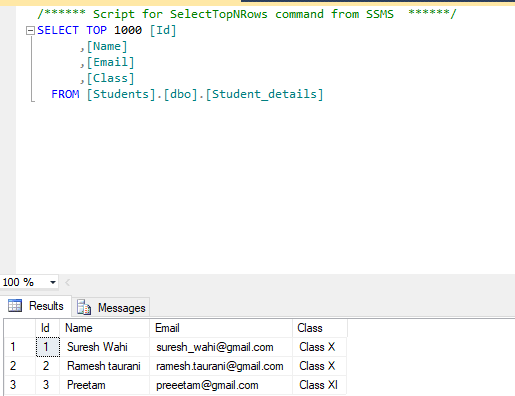
Step 3: Now we need to connect our project with database, so get your database from SQL server and connect it with your MVC project, here I am using my local database "Students", with table "Student_details" here is the snapshot of database, with its current dummy data
You can create database with dummy database with Demo table and Data using the below scripts (using SQL server 2012 or above)
USE [master]
GO
/****** Object: Database [Students] Script Date: 1/28/2018 3:36:00 PM ******/
CREATE DATABASE [Students]
CONTAINMENT = NONE
ON PRIMARY
( NAME = N'Students', FILENAME = N'C:\Program Files\Microsoft SQL Server\MSSQL11.SQLEXPRESS2\MSSQL\DATA\Students.mdf' , SIZE = 3072KB , MAXSIZE = UNLIMITED, FILEGROWTH = 1024KB )
LOG ON
( NAME = N'Students_log', FILENAME = N'C:\Program Files\Microsoft SQL Server\MSSQL11.SQLEXPRESS2\MSSQL\DATA\Students_log.ldf' , SIZE = 1024KB , MAXSIZE = 2048GB , FILEGROWTH = 10%)
GO
ALTER DATABASE [Students] SET COMPATIBILITY_LEVEL = 110
GO
IF (1 = FULLTEXTSERVICEPROPERTY('IsFullTextInstalled'))
begin
EXEC [Students].[dbo].[sp_fulltext_database] @action = 'enable'
end
GO
ALTER DATABASE [Students] SET ANSI_NULL_DEFAULT OFF
GO
ALTER DATABASE [Students] SET ANSI_NULLS OFF
GO
ALTER DATABASE [Students] SET ANSI_PADDING OFF
GO
ALTER DATABASE [Students] SET ANSI_WARNINGS OFF
GO
ALTER DATABASE [Students] SET ARITHABORT OFF
GO
ALTER DATABASE [Students] SET AUTO_CLOSE OFF
GO
ALTER DATABASE [Students] SET AUTO_CREATE_STATISTICS ON
GO
ALTER DATABASE [Students] SET AUTO_SHRINK OFF
GO
ALTER DATABASE [Students] SET AUTO_UPDATE_STATISTICS ON
GO
ALTER DATABASE [Students] SET CURSOR_CLOSE_ON_COMMIT OFF
GO
ALTER DATABASE [Students] SET CURSOR_DEFAULT GLOBAL
GO
ALTER DATABASE [Students] SET CONCAT_NULL_YIELDS_NULL OFF
GO
ALTER DATABASE [Students] SET NUMERIC_ROUNDABORT OFF
GO
ALTER DATABASE [Students] SET QUOTED_IDENTIFIER OFF
GO
ALTER DATABASE [Students] SET RECURSIVE_TRIGGERS OFF
GO
ALTER DATABASE [Students] SET DISABLE_BROKER
GO
ALTER DATABASE [Students] SET AUTO_UPDATE_STATISTICS_ASYNC OFF
GO
ALTER DATABASE [Students] SET DATE_CORRELATION_OPTIMIZATION OFF
GO
ALTER DATABASE [Students] SET TRUSTWORTHY OFF
GO
ALTER DATABASE [Students] SET ALLOW_SNAPSHOT_ISOLATION OFF
GO
ALTER DATABASE [Students] SET PARAMETERIZATION SIMPLE
GO
ALTER DATABASE [Students] SET READ_COMMITTED_SNAPSHOT OFF
GO
ALTER DATABASE [Students] SET HONOR_BROKER_PRIORITY OFF
GO
ALTER DATABASE [Students] SET RECOVERY SIMPLE
GO
ALTER DATABASE [Students] SET MULTI_USER
GO
ALTER DATABASE [Students] SET PAGE_VERIFY CHECKSUM
GO
ALTER DATABASE [Students] SET DB_CHAINING OFF
GO
ALTER DATABASE [Students] SET FILESTREAM( NON_TRANSACTED_ACCESS = OFF )
GO
ALTER DATABASE [Students] SET TARGET_RECOVERY_TIME = 0 SECONDS
GO
USE [Students]
GO
/****** Object: Table [dbo].[Student_details] Script Date: 1/28/2018 3:36:01 PM ******/
SET ANSI_NULLS ON
GO
SET QUOTED_IDENTIFIER ON
GO
SET ANSI_PADDING ON
GO
CREATE TABLE [dbo].[Student_details](
[Id] [int] IDENTITY(1,1) NOT NULL,
[Name] [varchar](50) NULL,
[Email] [varchar](50) NULL,
[Class] [varchar](50) NULL,
CONSTRAINT [PK_Student_details] PRIMARY KEY CLUSTERED
(
[Id] ASC
)WITH (PAD_INDEX = OFF, STATISTICS_NORECOMPUTE = OFF, IGNORE_DUP_KEY = OFF, ALLOW_ROW_LOCKS = ON, ALLOW_PAGE_LOCKS = ON) ON [PRIMARY]
) ON [PRIMARY]
GO
SET ANSI_PADDING OFF
GO
SET IDENTITY_INSERT [dbo].[Student_details] ON
INSERT [dbo].[Student_details] ([Id], [Name], [Email], [Class]) VALUES (1, N'Suresh Wahi', N'suresh_wahi@gmail.com', N'Class X')
INSERT [dbo].[Student_details] ([Id], [Name], [Email], [Class]) VALUES (2, N'Ramesh taurani', N'ramesh.taurani@gmail.com', N'Class X')
INSERT [dbo].[Student_details] ([Id], [Name], [Email], [Class]) VALUES (3, N'Preetam', N'preeetam@gmail.com', N'Class XI')
SET IDENTITY_INSERT [dbo].[Student_details] OFF
USE [master]
GO
ALTER DATABASE [Students] SET READ_WRITE
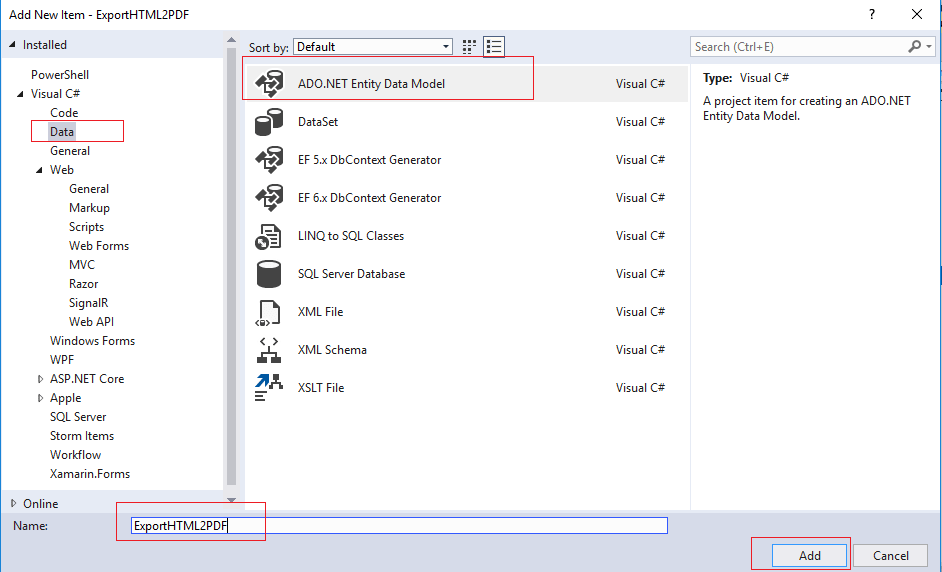
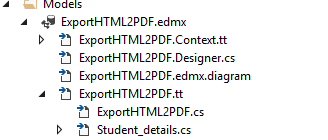
GOStep 4: Now create Entity framework(ADO.NET) file to connect the project with the database, you would have to add Entity Data Model to your project by right-clicking the "Model" folder in your Solution Explorer and then click on Add and then New Item option of the Context Menu.
From the Add New Item window, select ADO.NET Entity Data Model and set its Name as "ExportHTML2PDF" and then click Add.
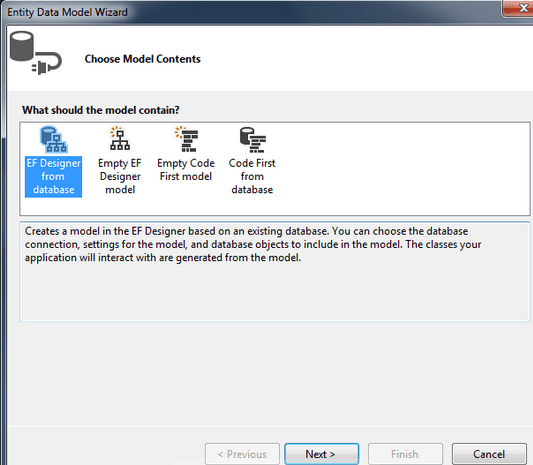
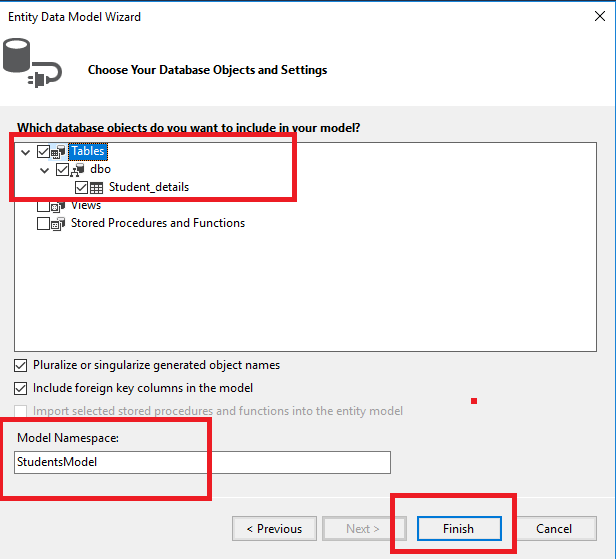
Then the Entity Data Model Wizard will open up where you need to select EF Designer database option.
 public ActionResult Index()
        {
            var studList = GetList();
            return View(studList);
        }
here I have created a separate method to get Student list data, here is
GetList Method
private List<Student_details> GetList()
        {
            List<Student_details> stuDet = new List<Student_details>();
            using (var context = new StudentsEntities())
            {
                stuDet = context.Student_details.ToList();
            }
            return stuDet;
        }
Now, To render data in your view, paste the code below in Index View
@model IEnumerable<ExportHTML2PDF.Models.Student_details>
@{
ViewBag.Title = "Home Page";
}
<br/>
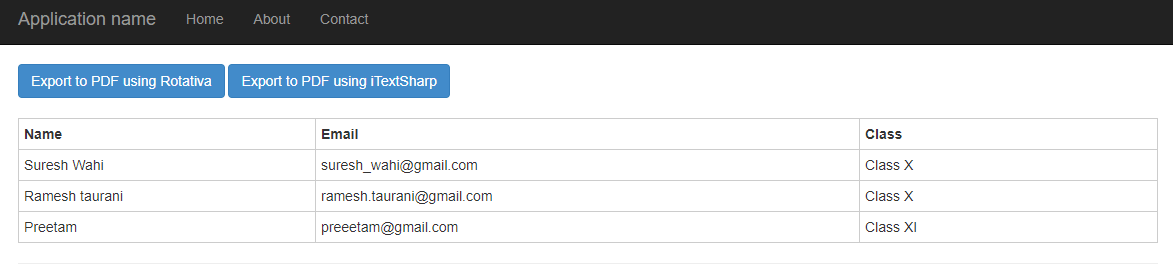
<a href="/Home/PDFUsingRotativa" class="btn btn-primary">Export to PDF using Rotativa</a>
<br />
<br />
<table class="table table-condensed">
<thead>
<tr>
<th style="border: 1px solid #ccc">Name</th>
<th style="border: 1px solid #ccc">Email</th>
<th style="border: 1px solid #ccc">Class</th>
</tr>
</thead>
<tbody>
@foreach (var stud in Model)
{
<tr>
<td style="width:100px;border: 1px solid #ccc">@stud.Name</td>
<td style="width:100px;border: 1px solid #ccc">@stud.Email</td>
<td style="width:100px;border: 1px solid #ccc">@stud.Class</td>
</tr>
}
</tbody>
</table>
Step 6: Create C# code to get required data from database and show it as PDF file to user(note: we have already installed Rotative, which we will be using in this process to convert HTML to PDF)
public ActionResult PDFUsingRotativa()
        {
            var studList = GetList(); //Get Student List

            string header = Server.MapPath("~/Staticpage/Header.html");//Path of Header.html File
            string footer = Server.MapPath("~/Staticpage/Footer.html");//Path of Footer.html File

            string customSwitches = string.Format("--header-html  \"{0}\" " +
                                   "--header-spacing \"0\" " +
                                   "--footer-html \"{1}\" " +
                                   "--footer-spacing \"10\" " +
                                   "--page-offset 0 --footer-center [page] --footer-font-size 8 " + //get paging in center of footer
                                   "--header-font-size \"10\" ", header, footer);

           //Show View as PDF
            return new Rotativa.ViewAsPdf("PDFUsingRotativa", studList) {

                CustomSwitches= customSwitches

            };

        }
We will be using Rotativa ViewAsPDF method, so let's create a separate View for it, with custom Header.html/Footer.html
@model IEnumerable<ExportHTML2PDF.Models.Student_details>
@{
    Layout = null;
}

<html>
<head>
    <title>PDF using Rotativa</title>
    <style>
        .table {
            border: 1px solid #ccc;
            float:left;
            font-size: 16px;
            background-color:cornsilk;

        }
    </style>

    </head>
<body>

<table cellpadding="5" cellspacing="0" class="table">
    <thead>
        <tr>
            <th style="border: 1px solid #ccc">Name</th>
            <th style="border: 1px solid #ccc">Email</th>
            <th style="border: 1px solid #ccc">Class</th>
        </tr>
    </thead>
    <tbody>
        @foreach (var stud in Model)
        {
            <tr>
                <td  style="width:100px;border: 1px solid #ccc">@stud.Name</td>
                <td  style="width:100px;border: 1px solid #ccc">@stud.Email</td>
                <td  style="width:100px;border: 1px solid #ccc">@stud.Class</td>
            </tr>
        }
    </tbody>
</table>


    </body>
</html>
Separate Header/Footer code which i have written is here
Header.html
<!DOCTYPE html>
<html>
<head>
    <script>
function subst() {
    var vars={};
    var x=document.location.search.substring(1).split('&');
    for(var i in x) {var z=x[i].split('=',2);vars[z[0]] = unescape(z[1]);}
    var x=['frompage','topage','page','webpage','section','subsection','subsubsection'];
    for(var i in x) {
        var y = document.getElementsByClassName(x[i]);
        for(var j=0; j<y.length; ++j) y[j].textContent = vars[x[i]];
    }
}
    </script>
</head>
<body style="border: 0; margin: 0;" onload="subst()">

    <div style="width:100%;float:left">
        <div style="width:33%;float:left">
            PDF using Rotativa
        </div>
        <div style="width:33%; text-align:center;float:left">
            DATE :- 3/2/2018
        </div>
        <div style="width:33%;text-align:right;float:left">
            Page <span class="page"></span>of <span class="topage"></span>
        </div>
    </div>
    <div style="clear:both"></div>

</body>
</html>
Footer.Html
<!DOCTYPE html>
<html>
<body>
<div style="text-align:left">
Footer Text
</div>
</body>
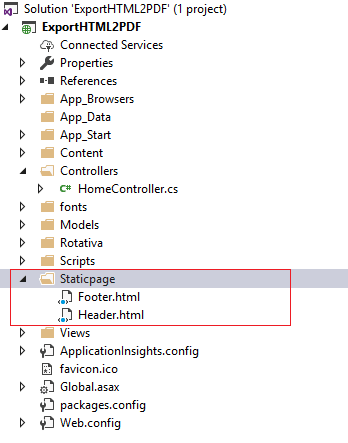
</html>Here is the complete different folder(Staticpage) image in which I have placed these files
Build your project and run it, you will get output as below.

Clicking to above "Export To PDF using Rotativa" button will give output as below
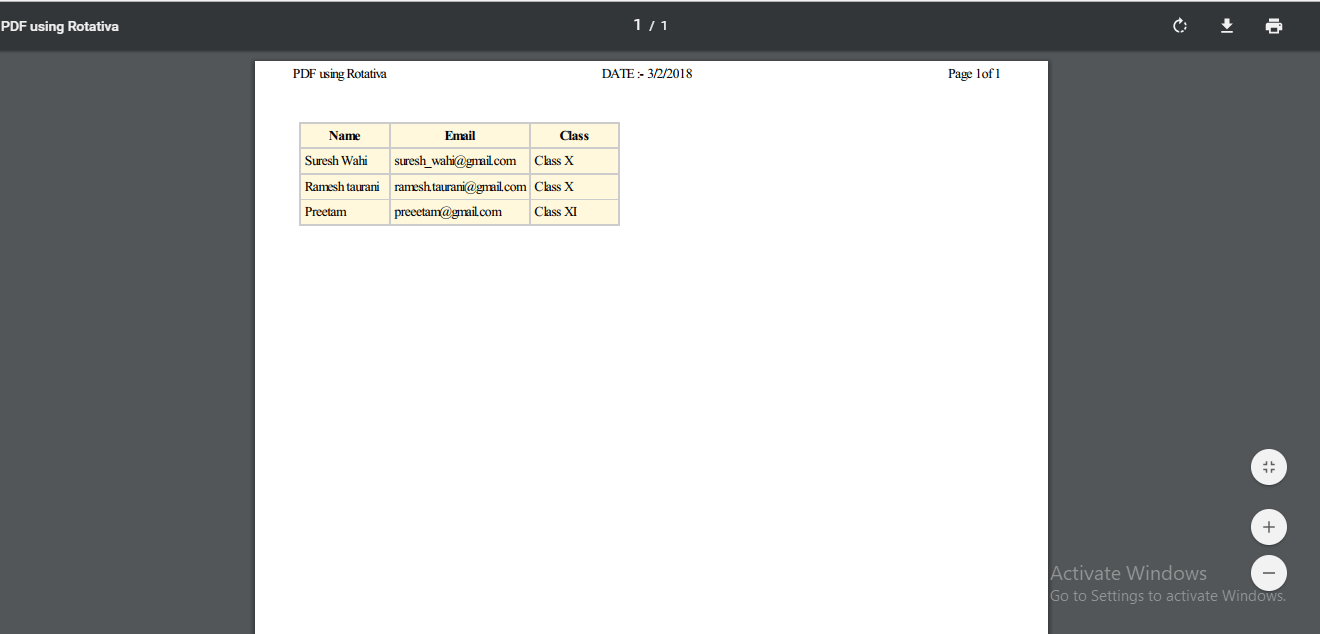
In the above PDF generated you can see, We have added header also in it.Footer is cropped, but you will see page number in center in it, something like this
![]()
For more information on setting header and footer, with it's options and details, please visit the URL –wkhtmltopdf.
ActionAsPdf - You can also use Rotativa ActionAsPDF method, it will take other action method to generate PDF using view
public ActionResult DownloadActionAsPDF()
{
  var model = new GeneratePDFModel();
  //Code to get content
  return new Rotativa.ActionAsPdf("GeneratePDF", model){FileName = "TestActionAsPdf.pdf"};
}
Here "GeneratePDF" is the name of other action which will return a view to generate PDF.
Note: Rotativa is Good but If we are using GoDaddy shared server then rotativa may not work there, Because it cant allow permission to third party exe file running, so in that case you can use iTextSharp, implementation is explained below.
Export HTML to PDF Using iTextSharp
Now let's try another widely used approach of using iTextSharp to export HTML to PDF.In this approach, we will be using same data and data source for generating output.
The process would be to convert View(which we need as PDF) as HTML string using C# code and then input this HTML string in iTextSharp and get the output as PDF using it.
static string RenderViewToString(ControllerContext context, string viewPath,object model = null,bool partial = false)
{
// first find the ViewEngine for this view
ViewEngineResult viewEngineResult = null;
if (partial)
viewEngineResult = ViewEngines.Engines.FindPartialView(context, viewPath);
else
viewEngineResult = ViewEngines.Engines.FindView(context, viewPath, null);
if (viewEngineResult == null)
throw new FileNotFoundException("View cannot be found.");
// get the view and attach the model to view data
var view = viewEngineResult.View;
context.Controller.ViewData.Model = model;
string result = null;
using (var sw = new StringWriter())
{
var ctx = new ViewContext(context, view,
context.Controller.ViewData,
context.Controller.TempData,
sw);
view.Render(ctx, sw);
result = sw.ToString();
}
return result;
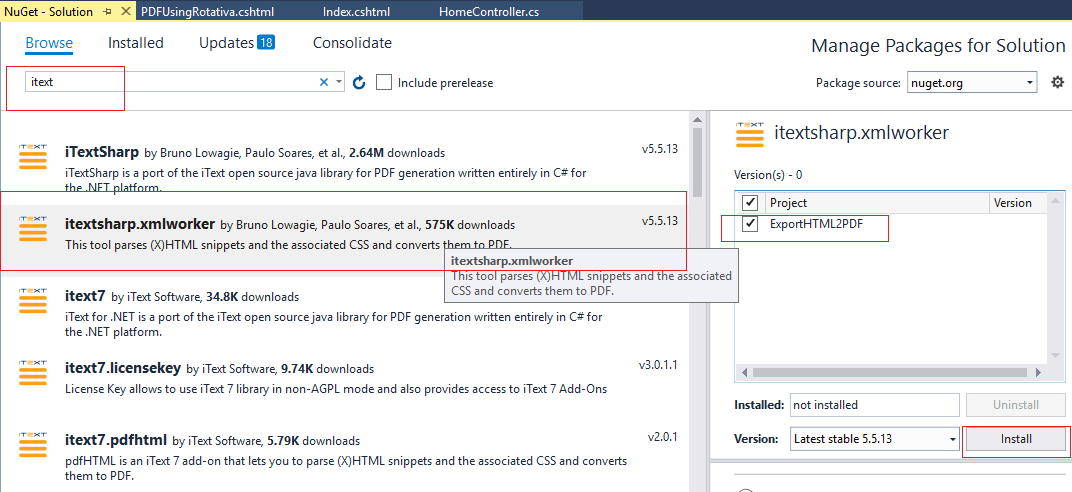
}Now before we proceed, Add "iTextSharp" in your project using Nuget package manager, Right-click on your project(In Solution Explorer pane) -->Manage Nuget packages-->In "Nuget package manager window" select the "Browse" tab, then search for "iTextSharp", Select "iTextSharp.xmlworker" and click install.
Now in your HomeController add ActionMethod to generate view to HTML string and then use iTextSharp to generate PDF
 public ActionResult PDFUsingiTextSharp()
        {
            var studList = GetList();
            var HTMLViewStr= RenderViewToString(ControllerContext,
            "~/Views/Home/PDFUsingiTextSharp.cshtml",
            studList);

            using (MemoryStream stream = new System.IO.MemoryStream())
            {
                StringReader sr = new StringReader(HTMLViewStr);
                Document pdfDoc = new Document(PageSize.A4, 10f, 10f, 100f, 0f);
                PdfWriter writer = PdfWriter.GetInstance(pdfDoc, stream);
                pdfDoc.Open();
                XMLWorkerHelper.GetInstance().ParseXHtml(writer, pdfDoc, sr);
                pdfDoc.Close();
                return File(stream.ToArray(), "application/pdf", "PDFUsingiTextSharp.pdf");
            }
        }
You will need to import the following namespaces
using System.IO;
using iTextSharp.text;
using iTextSharp.text.pdf;
using iTextSharp.tool.xml;
Now let's add the View which we need to convert into HTML string ('~/Views/Home/PDFUsingiTextSharp.cshtml')
@model IEnumerable<ExportHTML2PDF.Models.Student_details>
@{
    Layout = null;
}

<html>
<head>
    <title>PDF using iTextSharp</title>
    <style>
        .table {
            border: 1px solid #ccc;
            float: left;
            font-size: 16px;
            background-color: cornsilk;
            margin-top: 50px
        }
    </style>

</head>
<body>

    <table cellpadding="5" cellspacing="0" class="table">
        <thead>
            <tr>
                <th style="border: 1px solid #ccc">Name</th>
                <th style="border: 1px solid #ccc">Email</th>
                <th style="border: 1px solid #ccc">Class</th>
            </tr>
        </thead>
        <tbody>
            @foreach (var stud in Model)
            {
                <tr>
                    <td style="width:100px;border: 1px solid #ccc">@stud.Name</td>
                    <td style="width:100px;border: 1px solid #ccc">@stud.Email</td>
                    <td style="width:100px;border: 1px solid #ccc">@stud.Class</td>
                </tr>
            }
        </tbody>
    </table>


</body>
</html>
Now, in your Index.cshtml page add the new button to 'Export to PDF using iTextSharp'
<a href="/Home/PDFUsingiTextSharp" class="btn btn-primary">Export to PDF using iTextSharp</a>Build your project and run it in browser, you will get output as below
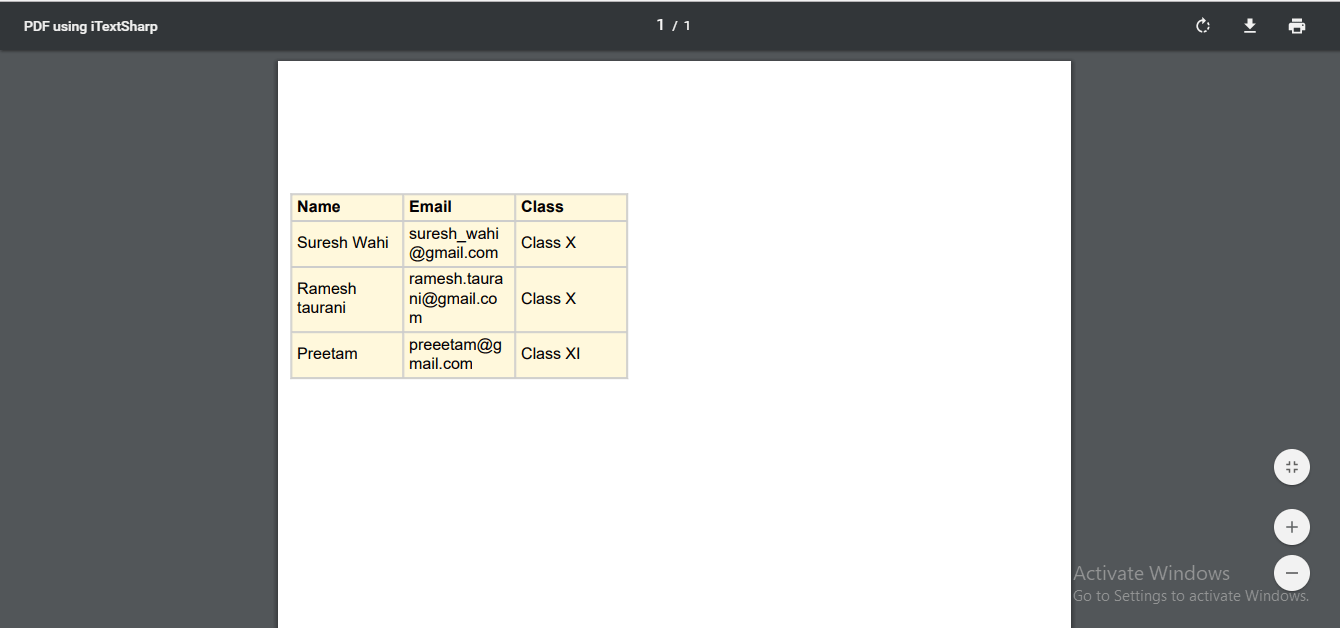
After Clicking on "Export to PDF using iTextSharp", it will generate PDF file using iTextSharp library and output will be as below
That's it feel free to ask any questions related to this post.
 Buy us a coffee
 Become a Patron