
When you submit a form in from View to Controller, we need to retrieve all the values of forms we can do it using FormCollection & Request.QueryString[] or we can directly use Model Binding and can just focus on values of users.
What is Model Binding in ASP.NET MVC?
Model binding is a powerful and customizable feature that eliminates the grind and toil of dealing with HTTP requests directly and lets us work with C# objects rather than dealing with Request.Form[] and Request.QueryString[] values.
So, basically, it maps the data from HTTP request to action method parameters. These parameters can be simple types such as string, integer or they may be the complex type.It is a great feature as it relieves the developer from writing all the type casting and “HTML-Model mapping code”. The Model binder is capable of retrieving the data from HTML form variables, POSTed variables and files, query string parameters and the values added in the routes.
Let's consider an example in which we need to send values from View to Controller without Model binding, and here is our Create ActionMetod
//Return Create View
public ActionResult Create()
{
return View();
}
// POST: Home/Create
[HttpPost]
[ValidateAntiForgeryToken]
public ActionResult Create(FormCollection collection)
{
try
{
// TODO: Logic for inserting data in database
return RedirectToAction("Index");
}
catch
{
return View();
}
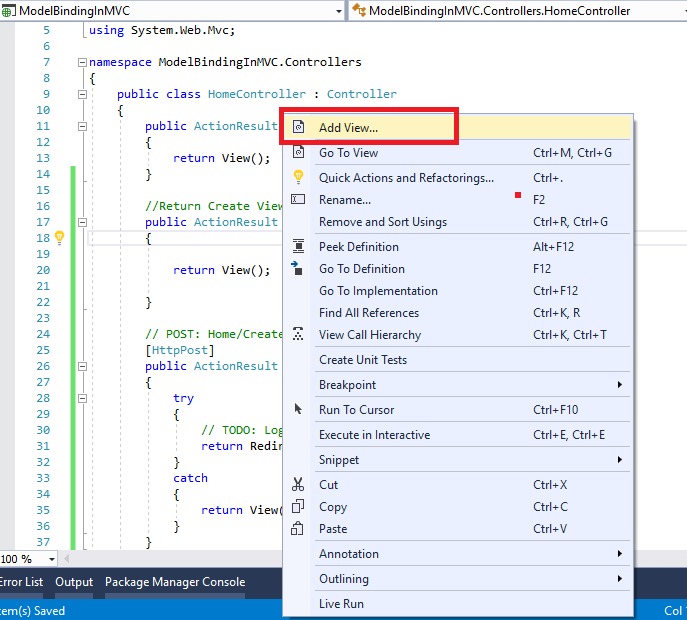
}Now add a View for this Create ActionMethod, by right-clicking inside view and use the code below
@model ModelBindingInMVC.Models.Student

@{
    ViewBag.Title = "Create";
}


@using (Html.BeginForm())
{
    @Html.AntiForgeryToken()
<div class="form-horizontal">
    <h4>Add Student</h4>

    @Html.ValidationSummary(true, "", new { @class = "text-danger" })

    <div class="form-group">
        @Html.LabelFor(model => model.Name,  new { @class = "control-label col-md-2" })

        <div class="col-md-10">
            @Html.TextBoxFor(model => model.Name, new{  @class = "form-control" })

            @Html.ValidationMessageFor(model => model.Name, "",
                         new { @class = "text-danger" })
        </div>
    </div>

    <div class="form-group">
        @Html.LabelFor(model => model.Class,new { @class = "control-label col-md-2" })

        <div class="col-md-10">
            @Html.TextBoxFor(model => model.Class, new { @class = "form-control" })

            @Html.ValidationMessageFor(model => model.Class, "",new { @class = "text-danger" })
        </div>
    </div>

    <div class="form-group">
        <div class="col-md-offset-2 col-md-10">
            <input type="submit" value="Create" class="btn btn-default" />
        </div>
    </div>

</div>
}
In the above code, as you can see we have Model of Student is also, so in your project's Model folder, let's create a Class Student.cs
public class Student
{
public string Name { get; set; }
public string Class { get; set; }
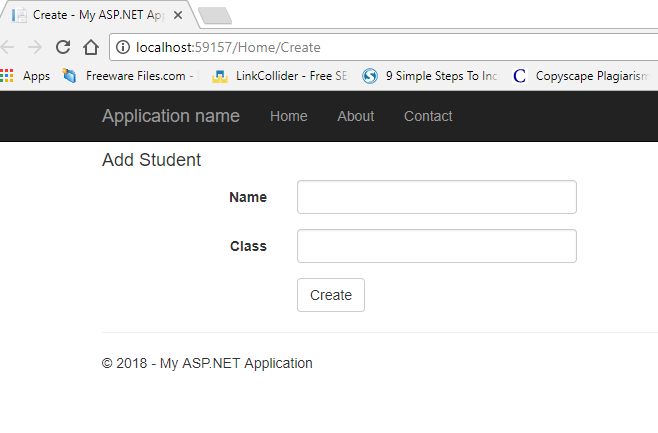
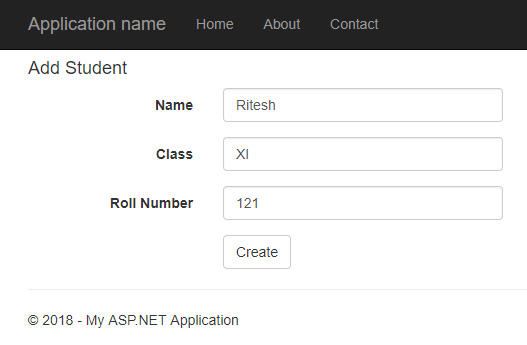
}Now, the above view in the browser will look like this
When the user enters values on Create View then it is available in FormCollection as well as Request.Form. We can use any of these values to populate the employee info from the view.
Let’s use the following code to create the Student using FormCollection, enter the details in Student Create View and then click "Create", in the controller to get data using FormCollection our code will be like below
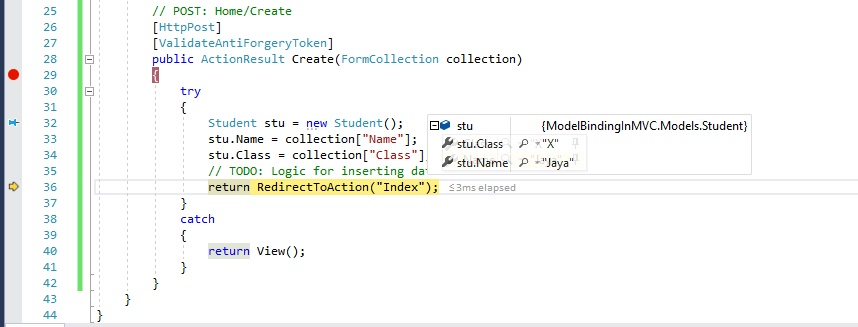
As you can see in the above we are getting all the posted values from the HTML view and then mapping these values to the Student properties and assigning them one by one.
In some cases, we will also be doing the type casting (not in the above image but as Collection only return string we may need to convert it into int or DateTime depending on model data) wherever the posted values are not of the same format as of the Model property.
This is also known as manual binding and this type of implementation might not be that bad for simple and small data model. However, if you have huge data models and need a lot of typecasting then we can utilize the power and ease-of-use of ASP.NET MVC Model binding.
Now, Let's change controller code to use Model binding & take its advantage.
[HttpPost]
[ValidateAntiForgeryToken]
public ActionResult Create(Student stu)
{
try
{
// TODO: Logic for inserting data in database
return RedirectToAction("Index");
}
catch
{
return View();
}
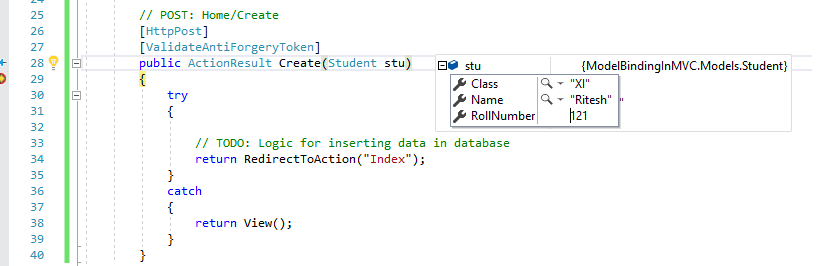
}Now, build and debug your project in browser, navigate to "http://localhost/Home/Create" , add the data again & click "Create" , you will see, the values of student are automatically attached with Fields, here is the screenshot
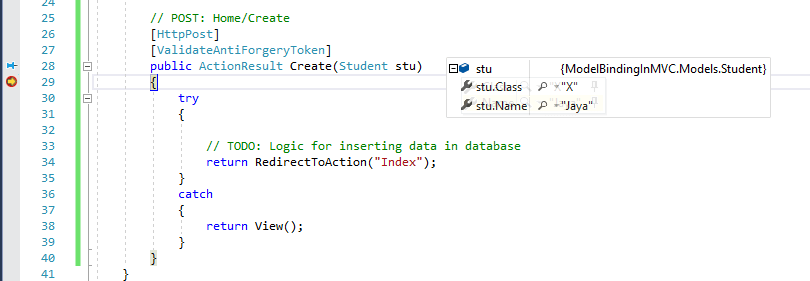
Now as you see in the above image values are automatically mapped with poperties of Student class, this is done with help of Default Model binding present in MVC.
The mapping of data is based on the HTML Property "name" by default. This is where we will find HTML helper methods very helpful because these helper methods will generate the HTML, which will have proper Names for the Model Binding to work.
So, to map the value with Student field "Class" we should have HTML like below in our form
<input class="form-control" id="Class" name="Class" type="text" />For which we can have razor code:
@Html.TextBoxFor(model => model.Class, new { @class = "form-control" })Model Binding Attributes
MVC contains several attributes that you can use to direct its default model binding behavior to a different source. For example, you can specify whether binding is required for a property, or if it should never happen at all by using the [BindRequired] or [BindNever] attributes. Alternatively, you can override the default data source, and specify the model binder's data source. Below is a list of model binding attributes:
- [BindRequired]: This attribute adds a model state error if binding cannot occur.
- [BindNever]: Tells the model binder to never bind to this parameter.
- [FromHeader], [FromQuery], [FromRoute], [FromForm]: Use these to specify the exact binding source you want to apply.
- [FromServices]: This attribute uses dependency injection to bind parameters from services.
- [FromBody]: Use the configured formatters to bind data from the request body. The formatter is selected based on content type of the request.
- [ModelBinder]: Used to override the default model binder, binding source and name.
Attributes are very helpful tools when you need to override the default behavior of model binding.
Custom Model Binder in MVC
There can be situtation in which you may need create your own Model binding, to handle and bind complex data, for that we can create a Model binding class by extending IModelBinder interface.
IModelBinder defines methods that are required for a Model Binder, like the BindModelAsync method. This method is responsible for binding a model to some values using ModelBindingContext.
Creating Custom Model Binder
We creating our custom model binder by implementing the IModelBinder interfaces. Let see how we will do that.
I have changed the Student Class, and adding one extra field of int type, i.e, RollNumber
public class Student
    {
        public string Name { get; set; }
        public string Class { get; set; }
        public int RollNumber { get; set; }
    }
So in the view, HTML code to get it's data will be
<div class="form-group">
        @Html.Label("Roll Number", new { @class = "control-label col-md-2" })

        <div class="col-md-10">
            @Html.TextBoxFor(model => model.RollNumber, new { @class = "form-control" })

            @Html.ValidationMessageFor(model => model.RollNumber, "", new { @class = "text-danger" })
        </div>
    </div>
Let's Create Custom Mode binder for Student class now, Right click on your Models Folder and add new Class, name it "StudentCustomBinder"
public class StudentCustomBinder : IModelBinder
    {
        public object BindModel(ControllerContext controllerContext, ModelBindingContext bindingContext)
        {
            var name = controllerContext.HttpContext.Request.Form.Get("Name");
            var cls = controllerContext.HttpContext.Request.Form.Get("Class");
            var rollNumber = controllerContext.HttpContext.Request.Form.Get("RollNumber");
            return new Student { Name = name, Class = cls, RollNumber= Convert.ToInt32(rollNumber) };
        }
    }
You would have to add a reference for "System.Web.Mvc", now to make this binder working you need to Register the custom model binder, so go to your Global.asax file and use the below code to register custom Model binder
protected void Application_Start()
        {
            AreaRegistration.RegisterAllAreas();
            FilterConfig.RegisterGlobalFilters(GlobalFilters.Filters);
            RouteConfig.RegisterRoutes(RouteTable.Routes);
            BundleConfig.RegisterBundles(BundleTable.Bundles);

            //register Custom Model binder here
            ModelBinders.Binders[typeof(Student)] = new StudentCustomBinder();
        }
Code in the Controller remains same.
Now build your project and debug it in web browser, we will see a new layout with one extra field, that is, Roll number
Enter your data, and click "Create", you can see the values in the controller are retrieved.
That's it, we are done, so Custom Model Binder gives you a mechanism that can help in mapping the data from the request to your ASP.NET MVC Model. Feel free to comment below or ask questions related to the above article.
 Buy us a coffee
 Become a Patron