
Many times, there can be a need of exporting your HTML table into excel (.xlsx) file while creating ASP.NET MVC application, and there are multiple ways for exporting to excel in C# MVC, one of the most common methods is to use Excel PIA (primary interop assemblies) but it is not recommended method as you would have to install Microsoft Office suite on your web server when you deploy your application on server, so it is not a good approach.
So, we will be discussing other methods(using EPPlus and NPOI) to export data to excel file using MVC, let's start with method to export excel file using EPPlus.
Step 1: Create a project in your Visual Studio(2017 in my example), by opening Visual Studio and clicking "File"-> "New"-> "Project".
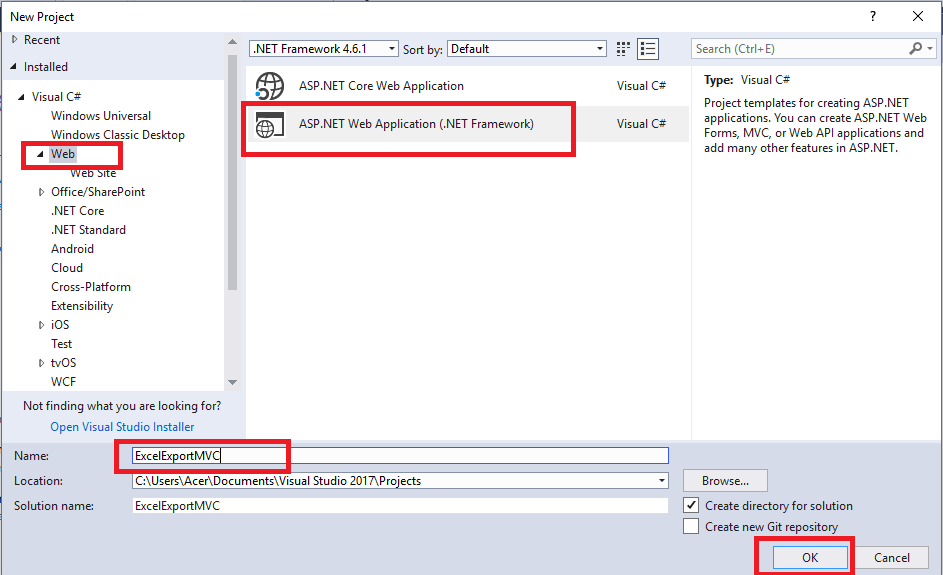
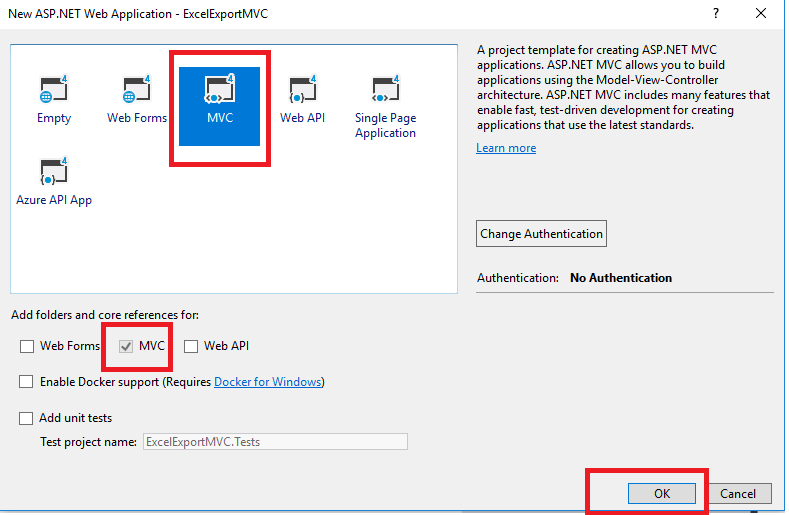
Select MVC template to generate basic HomeController and other details.
Step 2: Now you have generated basic MVC file template, now Right-click on your project(In Solution Explorer pane) -->Manage Nuget packages-->In "Nuget package manager window" select the "Browse" tab, then search for "EPPlus", Select and click install.
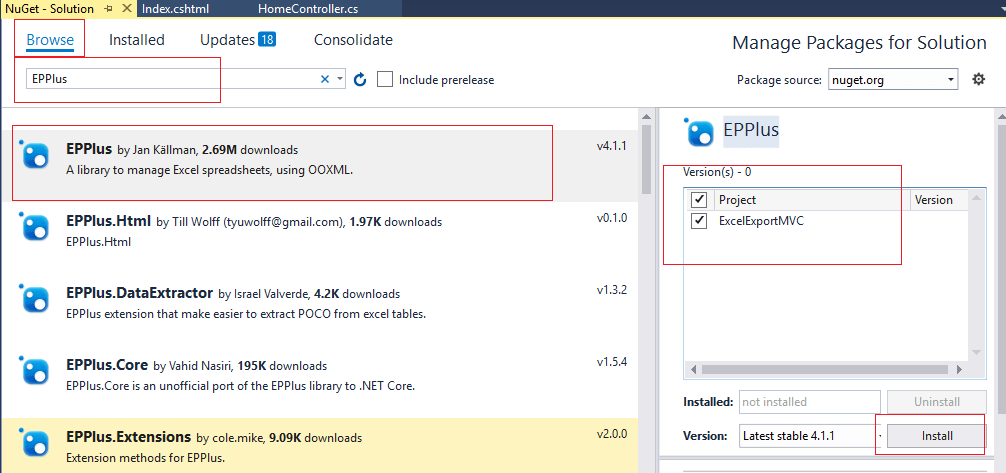
EPPlus is open source library, It writes Excel 2007/2010 files using the Open Office Xml format (xlsx) only.
Step 3: Now we need to connect our project with database, so get your database from SQL server and connect it with your MVC project, here I am using my local database "Students", with table "Student_details" here is the snapshot of database, with its current dummy data
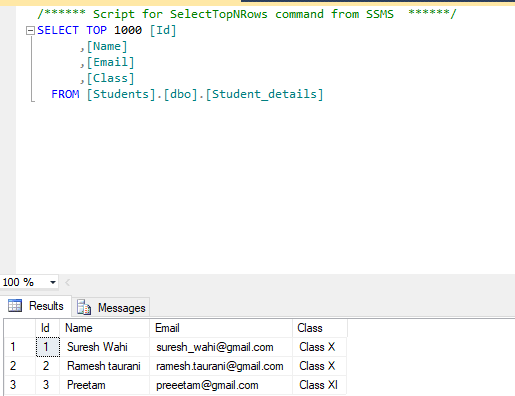
You can create database with dummy database with Demo table and Data using the below scripts (using SQL server 2012 or above)
USE [master]
GO
/****** Object:  Database [Students]    Script Date: 1/28/2018 3:36:00 PM ******/
CREATE DATABASE [Students]
 CONTAINMENT = NONE
 ON  PRIMARY
( NAME = N'Students', FILENAME = N'C:\Program Files\Microsoft SQL Server\MSSQL11.SQLEXPRESS2\MSSQL\DATA\Students.mdf' , SIZE = 3072KB , MAXSIZE = UNLIMITED, FILEGROWTH = 1024KB )
 LOG ON
( NAME = N'Students_log', FILENAME = N'C:\Program Files\Microsoft SQL Server\MSSQL11.SQLEXPRESS2\MSSQL\DATA\Students_log.ldf' , SIZE = 1024KB , MAXSIZE = 2048GB , FILEGROWTH = 10%)
GO
ALTER DATABASE [Students] SET COMPATIBILITY_LEVEL = 110
GO
IF (1 = FULLTEXTSERVICEPROPERTY('IsFullTextInstalled'))
begin
EXEC [Students].[dbo].[sp_fulltext_database] @action = 'enable'
end
GO
ALTER DATABASE [Students] SET ANSI_NULL_DEFAULT OFF
GO
ALTER DATABASE [Students] SET ANSI_NULLS OFF
GO
ALTER DATABASE [Students] SET ANSI_PADDING OFF
GO
ALTER DATABASE [Students] SET ANSI_WARNINGS OFF
GO
ALTER DATABASE [Students] SET ARITHABORT OFF
GO
ALTER DATABASE [Students] SET AUTO_CLOSE OFF
GO
ALTER DATABASE [Students] SET AUTO_CREATE_STATISTICS ON
GO
ALTER DATABASE [Students] SET AUTO_SHRINK OFF
GO
ALTER DATABASE [Students] SET AUTO_UPDATE_STATISTICS ON
GO
ALTER DATABASE [Students] SET CURSOR_CLOSE_ON_COMMIT OFF
GO
ALTER DATABASE [Students] SET CURSOR_DEFAULT  GLOBAL
GO
ALTER DATABASE [Students] SET CONCAT_NULL_YIELDS_NULL OFF
GO
ALTER DATABASE [Students] SET NUMERIC_ROUNDABORT OFF
GO
ALTER DATABASE [Students] SET QUOTED_IDENTIFIER OFF
GO
ALTER DATABASE [Students] SET RECURSIVE_TRIGGERS OFF
GO
ALTER DATABASE [Students] SET  DISABLE_BROKER
GO
ALTER DATABASE [Students] SET AUTO_UPDATE_STATISTICS_ASYNC OFF
GO
ALTER DATABASE [Students] SET DATE_CORRELATION_OPTIMIZATION OFF
GO
ALTER DATABASE [Students] SET TRUSTWORTHY OFF
GO
ALTER DATABASE [Students] SET ALLOW_SNAPSHOT_ISOLATION OFF
GO
ALTER DATABASE [Students] SET PARAMETERIZATION SIMPLE
GO
ALTER DATABASE [Students] SET READ_COMMITTED_SNAPSHOT OFF
GO
ALTER DATABASE [Students] SET HONOR_BROKER_PRIORITY OFF
GO
ALTER DATABASE [Students] SET RECOVERY SIMPLE
GO
ALTER DATABASE [Students] SET  MULTI_USER
GO
ALTER DATABASE [Students] SET PAGE_VERIFY CHECKSUM
GO
ALTER DATABASE [Students] SET DB_CHAINING OFF
GO
ALTER DATABASE [Students] SET FILESTREAM( NON_TRANSACTED_ACCESS = OFF )
GO
ALTER DATABASE [Students] SET TARGET_RECOVERY_TIME = 0 SECONDS
GO
USE [Students]
GO
/****** Object:  Table [dbo].[Student_details]    Script Date: 1/28/2018 3:36:01 PM ******/
SET ANSI_NULLS ON
GO
SET QUOTED_IDENTIFIER ON
GO
SET ANSI_PADDING ON
GO
CREATE TABLE [dbo].[Student_details](
	[Id] [int] IDENTITY(1,1) NOT NULL,
	[Name] [varchar](50) NULL,
	[Email] [varchar](50) NULL,
	[Class] [varchar](50) NULL,
 CONSTRAINT [PK_Student_details] PRIMARY KEY CLUSTERED
(
	[Id] ASC
)WITH (PAD_INDEX = OFF, STATISTICS_NORECOMPUTE = OFF, IGNORE_DUP_KEY = OFF, ALLOW_ROW_LOCKS = ON, ALLOW_PAGE_LOCKS = ON) ON [PRIMARY]
) ON [PRIMARY]

GO
SET ANSI_PADDING OFF
GO
SET IDENTITY_INSERT [dbo].[Student_details] ON

INSERT [dbo].[Student_details] ([Id], [Name], [Email], [Class]) VALUES (1, N'Suresh Wahi', N'suresh_wahi@gmail.com', N'Class X')
INSERT [dbo].[Student_details] ([Id], [Name], [Email], [Class]) VALUES (2, N'Ramesh taurani', N'ramesh.taurani@gmail.com', N'Class X')
INSERT [dbo].[Student_details] ([Id], [Name], [Email], [Class]) VALUES (3, N'Preetam', N'preeetam@gmail.com', N'Class XI')
SET IDENTITY_INSERT [dbo].[Student_details] OFF
USE [master]
GO
ALTER DATABASE [Students] SET  READ_WRITE
GO
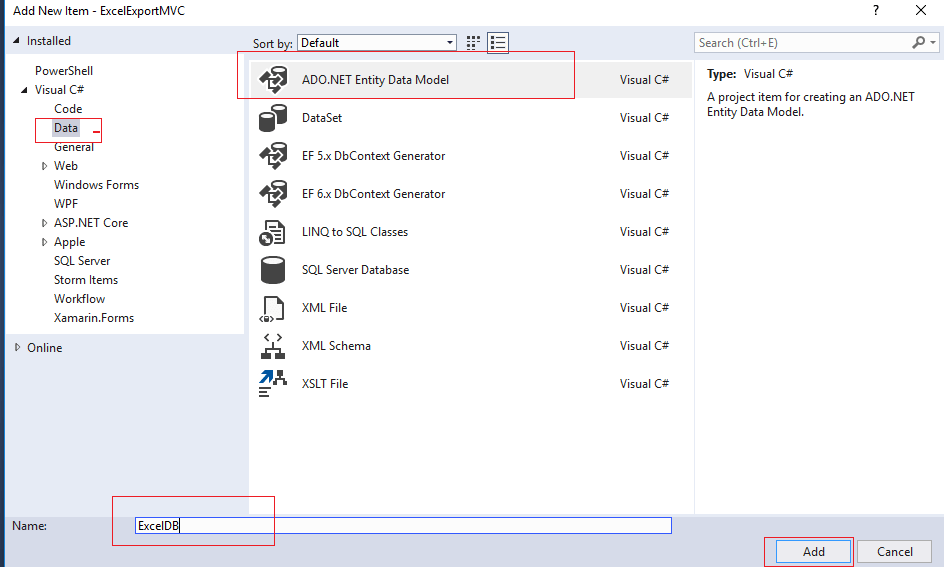
Step 4: Now create Entity framework(ADO.NET) file to connect the project with the database, you would have to add Entity Data Model to your project by right-clicking the "Model" folder in your Solution Explorer and then click on Add and then New Item option of the Context Menu.
From the Add New Item window, select ADO.NET Entity Data Model and set its Name as "ExcelDB" and then click Add.
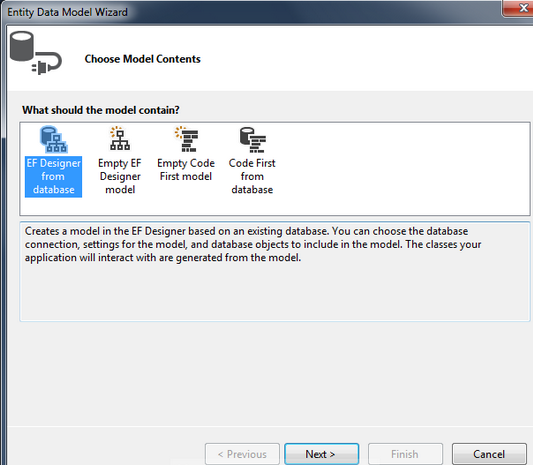
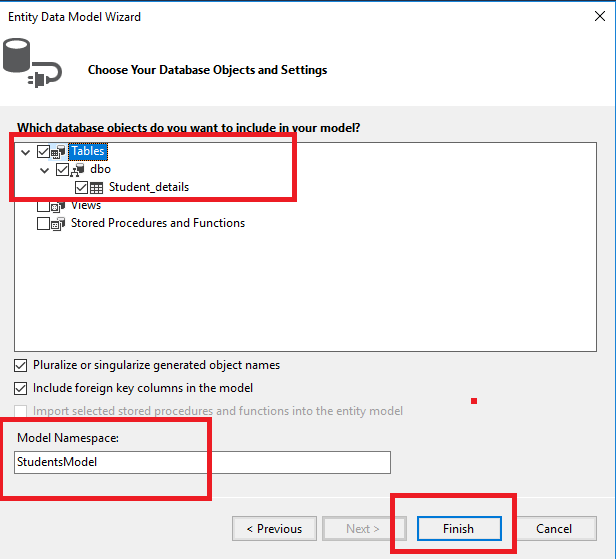
Then the Entity Data Model Wizard will open up where you need to select EF Designer database option.
 public ActionResult Index()
        {
            List<Student_details> studet = new List<Student_details>();
            using (var context = new StudentsEntities())
            {
                studet = context.Student_details.ToList();
            }
            return View(studet);
        }
to render data in your view, paste the code below in Index View
@model IEnumerable<ExcelExportMVC.Models.Student_details>
@{
    ViewBag.Title = "Home Page";
}
<br/>

<a href="/Home/ExportListUsingEPPlus" class="btn btn-primary">Export to excel</a>
<br /><br />
<table class="table table-bordered">
    <thead>
        <tr>
            <th>Id</th>
            <th>Name</th>
            <th>Email</th>
            <th>Class</th>
        </tr>
    </thead>
    <tbody>
        @foreach (var student in Model)
        {
        <tr>
            <td>@student.Id</td>
            <td>@student.Name</td>
            <td>@student.Email</td>
            <td>@student.Class</td>
        </tr>
        }
    </tbody>
</table>
Step 6: Create C# code to get required data from database and show it as excel file to user(note: we have already installed EPPlus, which we will be using first)
  public void ExportListUsingEPPlus()
        {
            List<Student_details> data = new List<Student_details>();
            using (var context = new StudentsEntities())
            {
                data = context.Student_details.ToList();
            }

            ExcelPackage excel = new ExcelPackage();
            var workSheet = excel.Workbook.Worksheets.Add("Sheet1");
            workSheet.Cells[1, 1].LoadFromCollection(data, true);
            using (var memoryStream = new MemoryStream())
            {
                Response.ContentType = "application/vnd.openxmlformats-officedocument.spreadsheetml.sheet";
                //here i have set filname as Students.xlsx
                Response.AddHeader("content-disposition", "attachment;  filename=Students.xlsx");
                excel.SaveAs(memoryStream);
                memoryStream.WriteTo(Response.OutputStream);
                Response.Flush();
                Response.End();
            }
        }
Build your project and run it, you will get output as below
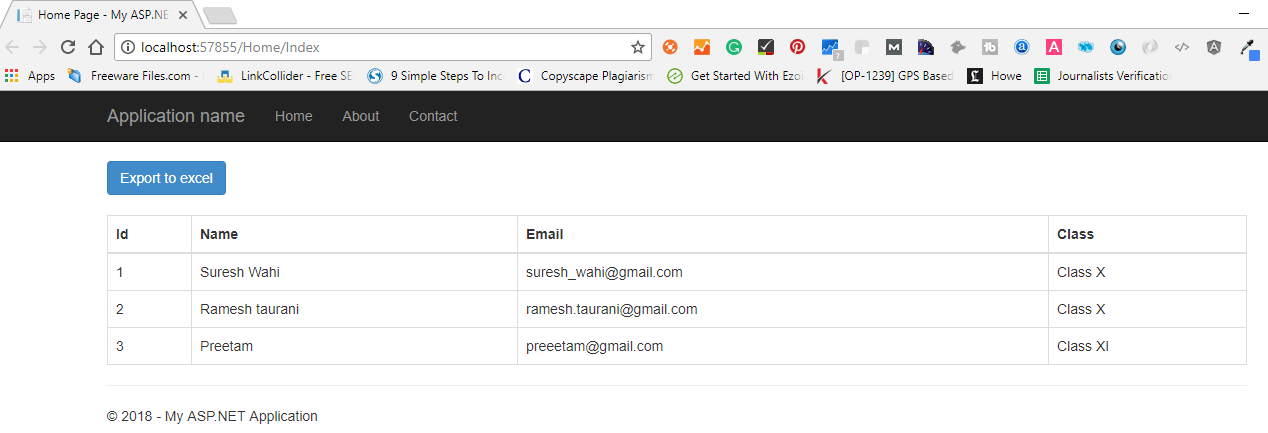
Now click on "Export to Excel" button, your excel(.xlsx) file will be generated and get's downloaded automatically, when you will open your file it would have output as below
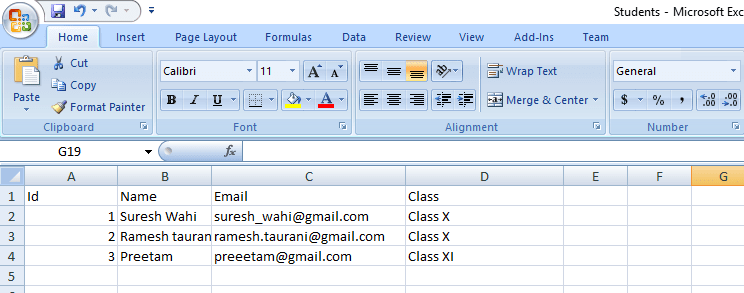
You can see how easy it is in .xlsx format. This library allows you to set worksheet properties, custom and conditional formatting, Cell Ranges and Cell styling (Border, Color, Fill, Font, Number, Alignments), Formula calculation ..etc.
If you have datatable as datasource, use following to load it
workSheet.Cells[1, 1].LoadFromDataTable(myDataTable, true);Using NPOI for .XLS & .XLSX
Now let's try another approach that is using NPOI to generate .xls & .xlsx, it works best when you need to generate both .xls and .xlsx files from single library.NPOI can read and write xls (Excel 97-2003), xlsx(Excel 2007+). To install NPOI, run the following command in the Package Manager Console:
Install-Package NPOI Let's add the code in our controller to use NPOI library
 public void WriteExcelWithNPOI(DataTable dt, String extension)
        {

            IWorkbook workbook;

            if (extension == "xlsx")
            {
                workbook = new XSSFWorkbook();
            }
            else if (extension == "xls")
            {
                workbook = new HSSFWorkbook();
            }
            else
            {
                throw new Exception("This format is not supported");
            }

            ISheet sheet1 = workbook.CreateSheet("Sheet 1");

            //make a header row
            IRow row1 = sheet1.CreateRow(0);

            for (int j = 0; j < dt.Columns.Count; j++)
            {

                ICell cell = row1.CreateCell(j);
                String columnName = dt.Columns[j].ToString();
                cell.SetCellValue(columnName);
            }

            //loops through data
            for (int i = 0; i < dt.Rows.Count; i++)
            {
                IRow row = sheet1.CreateRow(i + 1);
                for (int j = 0; j < dt.Columns.Count; j++)
                {

                    ICell cell = row.CreateCell(j);
                    String columnName = dt.Columns[j].ToString();
                    cell.SetCellValue(dt.Rows[i][columnName].ToString());
                }
            }

            using (var exportData = new MemoryStream())
            {
                Response.Clear();
                workbook.Write(exportData);
                if (extension == "xlsx") //xlsx file format
                {
                    Response.ContentType = "application/vnd.openxmlformats-officedocument.spreadsheetml.sheet";
                    Response.AddHeader("Content-Disposition", string.Format("attachment;filename={0}", "StudentNPOI.xlsx"));
                    Response.BinaryWrite(exportData.ToArray());
                }
                else if (extension == "xls")  //xls file format
                {
                    Response.ContentType = "application/vnd.ms-excel";
                    Response.AddHeader("Content-Disposition", string.Format("attachment;filename={0}", "StudentNPOI.xls"));
                    Response.BinaryWrite(exportData.GetBuffer());
                }
                Response.End();
            }
        }
In above method, It is clearly visible response syntax differences (ContentType, Header and Write) between xls and xlsx, above method get's input as DataTable and output the excel format as needed.
To export in .xls format use
WriteExcelWithNPOI(datatable, "xls");To Export in .xlsx format use
WriteExcelWithNPOI(datatable, "xlsx");So to use it in out controller I have created a method to convert .ToList into Datatable and then call the above method
 public void ExportListUsingNPOI()
        {
            List<Student_details> data = new List<Student_details>();
            using (var context = new StudentsEntities())
            {
                data = context.Student_details.ToList();
            }
            var Datatble = ToDataTable(data);

            //Call NPOI method with xlx output
            WriteExcelWithNPOI(Datatble, "xls");
        }


// Convert .ToList into Datatable
        public DataTable ToDataTable<T>(List<T> items)
            {
                DataTable dataTable = new DataTable(typeof(T).Name);
                //Get all the properties by using reflection
                PropertyInfo[] Props = typeof(T).GetProperties(BindingFlags.Public | BindingFlags.Instance);
                foreach (PropertyInfo prop in Props)
                {
                    //Setting column names as Property names
                    dataTable.Columns.Add(prop.Name);
                }
                foreach (T item in items)
                {
                    var values = new object[Props.Length];
                    for (int i = 0; i < Props.Length; i++)
                    {

                        values[i] = Props[i].GetValue(item, null);
                    }
                    dataTable.Rows.Add(values);
                }

                return dataTable;
            }
Now, add an anchor link to Call ExportListUsingNPOI method from the view to export data into .xls excel file
<a href="/Home/ExportListUsingEPPlus" class="btn btn-primary">Export to excel</a>
<a href="/Home/ExportListUsingNPOI" class="btn btn-primary">Export to Excel using NPOI</a>
<br /><br />
<table class="table table-bordered">
    <thead>
        <tr>
            <th>Id</th>
            <th>Name</th>
            <th>Email</th>
            <th>Class</th>
        </tr>
    </thead>
    <tbody>
        @foreach (var student in Model)
        {
        <tr>
            <td>@student.Id</td>
            <td>@student.Name</td>
            <td>@student.Email</td>
            <td>@student.Class</td>
        </tr>
        }
    </tbody>
</table>
New output of the view
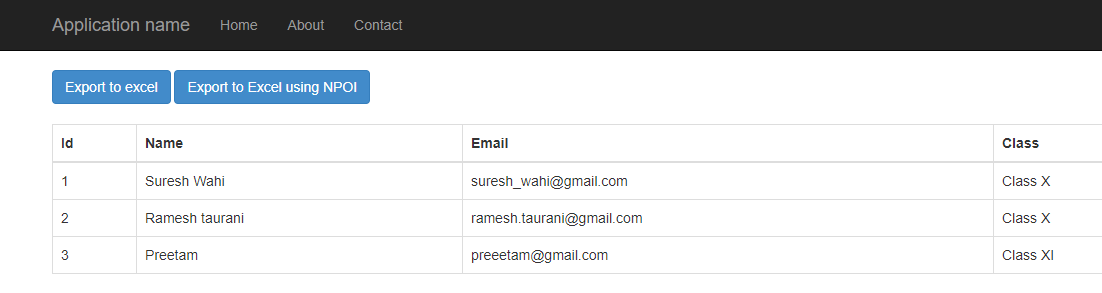
Clicking the button "Export to Excel using NPOI" will give your excel file with extention .xls.
Conclusion:If you need xlsx format then I recommend EPPlus. If you have to do a lot of operations on Excel and need support of both formats then NPOI is the best option for you, but it is very heavy.
You might also like to read:
Feel free to comment on the post below or ask a question related to this in the questions section by linking it.
 Buy us a coffee
 Become a Patron