
In the previous article, I mentioned how to generate CSR on IIS and install SSL on IIS, but in this article, I have mentioned how we can enable Caching on IIS, to speed up your website performance and reduce web-page load time, which will improve your SEO rankings.
What is Caching?
Caching (pronounced "cashing") is the process of storing data in a cache.
A cache is a temporary storage area. For example, the files you automatically request by looking at a Web page are stored on your hard disk in a cache subdirectory under the directory for your browser. When you return to a page you've recently looked at, the browser can get those files from the cache rather than the original server, saving you time and saving the network the burden of additional traffic.
How to Enable Output Caching on IIS?
Internet Information Services (IIS) 7.0 and above, has an output cache feature that caches dynamic content in memory (for example, output from your Microsoft® ASP.NET, classic Active Server Pages (ASP), PHP, or other dynamic pages). This helps to improve performance because the script used to generate dynamic output does not need to run for each request. The cache is able to vary the output that is cached, based on query string values and HTTP headers that are sent from the client to the server. The cache is also integrated with the HTTP.sys kernel mode driver to help improve performance speed.
You can improve performance on your site or application by enabling output caching. Caching decreases the amount of processing time for requests made to your site or application by returning a processed copy of a Web page from the cache.
You should enable output caching if your site or application content requires complex or lengthy processing. For example, you might want to enable caching if your application retrieves information from a database. This will let you avoid making a call to the database every time that a particular Web page is requested. In addition to enabling output caching, you must also set up output cache rules to specify how you want content to be cached.
Google’s various page speed testing tools seem to prefer browser caching set with at least a one-week expiration set.
Caching improves few things:
- Page Load Speed. If the page, or at least parts of the page, are loaded from cache, that is always going to display faster than a round-trip to the server. And the faster the visitor’s browsing experience is, the better the overall experience and site impression will be. Site load time has shown to have a large impact on visitor interaction with websites.
- Bandwidth / Data Transfers. If the data is pulled from cache rather than the server, that obviously means less data being transferred. In a case where bandwidth is tracked and allocated on a monthly data transfer plan, this means less overall usage and potentially fewer costs for your hosting. This would be especially important in sites that are image-heavy like perhaps storefronts that show images of varying size and quality for their products.
- Site / Server performance. If something is loaded from cache rather than from the server, that cuts down on the number of requests that the site needs to satisfy. Sure, even the smallest of servers can commonly handle hundreds if not thousands of concurrent visitors, but hey, why make it do all that work if it doesn’t need to? Imagine if your content is all cached and you have a 50% new vs returning visitor ratio… that means that your site load would potentially be cut in half, and the server could handle twice as many visitors before needing a resource upgrade.
We can enable it using IIS 7.0 or above
1. open the IIS Manager on your server, expand the Sites folder and then find the site you want to manage. You can control the caching either for the entire site or for specific folders. The interface and steps are basically the same, but I’ll show screenshots of making the change just on the \images\ folder of my site:
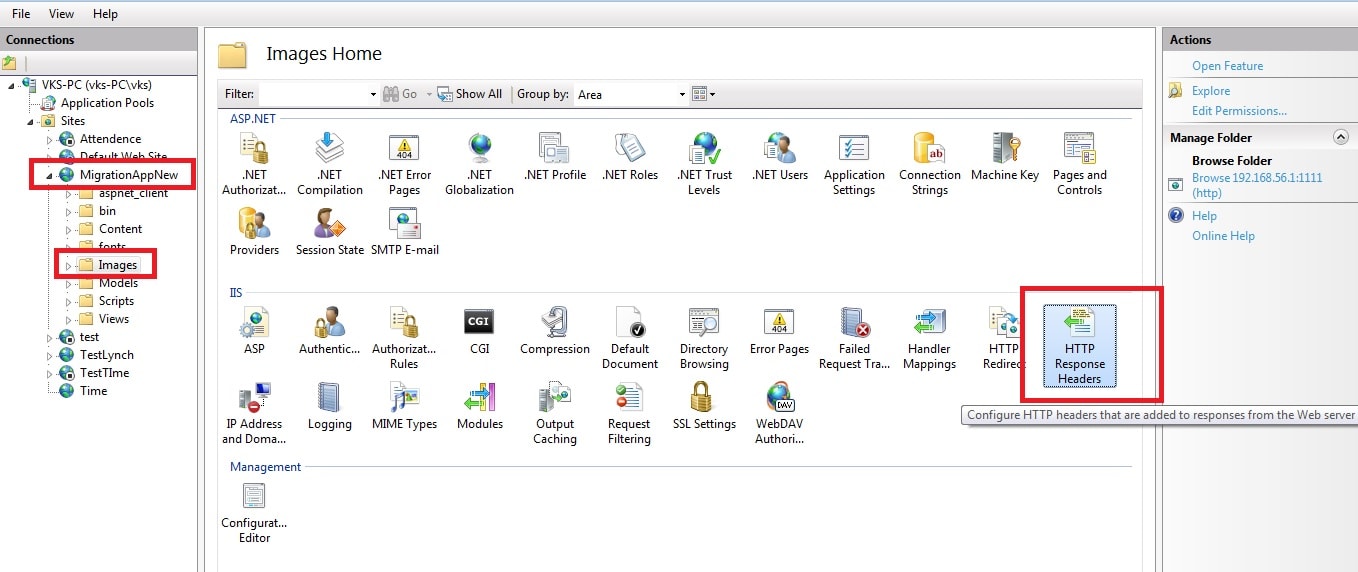
2. Open "HTTPS response headers", Go to Actions panel on right side click on "Set Common header"
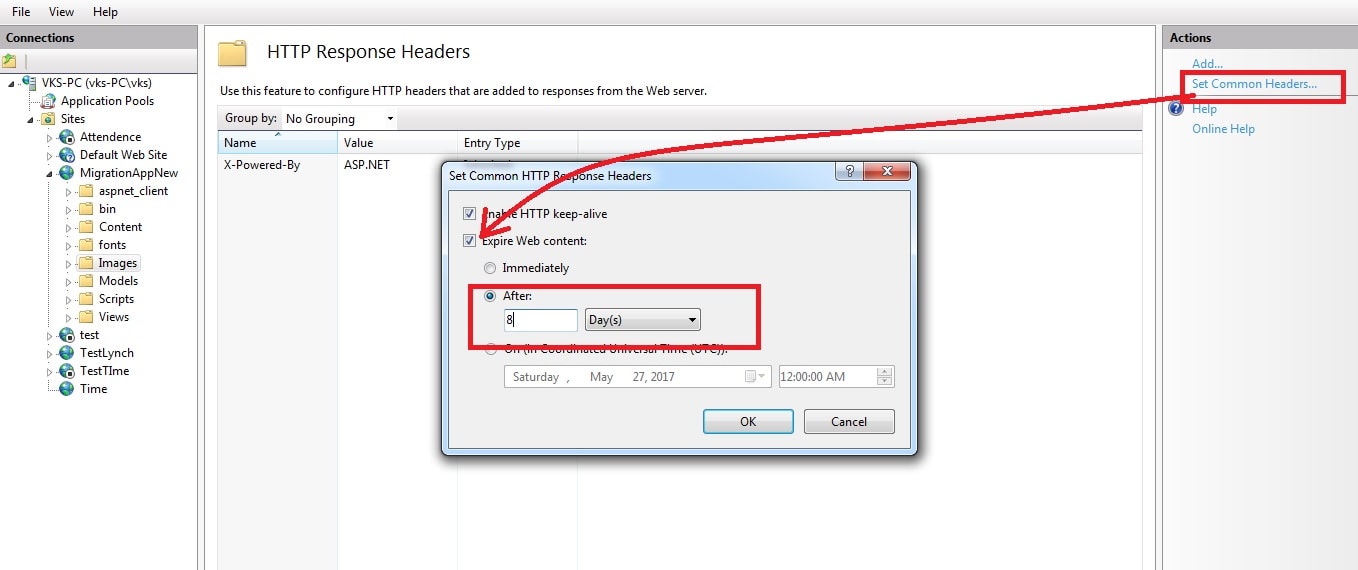
The HTTP Keep-alive should be already selected by default – leave that alone. Let’s pay attention to the Expire Web Content option which isn’t selected by default. Once you check that box you’ll see that it defaults to expiring the content immediately… which is not helpful at all. Choose the radio button for “After” then set a date range. Google seems to prefer this caching option set to at least one week so I commonly set it to 8 days as shown in my sample image.
Click OK to save the settings and you’re all done! You can test your site using browser (IE or Chrome) developer tools to confirm the headers, or use an external testing site to confirm the caching.
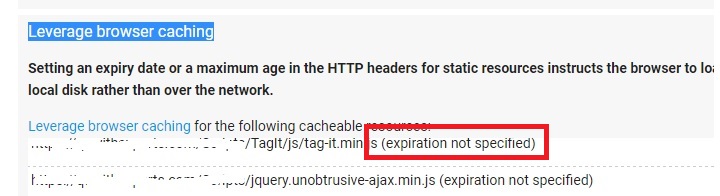
Now we have enabled caching for Images folder of the selected website, browser will cache it for 8 days, to check if your page is cached, you can go to https://developers.google.com/speed/pagespeed/insights/ , enter your URL, Click "Analyze", once this process is finished you can check "Leverage browser caching" section, it will show the url of image which needs to be cached (if it's expiration is below 8 days otherwise it will not show the image), like here it is showing me the files for which i have not enabled expiration
That's it, we are done.
You may also like to read:
Generate CSR and Import SSL on IIS Windows Server
how to Redirect from non-www to www website using IIS (and Vice-Versa)
 Buy us a coffee
 Become a Patron