
In previous article, we have mentioned about Enabling caching on IIS and how to Redirect from non-www to www website using IIS (and Vice-Versa), but now in this article, I have provided step by step procedure to generate CSR on IIS and then once we have got certificate file from hosting website, install SSL certificate or we can say way to import SSL on IIS, Windows server.
Generate CSR on IIS
Let's begin by creating or generating CSR on IIS, here are the steps which you need to follow, in order to create CSR using IIS on Windows server.
- Log in into your Windows server using Remote desktop connection
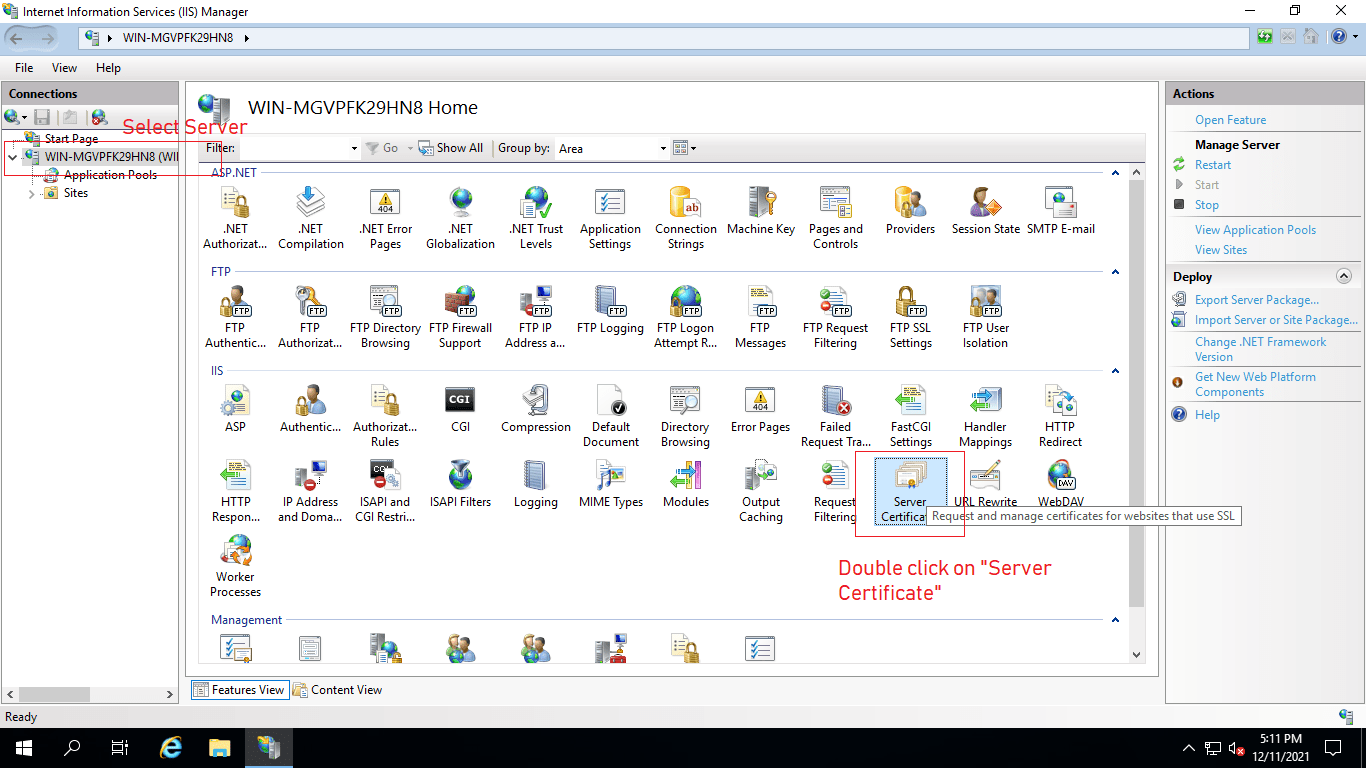
- Once you are logged in into your server, open Internet Information Services (IIS) Manager
- In the left Connections menu, select the server name (host) where you want to generate the request.
- Now, on the right side, you will see "Server Certificate" Option, double-click on it, to open it.
- Now, you need to select "Create Certificate Request" from the "Actions" pane on the right side
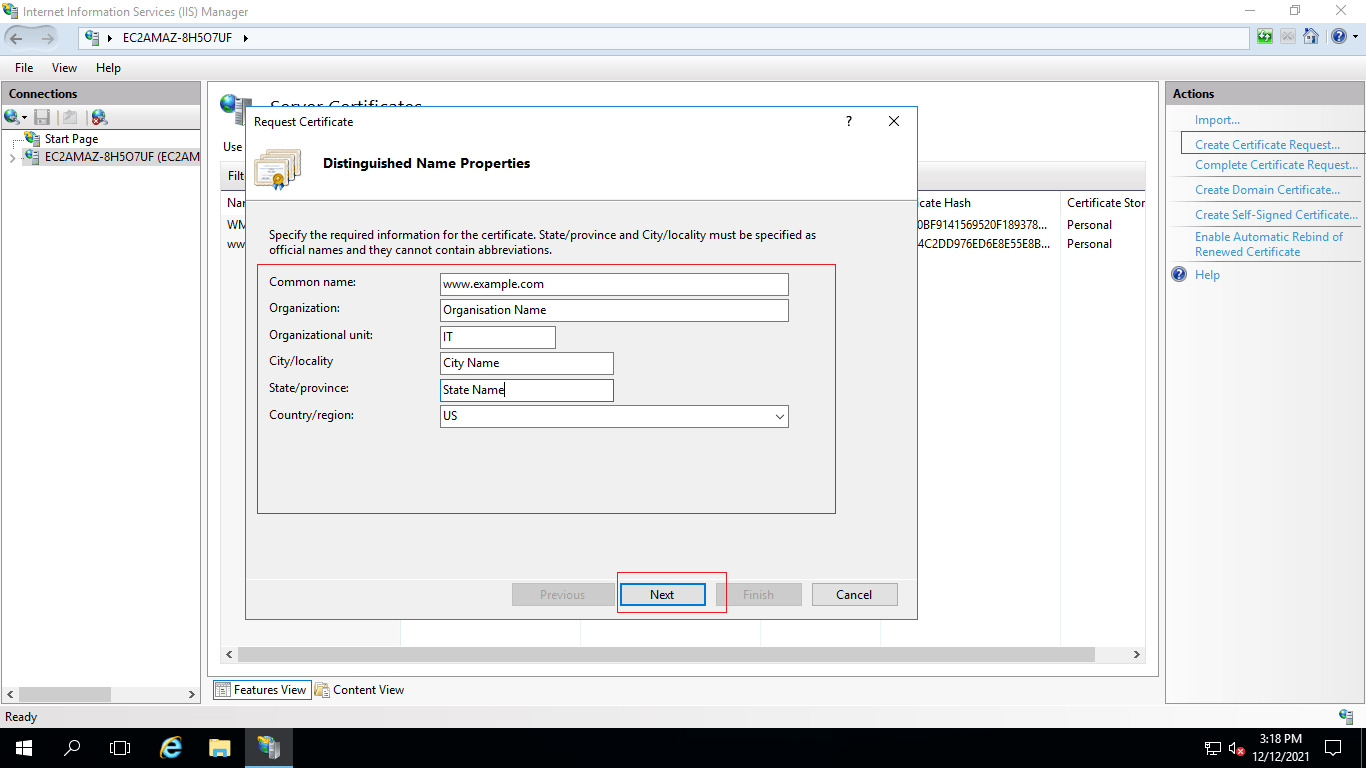
Then you need to fill in the pop-up form, as shown above.
Common name: Your website domain name
Organization: Organization Name
Organization Unit: The name of your department within the organization. This entry will usually be listed as "IT", "Web Security", or is simply left blank.
City/Locality: Your Organization/company City.
State/Province: Your Organization/company State.
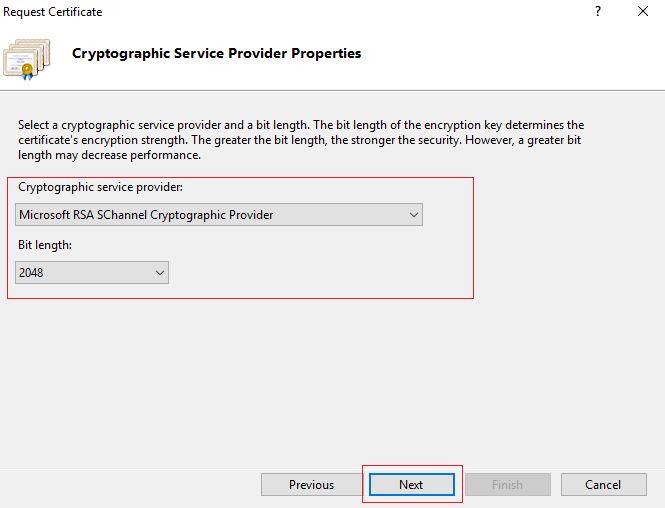
Country/Region: The country/region where your company is legally located. - Once, you are done with above pop-up, in next screen, select "Microsoft RSA SChannel Cryptographic Provider" and "2048" encryption, unless you have specific cryptographic provider and bit length.
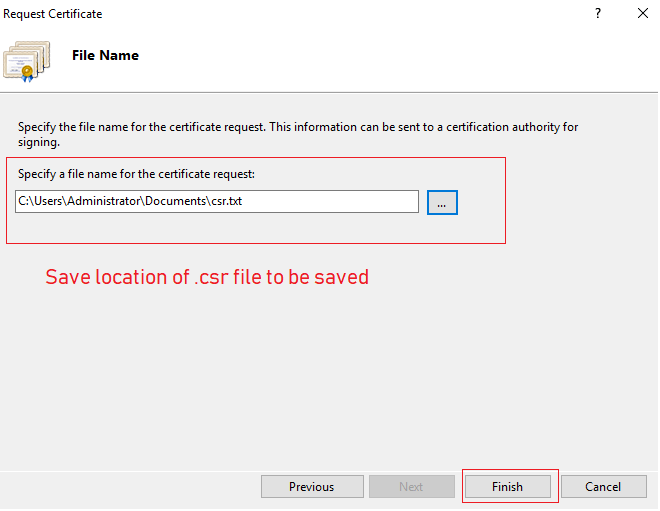
- Click "Next" and in next screen you need to select local disk location to save generate .csr file
Once you have generate CSR, it will looks like below text, which you will need to upload on SSL certificate provider website like Godaddy or Namecheap
-----BEGIN NEW CERTIFICATE REQUEST-----
MIIEaDCCA1ACAQAwbDELMAkGA1UEBhMCRVMxEjAQBgNVBAgMCUJhcmNlbG9uYTES
MBAGA1UEBwwJQmFyY2Vsb25hMREwDwYDVQQKDAhnbG9iYi5lczELMAkGA1UECwwC
SVQxFTATBgNVBAMMDHd3dy5nbG9iYi5lczCCASIwDQYJKoZIhvcNAQEBBQADggEP
DwEB/wQEAwIE8DATBgNVHSUEDDAKBggrBgEFBQcDATB4BgkqhkiG9w0BCQ8EazBp
MA4GCCqGSIb3DQMCAgIAgDAOBggqhkiG9w0DBAICAIAwCwYJYIZIAWUDBAEqMAsG
CWCGSAFlAwQBLTALBglghkgBZQMEAQIwCwYJYIZIAWUDBAEFMAcGBSsOAwIHMAoG
CCqGSIb3DQMHMB0GA1UdDgQWBBQkyqjdbBUC78z+fDDUPBPe8GIqJzANBgkqhkiG
9w0BAQUFAAOCAQEA0hkakzt2JekYhCuNdhj4qkAs0kR5aNDbCpkXHGUU3z+il8jw
RxmqZqqjamacCsgELbDX0T+vxe4UO3fCoU3BmZYqvZqQDiozp66iBR5e9lVDsoPl
AAwe9cuGTBNDzPmLq4DShEeTcB6i1skqMjLPPxYl9rAltL4v55+AuuUpsF1j84Ou
2JEWUFknFeDIL91W4ZrFyCwwvdrWe8j9bKVkqdMDclkb25wv5C1/1JBlNWJc3dnF
Ss35qppeG5ZXWZxl3Nasx+dLe5mzAjFgWq1iOzFDf05pFxerjFDU27eveipodfI5
PmZK1crDWnHwzs420VnfXJfDrItbALJ5S9wJEw==
-----END NEW CERTIFICATE REQUEST-----
Once you will submit this CSR, then Godaddy or Namecheap or any other SSL provider, will generate certificate file in .crt or .pk7b format.
Import SSL on IIS
Once you have generated CSR, you will to need to follow below instructions
- On the server where you created the CSR, save the SSL certificate .cer file (e.g., example_domain.cer) that you received from SSL provider.
- From the Start screen, find Internet Information Services (IIS) Manager and open it.
- In the Connections pane, locate and click the server.
- In the server Home page (center pane) under the IIS section, double-click "Server Certificates".
-
In the Actions menu (right pane), click Complete Certificate Request and browse the ".crt" file to be uploaded, as shown below
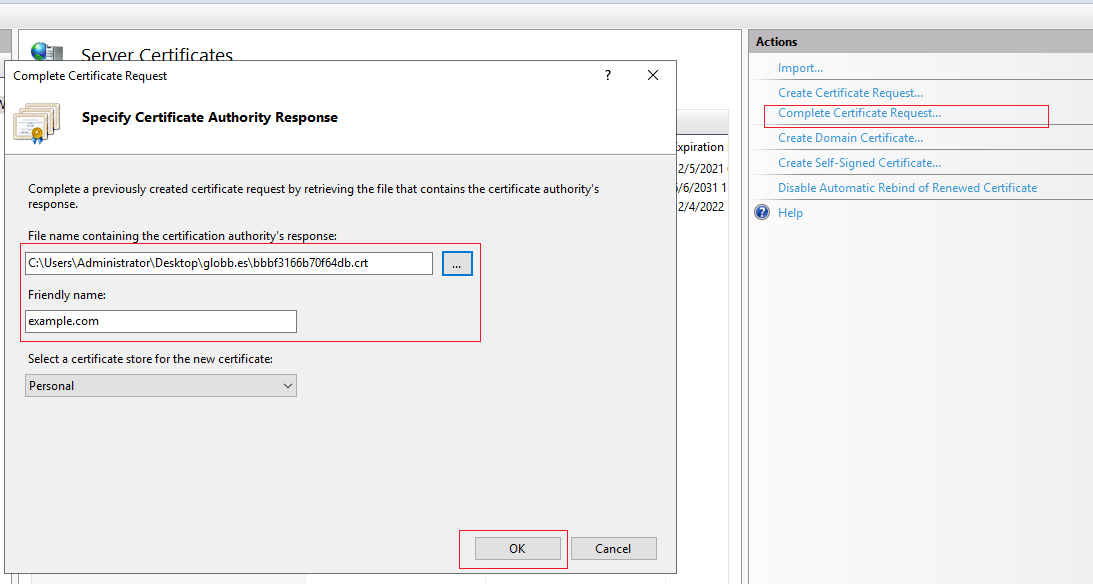
- Once you will, click on "OK", you will be able to see Certificate in "Server Certificates" mid pane.
Assign SSL to website
Once you have imported SSL on IIS, now you can assign it your website, which is very simple process, here are the steps to follow it
- In Internet Information Services (IIS) Manager, in the Connections pane, expand the name of the server on which the certificate was installed. Then expand Sites and click on the site you want to secure using the SSL certificate.
- Now, click on the "Bindings" from right "Actions" pane.
- In the Site Bindings window, click "Add"
- In the pop-up, you need to select "https" as binding type, and your certificate, with port as ":443", as shown below
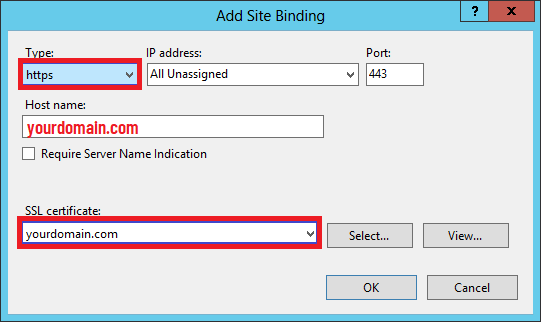
- That's it, we are done.
This is how you can generate CSR and import SSL on IIS, you can follow same steps in IIS 7/8 or 8.5,10.
If you haven't bought SSL yet, you can buy at cheaper price on Godaddy or Namecheap.
You may also like to read:
how to Redirect from non-www to www website using IIS (and Vice-Versa)
 Buy us a coffee
 Become a Patron