
In a previous article, I have provided ASP.NET GridView example, in this article I have explained ASP.NET MVC Gridview which is created using WebGrid which is one of the powerful and efficient way to quickly show data in a tabular form using ASP.NET MVC, without writing a lot's of Razor(if you just want data to show tabular data), so in this article, I am going to provide you step by step procedure of implementing WebGrid in MVC. WebGrid is lightweight for showing tabular data in ASP.NET MVC.
Step 1: First of all, we will need to create an MVC project in our Visual Studio, so open your Visual Studio IDE and navigate to File->New->Project-> ASP.NET Empty Web Application.
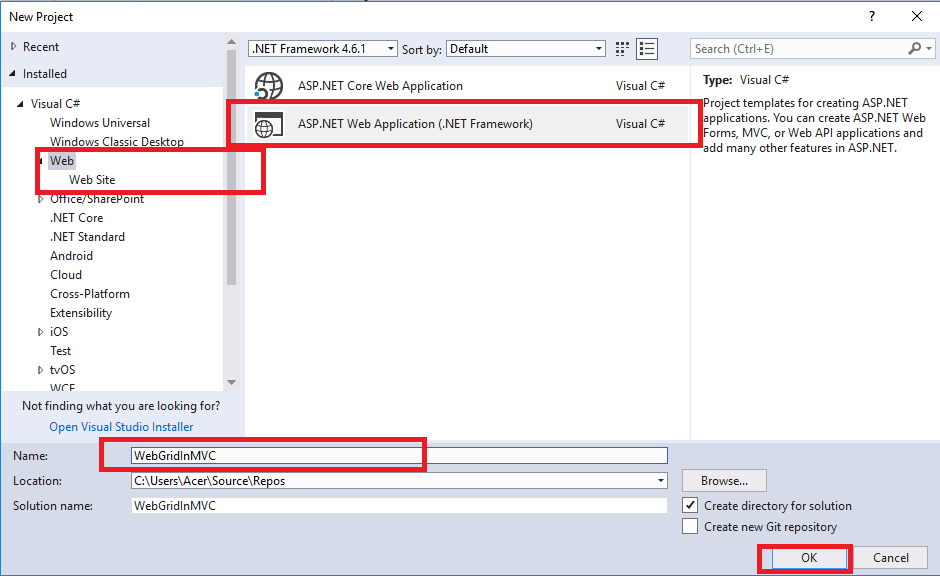
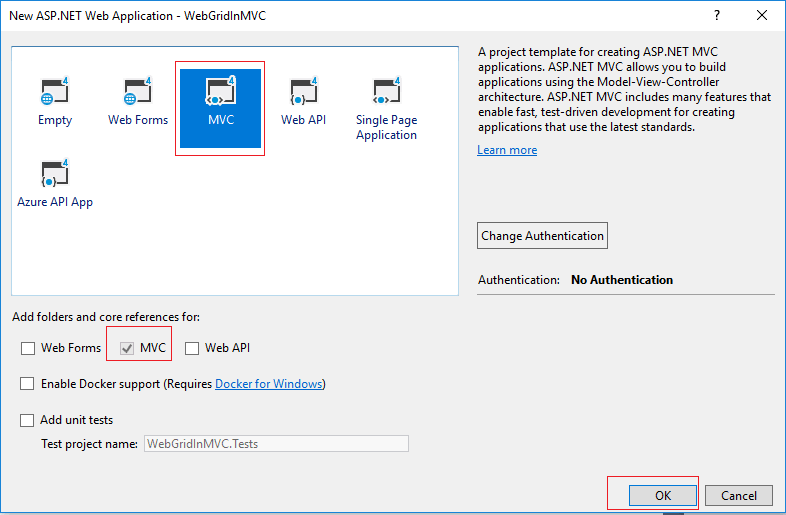
Name the Project as you like, I named it "WebGridInMVC", click "OK" & then select MVC template in the new screen
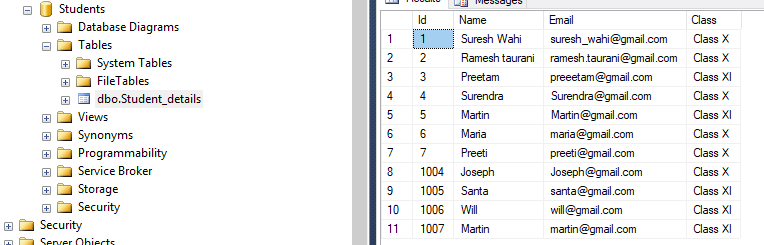
Step 2: Now, we would need some data to show in our WebGrid, so I will be using below database of "Students" to show student data
You can create this database and it'stable in your local database, by executing the below script in your local SQL server
USE [master]
GO
/****** Object:  Database [Students]    Script Date: 5/26/2018 6:12:18 PM ******/
CREATE DATABASE [Students]
 CONTAINMENT = NONE
 ON  PRIMARY
( NAME = N'Students', FILENAME = N'C:\Program Files\Microsoft SQL Server\MSSQL11.SQLEXPRESS2\MSSQL\DATA\Students.mdf' , SIZE = 3072KB , MAXSIZE = UNLIMITED, FILEGROWTH = 1024KB )
 LOG ON
( NAME = N'Students_log', FILENAME = N'C:\Program Files\Microsoft SQL Server\MSSQL11.SQLEXPRESS2\MSSQL\DATA\Students_log.ldf' , SIZE = 1024KB , MAXSIZE = 2048GB , FILEGROWTH = 10%)
GO
ALTER DATABASE [Students] SET COMPATIBILITY_LEVEL = 110
GO
IF (1 = FULLTEXTSERVICEPROPERTY('IsFullTextInstalled'))
begin
EXEC [Students].[dbo].[sp_fulltext_database] @action = 'enable'
end
GO
ALTER DATABASE [Students] SET ANSI_NULL_DEFAULT OFF
GO
ALTER DATABASE [Students] SET ANSI_NULLS OFF
GO
ALTER DATABASE [Students] SET ANSI_PADDING OFF
GO
ALTER DATABASE [Students] SET ANSI_WARNINGS OFF
GO
ALTER DATABASE [Students] SET ARITHABORT OFF
GO
ALTER DATABASE [Students] SET AUTO_CLOSE OFF
GO
ALTER DATABASE [Students] SET AUTO_CREATE_STATISTICS ON
GO
ALTER DATABASE [Students] SET AUTO_SHRINK OFF
GO
ALTER DATABASE [Students] SET AUTO_UPDATE_STATISTICS ON
GO
ALTER DATABASE [Students] SET CURSOR_CLOSE_ON_COMMIT OFF
GO
ALTER DATABASE [Students] SET CURSOR_DEFAULT  GLOBAL
GO
ALTER DATABASE [Students] SET CONCAT_NULL_YIELDS_NULL OFF
GO
ALTER DATABASE [Students] SET NUMERIC_ROUNDABORT OFF
GO
ALTER DATABASE [Students] SET QUOTED_IDENTIFIER OFF
GO
ALTER DATABASE [Students] SET RECURSIVE_TRIGGERS OFF
GO
ALTER DATABASE [Students] SET  DISABLE_BROKER
GO
ALTER DATABASE [Students] SET AUTO_UPDATE_STATISTICS_ASYNC OFF
GO
ALTER DATABASE [Students] SET DATE_CORRELATION_OPTIMIZATION OFF
GO
ALTER DATABASE [Students] SET TRUSTWORTHY OFF
GO
ALTER DATABASE [Students] SET ALLOW_SNAPSHOT_ISOLATION OFF
GO
ALTER DATABASE [Students] SET PARAMETERIZATION SIMPLE
GO
ALTER DATABASE [Students] SET READ_COMMITTED_SNAPSHOT OFF
GO
ALTER DATABASE [Students] SET HONOR_BROKER_PRIORITY OFF
GO
ALTER DATABASE [Students] SET RECOVERY SIMPLE
GO
ALTER DATABASE [Students] SET  MULTI_USER
GO
ALTER DATABASE [Students] SET PAGE_VERIFY CHECKSUM
GO
ALTER DATABASE [Students] SET DB_CHAINING OFF
GO
ALTER DATABASE [Students] SET FILESTREAM( NON_TRANSACTED_ACCESS = OFF )
GO
ALTER DATABASE [Students] SET TARGET_RECOVERY_TIME = 0 SECONDS
GO
USE [Students]
GO
/****** Object:  Table [dbo].[Student_details]    Script Date: 5/26/2018 6:12:18 PM ******/
SET ANSI_NULLS ON
GO
SET QUOTED_IDENTIFIER ON
GO
SET ANSI_PADDING ON
GO
CREATE TABLE [dbo].[Student_details](
	[Id] [int] IDENTITY(1,1) NOT NULL,
	[Name] [varchar](50) NULL,
	[Email] [varchar](50) NULL,
	[Class] [varchar](50) NULL,
 CONSTRAINT [PK_Student_details] PRIMARY KEY CLUSTERED
(
	[Id] ASC
)WITH (PAD_INDEX = OFF, STATISTICS_NORECOMPUTE = OFF, IGNORE_DUP_KEY = OFF, ALLOW_ROW_LOCKS = ON, ALLOW_PAGE_LOCKS = ON) ON [PRIMARY]
) ON [PRIMARY]

GO
SET ANSI_PADDING OFF
GO
SET IDENTITY_INSERT [dbo].[Student_details] ON

INSERT [dbo].[Student_details] ([Id], [Name], [Email], [Class]) VALUES (1, N'Suresh Wahi', N'suresh_wahi@gmail.com', N'Class X')
INSERT [dbo].[Student_details] ([Id], [Name], [Email], [Class]) VALUES (2, N'Ramesh taurani', N'ramesh.taurani@gmail.com', N'Class X')
INSERT [dbo].[Student_details] ([Id], [Name], [Email], [Class]) VALUES (3, N'Preetam', N'preeetam@gmail.com', N'Class XI')
INSERT [dbo].[Student_details] ([Id], [Name], [Email], [Class]) VALUES (4, N'Surendra', N'Surendra@gmail.com', N'Class X')
INSERT [dbo].[Student_details] ([Id], [Name], [Email], [Class]) VALUES (5, N'Martin ', N'Martin@gmail.com', N'Class XI')
INSERT [dbo].[Student_details] ([Id], [Name], [Email], [Class]) VALUES (6, N'Maria', N'maria@gmail.com', N'Class X')
INSERT [dbo].[Student_details] ([Id], [Name], [Email], [Class]) VALUES (7, N'Preeti', N'preeti@gmail.com', N'Class X')
INSERT [dbo].[Student_details] ([Id], [Name], [Email], [Class]) VALUES (1004, N'Joseph', N'Joseph@gmail.com', N'Class X')
INSERT [dbo].[Student_details] ([Id], [Name], [Email], [Class]) VALUES (1005, N'Santa', N'santa@gmail.com', N'Class XI')
INSERT [dbo].[Student_details] ([Id], [Name], [Email], [Class]) VALUES (1006, N'Will', N'will@gmail.com', N'Class XI')
INSERT [dbo].[Student_details] ([Id], [Name], [Email], [Class]) VALUES (1007, N'Martin', N'martin@gmail.com', N'Class XI')
SET IDENTITY_INSERT [dbo].[Student_details] OFF
USE [master]
GO
ALTER DATABASE [Students] SET  READ_WRITE
GO
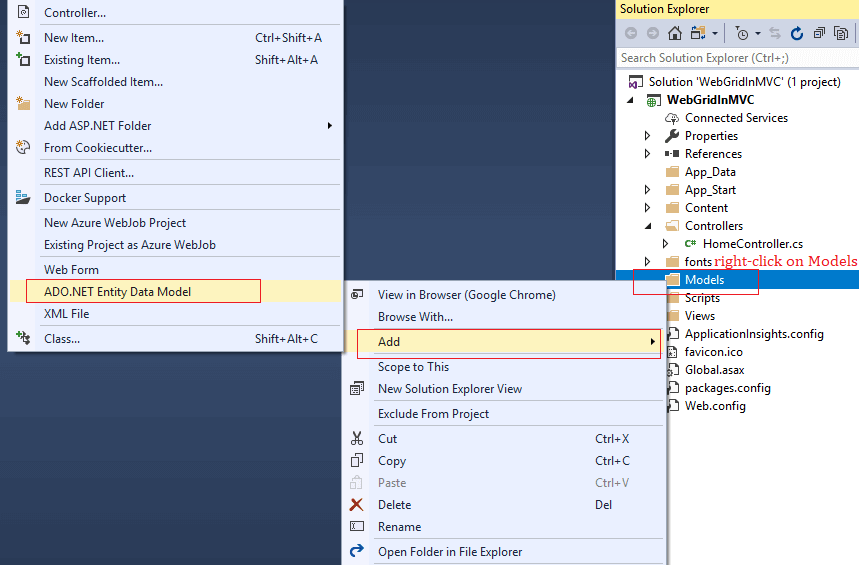
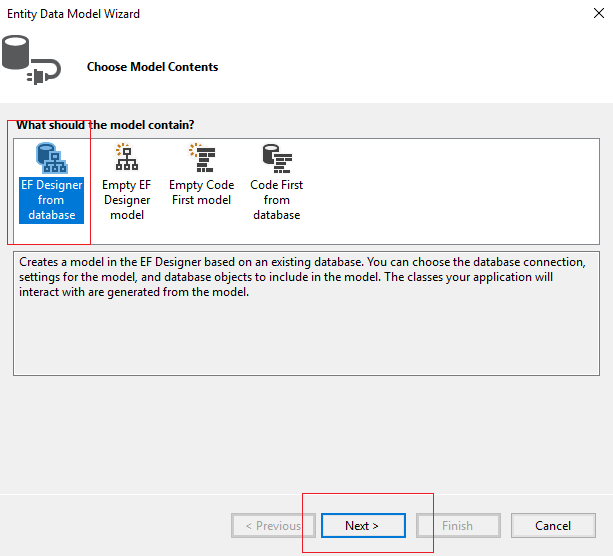
So, let's connect the above database with our project using ADO.NET Entity Framework database first approach, right click on your project's Model folder, then select "ADD" and then "ADO.NET Entity Data Model" as shown below"
Provide the Name of the ADO.NET Edmx File. Now, Select "Ef designer from database" -> Click "Next"
Click on "New Connection" -> to open New connection pop-up. In this pop-up, connect to your local database by entering required details as in the below image
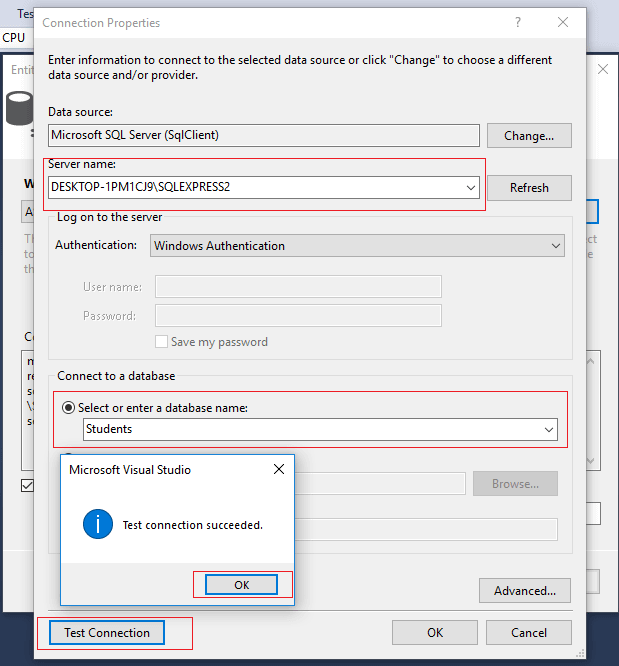
As you can see in the above image, we are successfully connected to our database. Now, click "OK" and then select "Next"
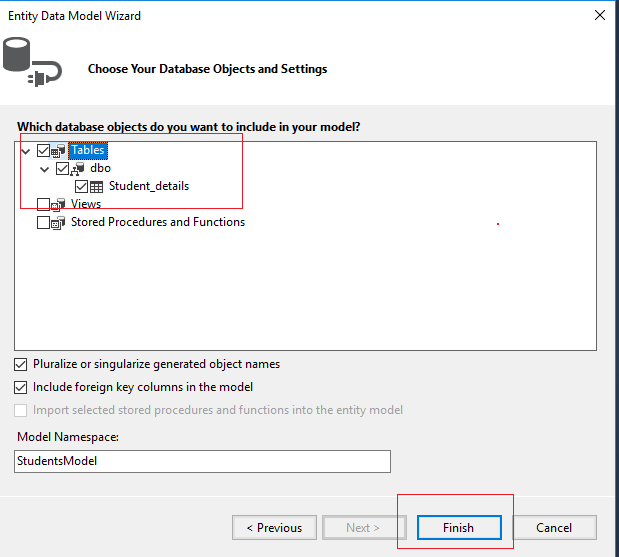
After clicking "Next", select the tables which you want to include and that's it you are done.
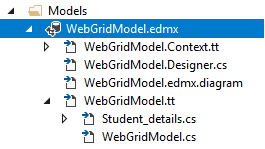
You can see the edmx files in your project's folders as below
Step 3: Now, let begin with the main part of this article, to integrate WebGrid In MVC, go to your HomeController and add the below C# code to fetch student data from the database
        public ActionResult Index()
        {
            var Model = new List<Student_details>();
            using (var context = new StudentsEntities())
            {
                Model = context.Student_details.ToList();
            }
            return View(Model);
        }
In your Razor View(Index.cshtml), you can write the code below to initialize WebGrid and start showing data
@model IEnumerable<WebGridInMVC.Models.Student_details>
@{
    ViewBag.Title = "Home Page";

    var grid = new WebGrid(source: Model);//initialize WebGrid with paging By default by providing sorce as Model

}
<br/>
<!--Razor code to show grid's HTML data-->
@grid.GetHtml()
Build & run your code in the browser
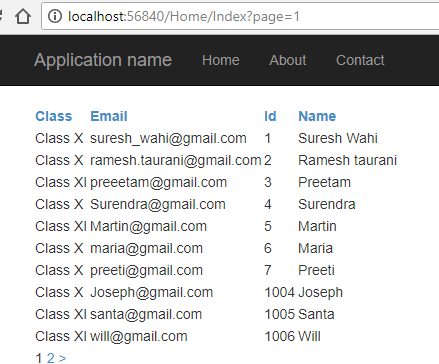
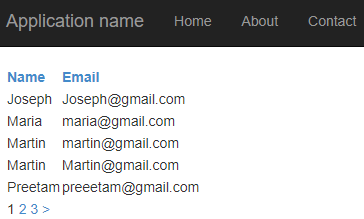
Now, as you can see in the above Razor code, we have just provided Source as Model while initializing WebGrid, now let's add a code to sort the columns using WebGrid, so your Razor code will be
@model IEnumerable<WebGridInMVC.Models.Student_details>
@{
    ViewBag.Title = "Home Page";

    var grid = new WebGrid(source: Model, canSort:true);

}
<br/>
<!--Razor code to show grid HTML data-->
@grid.GetHtml()
Now, refresh your browser and output will be as below
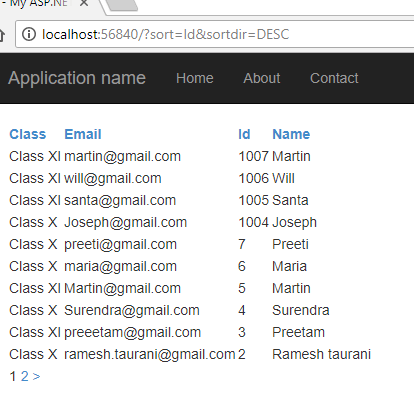
Note the url in the above image, as your can see "?sort=Id&sortdir=DESC",the above table is sorted by Id in Descending order,if you want to disable sorting in the table, you can provide canSort:false in the above razor code.
Sorting using Default sort column in WebGrid
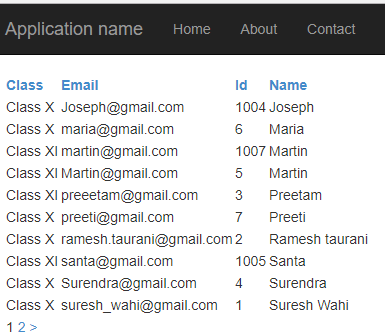
You can also specify default sort column in WebGrid, like in below code, default sort column is "Name"
var grid = new WebGrid(Model, defaultSort: "Name");Output in your browser, after changing code in Razor View
Providing rows per page to show in table view
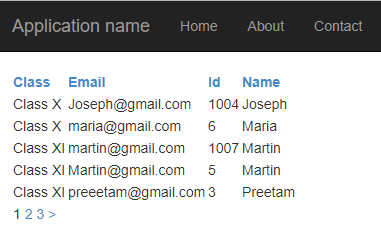
You can set rows per page to display in the WebGrid, set rowsPerPage property to the instance of the WebGrid.
var grid = new WebGrid(Model, defaultSort: "Name",rowsPerPage:5);after implementing the above code in Razor you can refresh your browser and check, you will see 5 rows per page
Specify the columns you want to show in WebGrid
You can specify the columns you want to show in WebGrid using columnNames property, so your razoe code to show Email and Name would be like
@model IEnumerable<WebGridInMVC.Models.Student_details>
@{
    ViewBag.Title = "Home Page";

    var grid = new WebGrid(Model, defaultSort: "Name",rowsPerPage:5, columnNames: new [] { "Name", "Email" });

}
<br/>
<!--Razor code to show grid HTML data-->
@grid.GetHtml()
Output of the above code will be as below
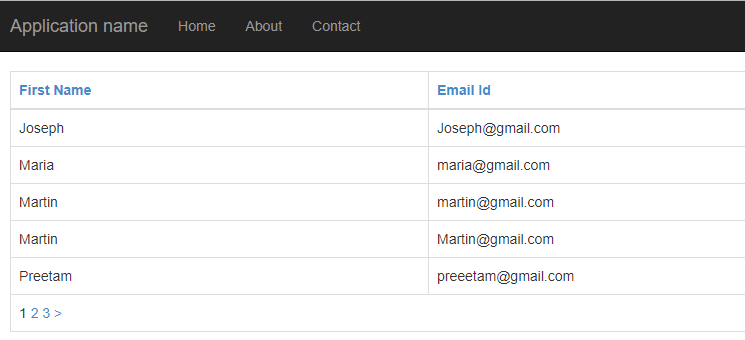
Change column header names
You can change default column names of the table, which is coming from database column's, suppose you want to change "Name" header into "First name", then you need to change code like below
@model IEnumerable<WebGridInMVC.Models.Student_details>
@{
    ViewBag.Title = "Home Page";

    var grid = new WebGrid(Model, defaultSort: "Name",rowsPerPage:5, columnNames: new [] { "Name", "Email" });

}
<br/>
<!--Razor Code to change column names -->
@grid.GetHtml(columns: grid.Columns(grid.Column("Name", header: "First Name"),
                            grid.Column("Email", "Email Id")))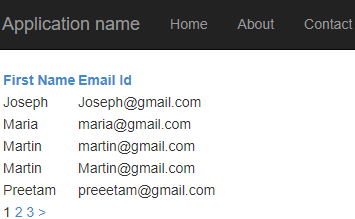
Providing WebGrid table style
You can also specify css class to be used in table, suppose, we need to implement bootstrap table class .table & .table-bordered in our <table> tag of WebGrid generated HTML, then you can modify your Razor code as below
@grid.GetHtml(columns: grid.Columns(grid.Column("Name", header: "First Name"),
                            grid.Column("Email", "Email Id")), tableStyle: "table table-bordered")
Implementing the above classes in <table> provide in output as below
Similary, we can also set other HTML tag's of table also, like
- headerStyle - for header of the webgrid
- footerStyle - for footer of the webgrid
- rowStyle - for rows of the webgrid
- alternateRowStyle - for alternate rows of the webgrid
- selectedRowStyle - for selected row of the webgrid
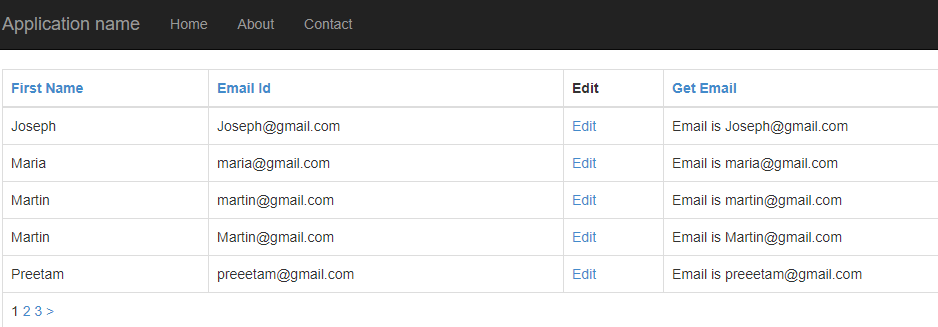
Adding Custom columns like Edit/Delete in WebGrid
This is one of the important functionality which we may need wwhile working with WebGrid, as usually we need two more fields like to Edit & delete row data, so for that you can addtional columns and column with custom function also
<!--Razor code to show grid HTML data with Custom columns added and function-->
@grid.GetHtml(columns: grid.Columns(
                            grid.Column("Name", header: "First Name"),
                            grid.Column("Email", "Email Id"),
                              grid.Column(header: "Edit", format: (item) =>
                              {
                                  var link = Html.ActionLink("Edit", "Edit", new { id = item.Id});
                                  return link;
                              }),

                            grid.Column("Get Email", format: a => CustomFunction(a.Email))

                            ), tableStyle: "table table-bordered")

<!--Custom helper function which can be called-->
@helper CustomFunction(string Email)
{
        <text>Email is @Email </text>
}
As you can see in the above Razor Code we have added our custom razor helper function to get user's email, also "Edit" is a hyperlink which Url like "http://localhost:56840/Home/Edit/6" where 6 is Id from the database
Get Table data using Ajax in WebGrid
You can also get data in table using AJAX, this will benefit you to load next page without full refresh of page, so for that you would have to sepcify ajaxUpdateContainerId property, Id of the HTML element inside which we want to populate WebGrid's tabular data.
@{
      var grid = new WebGrid(Model, ajaxUpdateContainerId: "GridTableDiv");
}

<div id="GridTableDiv">
    @grid.GetHtml(tableStyle: "table table-bordered")
</div>
You may also like to read:
How to use Rich text editor (CKEditor) in MVC
Multiple models in one view (Single view) in ASP.NET MVC
Autocomplete Textbox using Javascript (Multiple Methods)
That's it, we are done, I hope this article makes lots of thinsg clear for you about WebGrid in MVC, if you have any questions, feel free to ask it using comment's section or in question's section.
 Buy us a coffee
 Become a Patron