
Photoshop is an easy tool to use and a difficult one to master, It’s been 25 years since the first version of Photoshop was released and many folks in the designing field have been using it for many years, but some of you might be struggling with the basic tools or some advanced preferences inside Photoshop.
So here are few tips and tricks to help the Photoshop user's
New Guide Layout – Stay Aligned
It’s always good to keep your developers happy by creating well aligned and pixel-perfect designs. If you guys are using the latest Photoshop cloud versions like Photoshop CC, then under the view menu you will find a new option called ‘NEW GUIDE LAYOUT’; Many of you might be familiar with column grid lines, but what if I told you can make them in Photoshop with just a few clicks.
Artboards – Enlarge Your Canvas
In Photoshop as of 2015; if you are a web or UX designer, you may increasingly find yourself designing websites or apps for multiple devices. Artboards let you streamline your design process by giving you an infinite canvas on which you can layout designs for different devices and screens. Also, while creating artboards, you can choose from a wide variety of preset sizes or define your own custom artboard size. Hence, if you are a subscriber to cloud versions of Adobe software then don’t forget to update to Photoshop CC 2015.
Combine images with text
There's a really easy way to overlay an image on top of text. Drop an image layer over a type layer then hold down Alt and click the line between the two layers in the Layers Panel to clip the image to the text.
Bird's eye view
When zoomed in close, hold down H and drag in the image to instantly dart out to full screen then jump back to another area. One of the best Photoshop tips for viewing work!
Transform: Change the size of an image, rotate, flip or distort it!
Click Edit > then click Transform > and select the action you desire.
Or try these shortcuts to make life even easier:
Press Ctrl + T on your keyboard and a bounding box will then appear around the image, indicating transformation. This means you can now resize your image. The best way to do so is by placing the cursor on one of the rectangle corners of the box and then dragging the corner while holding the Shift key. When you’re finished just press Enter and you’re done.
To flip your image vertically or horizontally press Ctrl + T and then right click your mouse. A popup window will appear with a few options for rotating and flipping the image. Select the action you want and when you are done press Enter.
To distort or skew an image press Ctrl + T and then place the cursor on whichever corner you want to distort. Press Ctrl while holding your mouse down on whichever corner of the image you’re looking to morph and drag it down to your desired point, finally press Enter to activate.
Change the Unit of Measurement
A short and quick way to switch between units of measurements that you’re working with is to place your cursor on one of the rulers on your grid (press Ctrl + R to show or hide the rulers), and right click, then choose a new unit from the context menu. There you’ll find a wide variety of units, from centimeters to pixels, millimeters, points and even percents.
Learning Keyboard Shortcuts
Learning keyboard shortcuts will help you to speed up your processing workflow. There are few key shortcuts for different tools in the tool bar. A few of the most widely used shortcuts are:
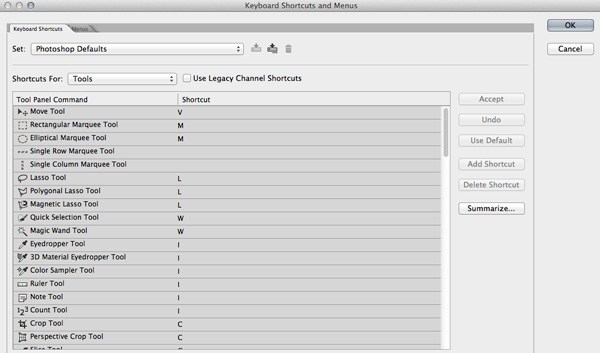
- V = move tool
- F – toggles through display screen modes
- Space bar = temporary hand key
- B – paintbrush tool
- D – sets the foreground/background colorss to default
- X – swaps between background and foreground color
- E – eraser tool
- S – stamp or cloning tool
- W – quick selection tool
- Ctrl+j – duplicates the selected layer
There are just few of the most regularly used Photoshop shortcuts. When you start using the program more, your knowledge of shortcuts will gradually increase. Once you are aware of the most used shortcuts retouching pace will be faster than ever.
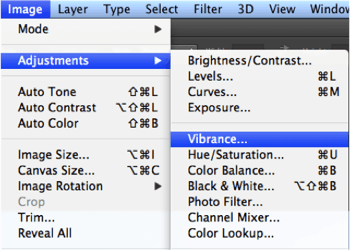
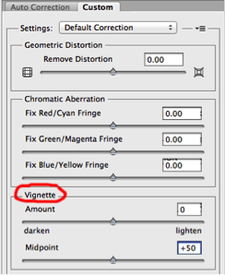
Adding a Vignette
Vignetting is basically a technique to darken the edges of your frame so that the eyes move to the subject more easily. This procedure works best when you have a subject in the center. Our eyes tend to move towards the brighter part of the image and recede on the darker side. This technique will result in dark space around the subject.
There are lots of manual ways you can add vignetting in your photos but I will talk about how to easily add vignetting in your images via Photoshop. Go to Filters Menu at the top and select “Lens Correction”, then choose the Custom Tab on the right. The third section down is for adding a vignette. Slide the Amount to the left to darken, and Midpoint to adjust the size of the circle.
New Guide Layout – Stay Aligned
It’s always good to keep your developers happy by creating well aligned and pixel-perfect designs. If you guys are using the latest Photoshop cloud versions like Photoshop CC, then under the view menu you will find a new option called ‘NEW GUIDE LAYOUT’; Many of you might be familiar with column grid lines, but what if I told you can make them in Photoshop with just a few clicks? Isn’t it cool?

Artboards – Enlarge Your Canvas
I know what you’re thinking: “ARTBOARDS? Wait, you said this article is about Photoshop, not Illustrator!” Well, the good news is now you can make artboards in Photoshop as of 2015; if you are a web or UX designer, you may increasingly find yourself designing websites or apps for multiple devices. Artboards let you streamline your design process by giving you an infinite canvas on which you can lay out designs for different devices and screens. Also, while creating artboards, you can choose from a wide variety of preset sizes or define your own custom artboard size. Hence, if you are a subscriber to cloud versions of Adobe software then don’t forget to update to Photoshop CC 2015.

Helpful History Settings
Have you ever tried (and failed) to undo layer visibility by pressing ctrl+alt+z? Well, there is a small setting you need to perform before you can actually undo any layer visibility changes. Just go to your history options under the history panel by clicking on the top right corner icon and check mark the box that says “make layer visibility changes undoable”. And, if you are a beginner in Photoshop, don’t forget to crank up your history states the value in Edit > preferences > Performance > History states.

Quick Export Options
If you are a web or UI/UX designer, you must have faced the tedious process of exporting your assets by saving them all in PNG or JPG individually. Some of you folks would also have tried to export the assets by renaming the layers and generating the Image Asset as Photoshop cc lets you do that (Yes it does in case you don’t know about it yet). But if you have updated your Photoshop to CC 2015 you will be able to export anything by just right-clicking on that layer and export it in whatever format you want it to. You simply can change your export preferences by going to Edit > Preferences > Export > and choose the desired format from the drop-down.

Insert Lorem Ipsum – Dummy Text
A new feature that will help save time when you’re producing mock-ups inside Photoshop is the handy new Lorem Ipsum function. Select the type tool and draw an area, type box by clicking and dragging out a selection. Now choose Type > Paste Lorem Ipsum to automatically fill your type area with dummy text.
 Buy us a coffee
 Become a Patron