
In one of our previous articles, I have provided code to upload file on server using asp.net core mvc and importing excel file in database in MVC, now in this article, we will be importing excel file data to .NET Core application and then save it's data in sql server database using C# and SQL bulk copy in .NET Core.
Note: As we are using OleDb in this article, it will only work for you if have .NET Core version 2.0 or above as OleDb doesn't work below .NET Core 2.0
Step 1: First of all, you need to create new project in your Visual Studio, I am using Visual Studio 2017, navigate to File-> New -> Project -> Select "Web" from left pane and "ASP.NET Core Web-Application" from right pane, as shown in the below image
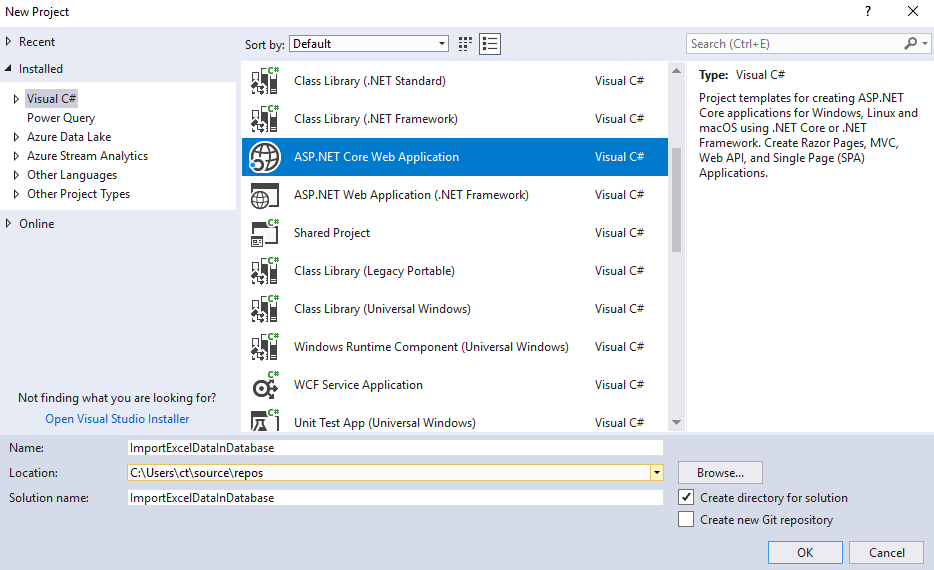
In the next screen, select .NET Core/ASP.NET Core 2 or higher version, also select "Web-Application (Model-View-Controller)" to generate it's default template automatically by VIsual Studio

Step 2: Once the template files has been generated by Visual Studio, you can navigate to "Home"->"Index.cshtml" as we will be writing code to create form and file upload field in it.
Use the code below for Index.cshtml
@{
    ViewData["Title"] = "Home Page";
}

<form enctype="multipart/form-data" method="post" asp-controller="Home" asp-action="ImportExcelFile">
    <dl>
        <dt>
            <label>Upload Excel:</label>
        </dt>
        <dd>
            <input type="file" name="FormFile" id="FormFile">

        </dd>
    </dl>
    <input class="btn" type="submit" value="Upload" />
</form>
<br/>
<div class="">
    <!--Show Message if file is uploaded or not-->
    @ViewBag.Message
</div>
In the above code, we are creating form with asp-controller =name of controller and asp-action= name of action method to call, where we will submit form with file.
So, in the above code, we are uploading file with "HomeController" and "ImportExcelFile" as ActionMethod inside it.
Step 3: Install OleDb in your project using NuGet , naviagte to "Tools"-> "NuGet Package Manager"->"Manage NuGet Package for Solution.."-> Select "Browse" tab and then search for "OleDb"

Step 4: Navigate to HomeController.cs to write C# code to upload file and save details in database.
You can find it "Controllers"->"HomeController.cs" and create a new ActionMethod "ImportExcelFile"
In the ActionMethod we will upload excel file using IFormFile and then we will save the excel rows in database using OleDB and SqlBulkCopy
   private IHostingEnvironment _hostingEnv;
        public HomeController(IHostingEnvironment hostingEnv)
        {
            _hostingEnv = hostingEnv;
        }

        [HttpPost]
        public async Task<IActionResult> ImportExcelFile(IFormFile FormFile)
        {
            //get file name
            var filename = ContentDispositionHeaderValue.Parse(FormFile.ContentDisposition).FileName.Trim('"');

            //get path
            var MainPath = Path.Combine(Directory.GetCurrentDirectory(), "wwwroot", "Uploads");

            //create directory "Uploads" if it doesn't exists
            if (!Directory.Exists(MainPath))
            {
                Directory.CreateDirectory(MainPath);
            }

            //get file path
            var filePath = Path.Combine(MainPath, FormFile.FileName);
            using (System.IO.Stream stream = new FileStream(filePath, FileMode.Create))
            {
                await FormFile.CopyToAsync(stream);
            }

            //get extension
            string extension = Path.GetExtension(filename);


            string conString = string.Empty;

            switch (extension)
            {
                case ".xls": //Excel 97-03.
                    conString = "Provider=Microsoft.Jet.OLEDB.4.0;Data Source=" + filePath + ";Extended Properties='Excel 8.0;HDR=YES'";
                    break;
                case ".xlsx": //Excel 07 and above.
                    conString = "Provider=Microsoft.ACE.OLEDB.12.0;Data Source=" + filePath + ";Extended Properties='Excel 8.0;HDR=YES'";
                    break;
            }

            DataTable dt = new DataTable();
            conString = string.Format(conString, filePath);

            using (OleDbConnection connExcel = new OleDbConnection(conString))
            {
                using (OleDbCommand cmdExcel = new OleDbCommand())
                {
                    using (OleDbDataAdapter odaExcel = new OleDbDataAdapter())
                    {
                        cmdExcel.Connection = connExcel;

                        //Get the name of First Sheet.
                        connExcel.Open();
                        DataTable dtExcelSchema;
                        dtExcelSchema = connExcel.GetOleDbSchemaTable(OleDbSchemaGuid.Tables, null);
                        string sheetName = dtExcelSchema.Rows[0]["TABLE_NAME"].ToString();
                        connExcel.Close();

                        //Read Data from First Sheet.
                        connExcel.Open();
                        cmdExcel.CommandText = "SELECT * From [" + sheetName + "]";
                        odaExcel.SelectCommand = cmdExcel;
                        odaExcel.Fill(dt);
                        connExcel.Close();
                    }
                }
            }
            //your database connection string
            conString = @"Server=VKS-PC-NEW\SQLEXPRESS;Database=Students;Trusted_Connection=True;";

            using (SqlConnection con = new SqlConnection(conString))
            {
                using (SqlBulkCopy sqlBulkCopy = new SqlBulkCopy(con))
                {
                    //Set the database table name.
                    sqlBulkCopy.DestinationTableName = "dbo.Student_details";

                    // Map the Excel columns with that of the database table, this is optional but good if you do
                    //
                    sqlBulkCopy.ColumnMappings.Add("Id", "Id");
                    sqlBulkCopy.ColumnMappings.Add("Name", "Name");
                    sqlBulkCopy.ColumnMappings.Add("Email", "Email");
                    sqlBulkCopy.ColumnMappings.Add("Class", "Class");

                    con.Open();
                    sqlBulkCopy.WriteToServer(dt);
                    con.Close();
                }
            }
            //if the code reach here means everthing goes fine and excel data is imported into database
            ViewBag.Message = "File Imported and excel data saved into database";


            return View("Index");

        }
In the above code, first we are uploading excel file in "Uploads" folder of project, then we have created OldDbConnection object using connection string, the fetched Sheet name, a SELECT statement is executed and all the records from the Excel sheet are fetched into a DataTable.
Now a connection is established with the database and the SqlBulkCopy object is initialized and I have specified the name of the Table using the DestinationTableName property.
Finally, the columns are mapped and all the rows from the DataTable are inserted into the SQL Server table, here the following namespace will be used.
using System.Threading.Tasks;
using Microsoft.AspNetCore.Mvc;
using ImportExcelDataInDatabase.Models;

using Microsoft.AspNetCore.Hosting;
using Microsoft.AspNetCore.Http;
using System.Net.Http.Headers;
using System.IO;
using System.Data;
using System.Data.OleDb;
using System.Data.SqlClient;
Here is the sample file, which we will be uploading for this sample.

Once you are done, build project and run it in browser, you will see output like below

If you have any questions related to this article, feel free to ask it below in the comment's section.
You may also like to read:
Bulk Insert in ASP.NET Core MVC using Entity Framework Core
Creating GridView in ASP.NET Core MVC with Paging
 Buy us a coffee
 Become a Patron