
In the previous article, I mentioned GridView Control in ASP.NET Web-Forms and how to create webgrid in ASP.NET MVC, but now in this article, I am going to provide you step by step procedure for creating GridView in ASP.NET Core MVC with paging by fetching data from database using AdventureWorks database as a sample.
Step 1: Let's begin by creating new ASP.NET Core MVC project in your Visual Studio, so navigate to File->New->Project -> Select "ASP.NET Core Web Application" and then select "Model-View-Controller" in template and Click OK and let Visual Studio generate template for .NET Core MVC project.
Step 2: Install Entity Framework Core, so navigate to Tools -> NuGet Package Manager -> Manage Nuget Package for solution -> Select "Browse" tab and then search for "Microsoft.EntityFrameworkCore.SqlServer" and then install it.

Note: If you are getting any error to Install above package, you may need to make sure that EF Core version matches with ASP.NET Core version.
Step 3: Once you have installed the above package, right-click on your Solution "Models" folder and then select "Add"-> then select "Class", then name it as "Employee.cs"
using System.ComponentModel.DataAnnotations;

namespace GridViewNetCoreMVC.Models
{
    public class Employee
    {
        [Key] // indicate EF that this is key of table, as it doesn't have usualy "Id" column as PK
        public int EmpID { get; set; }
        public string FirstName { get; set; }
        public string LastName { get; set; }
        public string JobTitle { get; set; }
    }
}
Step 4: Now, we will need to add Database context in our project, add a new class to your project by right clicking on your project and then click on "Add" and then "New Item" option of the Context Menu and then select "Code" from left-pane and "Class" from right-pane.
Name it as "DBcontext.cs" and use the below C# code
using GridViewNetCoreMVC.Models;
using Microsoft.EntityFrameworkCore;
namespace GridViewNetCoreMVC
{
    public class DBcontext : DbContext
    {
        public DBcontext(DbContextOptions<DBcontext> options) : base(options)
        {
        }

        public DbSet<Employee> Employee { get; set; }
    }
}
Step 5: Add Connection string in appsettings.json as shown below
{
  "Logging": {
    "LogLevel": {
      "Default": "Warning"
    }
  },
  "AllowedHosts": "*",
  "ConnectionStrings": {
    "MyConnection": "Data Source=DESKTOP-1PM1CJ9\\SQLEXPRESS2;Initial Catalog=AdventureWorks2012;Integrated security=true"
  }
}
Step 6: Configure services in Startup.cs, basically, you need to add below code in Startup.cs -> ConfigrueServices method
 string conStr = this.Configuration.GetConnectionString("MyConnection");
 services.AddDbContext<DBcontext>(options => options.UseSqlServer(conStr));
Since, I am using ASP.NET Core 2.1, my Startup.cs looks like this
using System;
using System.Collections.Generic;
using System.Linq;
using System.Threading.Tasks;
using Microsoft.AspNetCore.Builder;
using Microsoft.AspNetCore.Hosting;
using Microsoft.AspNetCore.Http;
using Microsoft.AspNetCore.HttpsPolicy;
using Microsoft.AspNetCore.Mvc;
using Microsoft.EntityFrameworkCore;
using Microsoft.Extensions.Configuration;
using Microsoft.Extensions.DependencyInjection;

namespace GridViewNetCoreMVC
{
    public class Startup
    {
        public Startup(IConfiguration configuration)
        {
            Configuration = configuration;
        }

        public IConfiguration Configuration { get; }

        // This method gets called by the runtime. Use this method to add services to the container.
        public void ConfigureServices(IServiceCollection services)
        {
            services.Configure<CookiePolicyOptions>(options =>
            {
                // This lambda determines whether user consent for non-essential cookies is needed for a given request.
                options.CheckConsentNeeded = context => true;
                options.MinimumSameSitePolicy = SameSiteMode.None;
            });

            services.AddMvc().SetCompatibilityVersion(CompatibilityVersion.Version_2_1);

            string conStr = this.Configuration.GetConnectionString("MyConnection");
            services.AddDbContext<DBcontext>(options => options.UseSqlServer(conStr));
        }

        // This method gets called by the runtime. Use this method to configure the HTTP request pipeline.
        public void Configure(IApplicationBuilder app, IHostingEnvironment env)
        {
            if (env.IsDevelopment())
            {
                app.UseDeveloperExceptionPage();
            }
            else
            {
                app.UseExceptionHandler("/Home/Error");
                app.UseHsts();
            }

            app.UseHttpsRedirection();
            app.UseStaticFiles();
            app.UseCookiePolicy();

            app.UseMvc(routes =>
            {
                routes.MapRoute(
                    name: "default",
                    template: "{controller=Home}/{action=Index}/{id?}");
            });
        }
    }
}
Step 7: Now, we will add paging Nuget Package, so navigate to Tools -> Nuget Package Manager -> Manage Nuget Packages -> Search for "LazZiya.TagHelpers"

We are using the above Nuget package to add Paging in our table-based gridview, the above page will help you in generating Bootstrap class based HTML for paging.
Step 8: Now, we will create a class for Paging Extension in ASP.NET Core MVC, so right-click on your solution "Models" folder and then add a new Class named "PagedResultBase", by right-clicking Models folder and select "Add", then select "New Item" and then select "Class"
using System;
using System.Collections.Generic;


namespace GridViewNetCoreMVC.Models
{
    public abstract class PagedResultBase
    {
        public int CurrentPage { get; set; }
        public int PageCount { get; set; }
        public int PageSize { get; set; }
        public int RowCount { get; set; }

        public int FirstRowOnPage
        {

            get { return (CurrentPage - 1) * PageSize + 1; }
        }

        public int LastRowOnPage
        {
            get { return Math.Min(CurrentPage * PageSize, RowCount); }
        }
    }

    public class PagedResult<T> : PagedResultBase where T : class
    {
        public IList<T> Results { get; set; }

        public PagedResult()
        {
            Results = new List<T>();
        }
    }
}
Now, add another static Class in similar way, named as "PageHelper", which will be static class
using System;
using System.Linq;

namespace GridViewNetCoreMVC.Models
{
    public static class PageHelper
    {
        public static PagedResult<T> GetPaged<T>(this IQueryable<T> query,int page, int pageSize) where T : class
        {
            var result = new PagedResult<T>();
            result.CurrentPage = page;
            result.PageSize = pageSize;
            result.RowCount = query.Count();


            var pageCount = (double)result.RowCount / pageSize;
            result.PageCount = (int)Math.Ceiling(pageCount);

            var skip = (page - 1) * pageSize;
            result.Results = query.Skip(skip).Take(pageSize).ToList();

            return result;
        }
   }
}
Step 8: We are almost done, Navigate to HomeController.cs and add the below code so, we can get paginated result in GridView of .NET Core MVC
using Microsoft.AspNetCore.Mvc;
using GridViewNetCoreMVC.Models;

namespace GridViewNetCoreMVC.Controllers
{
    public class HomeController : Controller
    {
        private DBcontext Context { get; }
        public HomeController(DBcontext _context)
        {
            this.Context = _context;
        }


        public IActionResult Index(int p = 1)
        {
            PagedResult<Employee> customers = this.Context.Employee.GetPaged(p, 10);
            return View(customers);
        }

    }
}
In the above code, we are calling the database to get the results of Employee table, plus we are using GetPaged method, by passing page number as "p" and fetching 10 rows at a time.
Step 10: This is final step, now go to Index.cshtml view and use the below code, where we are using Lazziya taghelper for pagination and creating table for showing the results
@addTagHelper *, LazZiya.TagHelpers
@model PagedResult<Employee>
<br/>
<table cellpadding="0" cellspacing="0" class="table table-bordered table-condensed">
    <tr>
        <th>Emp Id</th>
        <th>First Name</th>
        <th>Last Name</th>
        <th>Job Title</th>
    </tr>
    @foreach (var products in Model.Results)
    {
        <tr>
            <td>@products.EmpID</td>
            <td>@products.FirstName</td>
            <td>@products.LastName</td>
            <td>@products.JobTitle</td>
        </tr>
    }
</table>


<paging page-no="@Model.CurrentPage"
        page-size="@Model.PageSize"
        total-records="@(Model.RowCount)">
</paging>
In the above Razor view, we are using Tag helper "@addTagHelper *, LazZiya.TagHelpers" to generate Bootstrap paging in .NET Core Razor View, we can simply use this code
<paging page-no="@Model.CurrentPage"
        page-size="@Model.PageSize"
        total-records="@(Model.RowCount)">
</paging>
That's it, we are done, you should see the output like below
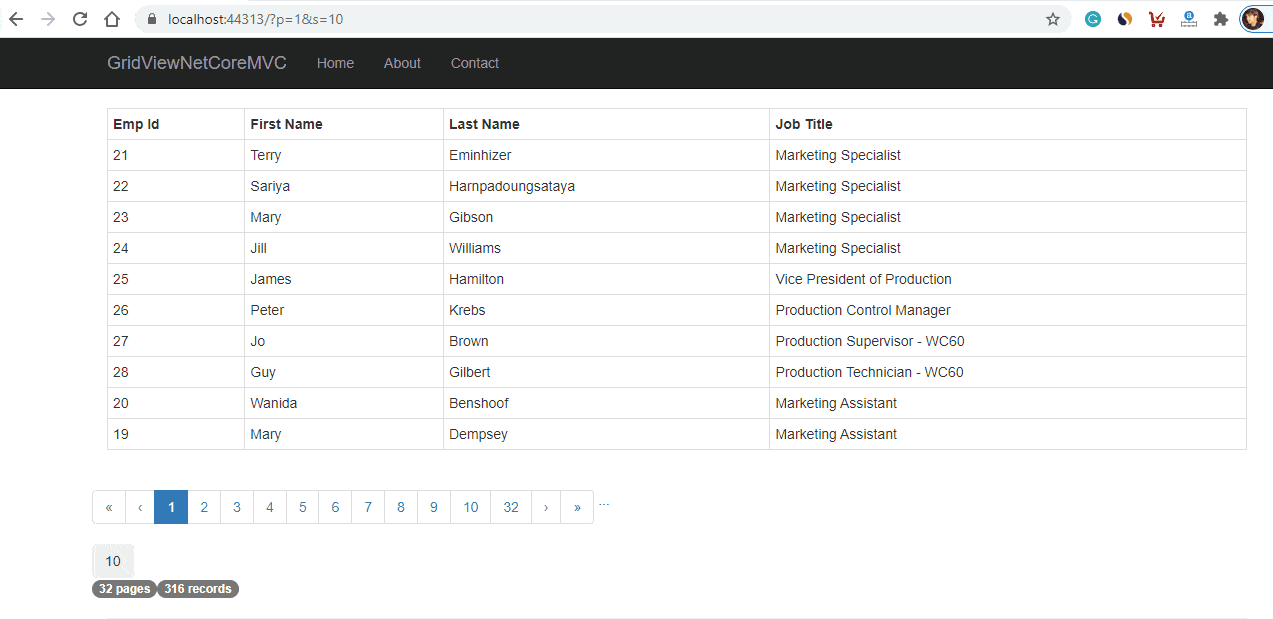
In the above image, as you can we are able to view total pages and total records also, if you don't want you can simply hide them using CSS.
You may also like to read:
Model Validation in ASP.NET Core MVC (With Custom validation example)
File upload in ASP.NET Core MVC (Single or Multiple files)
Form Submit in ASP.NET Core MVC using Tag Helpers
Read OR Generate QR Code in ASP.NET Core
Creating Google charts in ASP.NET Core MVC
Convert PDF to Image in C# (Console Application Example)
AWS vs DigitalOcean (Which is better? with Price Comparison)
Understanding Unit testing in C# With Example
 Buy us a coffee
 Become a Patron