In one of the previous article, I have explained about Implementing Payment Gateway in C# (ASP.NET Core MVC Razorpay Example) but now in this article, I have mentioned how we can upload large files in ASP.NET Core with progress bar using Tus third party client.
Tus.Io is a resumable file upload client and we will be using tusdotnet, which is a .NET server implementation of the tus.io protocol that runs on both .NET 4.x and .NET Core, so, let's get started with an example
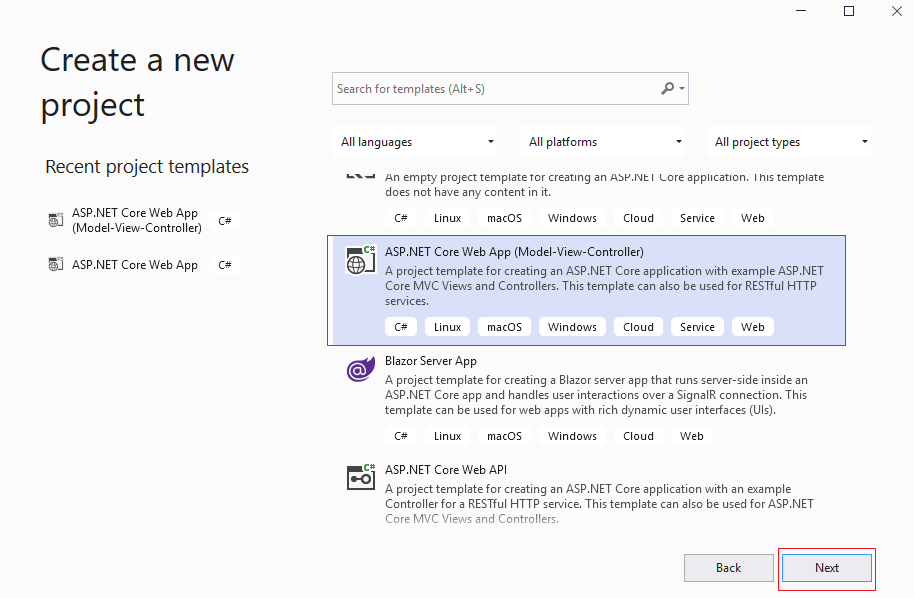
Step 1: Create a new project in your Visual Studio, I am using VS 2019, so open VS 2019, Click on "Create a project" -> then select "ASP.NET Core (Model View Controller)" as project template,

select .NET core version and click on "Create"

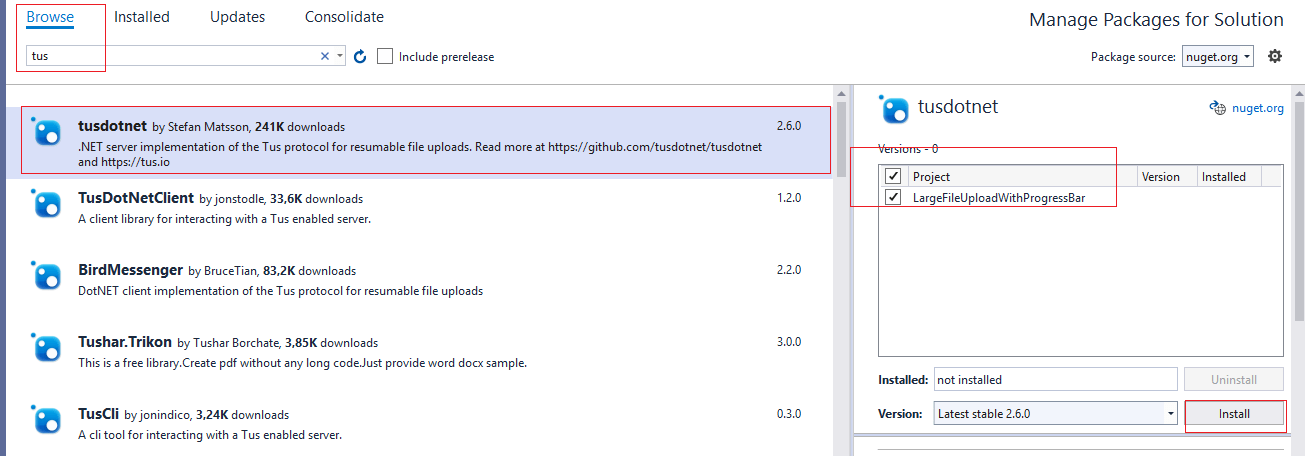
Step 2: One Visual Studio has generated template file, we will need to install Tusdotnet package in our project, so navigate to "Tools" -> Nuget package manager -> "Manage package for solution" -> Select "Browse" then search for "tus" and install tusdotnet package, as shown below

Step 3: Navigate to Startup.cs and create Tus Configuration
        private DefaultTusConfiguration CreateTusConfiguration(IServiceProvider serviceProvider)
        {
            var env = (IWebHostEnvironment)serviceProvider.GetRequiredService(typeof(IWebHostEnvironment));

            //File upload path
            var tusFiles = Path.Combine(env.WebRootPath, "tusfiles");

            return new DefaultTusConfiguration
            {
                UrlPath = "/files",
                //File storage path
                Store = new TusDiskStore(tusFiles),
                //Does metadata allow null values
                MetadataParsingStrategy = MetadataParsingStrategy.AllowEmptyValues,
                //The file will not be updated after expiration
                Expiration = new AbsoluteExpiration(TimeSpan.FromMinutes(5)),
                //Event handling (various events, meet your needs)
                Events = new Events
                {
                    //Upload completion event callback
                    OnFileCompleteAsync = async ctx =>
                    {
                        //Get upload file
                        var file = await ctx.GetFileAsync();

                        //Get upload file=
                        var metadatas = await file.GetMetadataAsync(ctx.CancellationToken);

                        //Get the target file name in the above file metadata
                        var fileNameMetadata = metadatas["name"];

                        //The target file name is encoded in Base64, so it needs to be decoded here
                        var fileName = fileNameMetadata.GetString(Encoding.UTF8);

                        var extensionName = Path.GetExtension(fileName);

                        //Convert the uploaded file to the actual target file
                        File.Move(Path.Combine(tusFiles, ctx.FileId), Path.Combine(tusFiles, $"{ctx.FileId}{extensionName}"));
                    }
                }
            };
        }
In the above code, we are saving file in "tusfiles", which you can create inside wwwroot folder of your project.
and also have created endpoint to upload file as "/files".
Also, you would have to add configuration in Configure method
app.UseTus(httpContext => Task.FromResult(httpContext.RequestServices.GetService<DefaultTusConfiguration>()));And, to use it in application, we will add it as Singleton and increase file upload size
  public void ConfigureServices(IServiceCollection services)
        {
            services.AddControllersWithViews();
            services.AddSingleton(CreateTusConfiguration);
            services.Configure<IISServerOptions>(options =>
            {
                options.MaxRequestBodySize = int.MaxValue;
            });
        }
If you are not aware of what is AddSingleton, you can read: Difference between AddTransient, AddScoped and AddSingleton in ASP.NET Core
So your complete Startup.cs would be as below
using Microsoft.AspNetCore.Builder;
using Microsoft.AspNetCore.Hosting;
using Microsoft.AspNetCore.HttpsPolicy;
using Microsoft.Extensions.Configuration;
using Microsoft.Extensions.DependencyInjection;
using Microsoft.Extensions.Hosting;
using System;
using System.Collections.Generic;
using System.IO;
using System.Linq;
using System.Text;
using System.Threading.Tasks;
using tusdotnet;
using tusdotnet.Models;
using tusdotnet.Models.Configuration;
using tusdotnet.Models.Expiration;
using tusdotnet.Stores;


namespace LargeFileUploadWithProgressBar
{
    public class Startup
    {
        public Startup(IConfiguration configuration)
        {
            Configuration = configuration;
        }

        public IConfiguration Configuration { get; }

        // This method gets called by the runtime. Use this method to add services to the container.
        public void ConfigureServices(IServiceCollection services)
        {
            services.AddControllersWithViews();
            services.AddSingleton(CreateTusConfiguration);
            services.Configure<IISServerOptions>(options =>
            {
                options.MaxRequestBodySize = int.MaxValue;
            });
        }

        // This method gets called by the runtime. Use this method to configure the HTTP request pipeline.
        public void Configure(IApplicationBuilder app, IWebHostEnvironment env)
        {
            if (env.IsDevelopment())
            {
                app.UseDeveloperExceptionPage();
            }
            else
            {
                app.UseExceptionHandler("/Home/Error");
                // The default HSTS value is 30 days. You may want to change this for production scenarios, see https://aka.ms/aspnetcore-hsts.
                app.UseHsts();
            }
            app.UseHttpsRedirection();
            app.UseStaticFiles();

            app.UseRouting();
            app.UseTus(httpContext => Task.FromResult(httpContext.RequestServices.GetService<DefaultTusConfiguration>()));
            app.UseAuthorization();

            app.UseEndpoints(endpoints =>
            {
                endpoints.MapControllerRoute(
                    name: "default",
                    pattern: "{controller=Home}/{action=Index}/{id?}");
            });
        }


        private DefaultTusConfiguration CreateTusConfiguration(IServiceProvider serviceProvider)
        {
            var env = (IWebHostEnvironment)serviceProvider.GetRequiredService(typeof(IWebHostEnvironment));

            //File upload path
            var tusFiles = Path.Combine(env.WebRootPath, "tusfiles");

            return new DefaultTusConfiguration
            {
                UrlPath = "/files",
                //File storage path
                Store = new TusDiskStore(tusFiles),
                //Does metadata allow null values
                MetadataParsingStrategy = MetadataParsingStrategy.AllowEmptyValues,
                //The file will not be updated after expiration
                Expiration = new AbsoluteExpiration(TimeSpan.FromMinutes(5)),
                //Event handling (various events, meet your needs)
                Events = new Events
                {
                    //Upload completion event callback
                    OnFileCompleteAsync = async ctx =>
                    {
                        //Get upload file
                        var file = await ctx.GetFileAsync();

                        //Get upload file=
                        var metadatas = await file.GetMetadataAsync(ctx.CancellationToken);

                        //Get the target file name in the above file metadata
                        var fileNameMetadata = metadatas["name"];

                        //The target file name is encoded in Base64, so it needs to be decoded here
                        var fileName = fileNameMetadata.GetString(Encoding.UTF8);

                        var extensionName = Path.GetExtension(fileName);

                        //Convert the uploaded file to the actual target file
                        File.Move(Path.Combine(tusFiles, ctx.FileId), Path.Combine(tusFiles, $"{ctx.FileId}{extensionName}"));
                    }
                }
            };
        }

    }
}
Step 4: Now, navigate to Views -> Home -> Index.cshtml and use the below code, in which we are using Tus Js client to upload file with getting progress status
@{
    ViewData["Title"] = "Home Page";
}
<link href="~/lib/bootstrap/dist/css/bootstrap.css" rel="stylesheet" />

<script src="~/lib/jquery/dist/jquery.min.js"></script>
<script type="text/javascript" src="https://cdn.jsdelivr.net/npm/tus-js-client@latest/dist/tus.min.js"></script>


<div class="form-horizontal" style="margin-top:80px;">
    <div class="form-group" id="progress-group" style="display:none;">
        <div id="size"></div>
        <div class="progress">
            <div id="progress" class="progress-bar progress-bar-success progress-bar-animated progress-bar-striped" role="progressbar"
                 aria-valuemin="0" aria-valuemax="100">
                <span id="percentage"></span>
            </div>
        </div>
    </div>
    <div class="form-group">
        <div class="col-md-10">
            <input name="file" id="file" type="file" />
        </div>
    </div>
    <div class="form-group">
        <div class="col-md-offset-2 col-md-10">
            <input type="submit" id="submit" value="Upload" class="btn btn-success" />
            <input type="button" id="pause" value="Pause" class="btn btn-danger" />
            <input type="button" id="continue" value="Continue" class="btn btn-info" />
        </div>
    </div>
</div>


<script type="text/javascript">
    $(function () {
        var upload;

        //Upload
        $('#submit').click(function () {

            $('#progress-group').show();

            var file = $('#file')[0].files[0];

            //Create tus upload object
            upload = new tus.Upload(file, {
                //File server upload endpoint address settings
                endpoint: "files",
                //Retrying delay settings
                retryDelays: [0, 3000, 5000, 10000, 20000],
                //Metadata required by attachment server
                metadata: {
                    name: file.name,
                    contentType: file.type || 'application/octet-stream',
                    emptyMetaKey: ''
                },
                //Callback errors that cannot be resolved by retrying
                onError: function (error) {
                    console.log("Failed because: " + error)
                },
                //Upload progress callback
                onProgress: onProgress,
                //Callback after upload
                onSuccess: function () {
                    console.log("Download %s from %s", upload.file.name, upload.url);
                    $('.progress-bar-animated').removeClass('progress-bar-animated');
                }
            })

            upload.start()
        });

        //Pause
        $('#pause').click(function () {
            upload.abort()
        });

        //Continue
        $('#continue').click(function () {
            upload.start()
        });

        //Upload bar progress update function
        function onProgress(bytesUploaded, bytesTotal) {
            var percentage = (bytesUploaded / bytesTotal * 100).toFixed(2);
            $('#progress').attr('aria-valuenow', percentage);
            $('#progress').css('width', percentage + '%');

            $('#percentage').html(percentage + '%');

            var uploadBytes = byteToSize(bytesUploaded);
            var totalBytes = byteToSize(bytesTotal);

            $('#size').html(uploadBytes + '/' + totalBytes);
        }

        //Convert bytes to byte, KB, MB, etc
        function byteToSize(bytes, separator = '', postFix = '') {
            if (bytes) {
                const sizes = ['Bytes', 'KB', 'MB', 'GB', 'TB'];
                const i = Math.min(parseInt(Math.floor(Math.log(bytes) / Math.log(1024)).toString(), 10), sizes.length - 1);
                return `${(bytes / (1024 ** i)).toFixed(i ? 1 : 0)}${separator}${sizes[i]}${postFix}`;
            }
            return 'n/a';
        }
    });

</script>
as you can see in above JS code, on clicking submit button, we are creatung tus js client object and calling it's endpoint "/files" to upload file.
We are also checking upload progress
                //Upload progress callback
                onProgress: onProgress,
which calls Jaavscript function
 //Upload bar progress update function
        function onProgress(bytesUploaded, bytesTotal) {
            var percentage = (bytesUploaded / bytesTotal * 100).toFixed(2);
            $('#progress').attr('aria-valuenow', percentage);
            $('#progress').css('width', percentage + '%');

            $('#percentage').html(percentage + '%');

            var uploadBytes = byteToSize(bytesUploaded);
            var totalBytes = byteToSize(bytesTotal);

            $('#size').html(uploadBytes + '/' + totalBytes);
        }
which will update bootstrap progress bar width while file is uploading.
Once you will build project and check output, you will see output like below

To download large files, you can create endpoint in HomeController like this, in which we are passing fileId to download file.
        public static async Task HandleRoute(HttpContext context)
        {
            var config = context.RequestServices.GetRequiredService<DefaultTusConfiguration>();

            if (!(config.Store is ITusReadableStore store))
            {
                return;
            }

            var fileId = (string)context.Request.RouteValues["fileId"];
            var file = await store.GetFileAsync(fileId, context.RequestAborted);
            if (file == null)
            {
                context.Response.StatusCode = 404;
                await context.Response.WriteAsync($"File with id {fileId} was not found.", context.RequestAborted);
                return;
            }

            var fileStream = await file.GetContentAsync(context.RequestAborted);
            var metadata = await file.GetMetadataAsync(context.RequestAborted);

            context.Response.ContentType = GetContentTypeOrDefault(metadata);
            context.Response.ContentLength = fileStream.Length;

            if (metadata.TryGetValue("name", out var nameMeta))
            {
                context.Response.Headers.Add("Content-Disposition",
                    new[] { $"attachment; filename=\"{nameMeta.GetString(Encoding.UTF8)}\"" });
            }

            using (fileStream)
            {
                await fileStream.CopyToAsync(context.Response.Body, 81920, context.RequestAborted);
            }
        }

        private static string GetContentTypeOrDefault(Dictionary<string, Metadata> metadata)
        {
            if (metadata.TryGetValue("contentType", out var contentType))
            {
                return contentType.GetString(Encoding.UTF8);
            }

            return "application/octet-stream";
        }
You may also like to read:
File upload with progress bar in ASP.NET MVC
