
This is the part-2 tutorial of the jQuery datatable server side processing using WEB-API in asp.net MVC C#, if you haven't read the first article, please check part-1 article first, as we will continue the remaining operations of create, Edit and delete in this part, you can already see List from database in jQuery datatable using WEB-API with Sorting, filtering and Paging enabled in it.
Create/Add new data using jQuery datatable and Web API
Let's create a button to add new values in the database and load the bootstrap pop-up modal to enter new details, so here is the code for Pop-up modal
<button type="button" class="btn btn-primary" id="Create">Create</button>
<!-- Modal -->
<div id="myModal" class="modal fade" role="dialog">
<div class="modal-dialog">
<!-- Modal content-->
<div class="modal-content">
<div class="modal-header">
<button type="button" class="close" data-dismiss="modal">×</button>
<h4 class="modal-title" id='ModalHeader'></h4>
</div>
<div class="modal-body" id="MainBody">
</div>
<div class="modal-footer">
<button type="button" class="btn btn-default" data-dismiss="modal">Close</button>
</div>
</div>
</div>
</div>in the above bootstrap pop-up modal we have left the main body empty, as we will be loading this data from another partial view, by calling it using jQuery Ajax.
The benefit of loading modal body part using jQuery Ajax & partial view will be, that we wouldn't need to create another modal for edit function, we will be open/closing bootstrap pop-up modal using jQuery and loading its content by calling partial view using jQuery Ajax, and validating values using jQuery Validate plugin , so I have included the jQuery validate plugin in my view using CDN link as below
<script src="https://cdnjs.cloudflare.com/ajax/libs/jquery-validate/1.17.0/jquery.validate.js"></script>Now, let's create a Partial View & it's ActionMethod in controller
 public ActionResult Create()
        {

            return PartialView("_CreateEdit");
        }
Partial View razor code
@model jQueryDatatablWebApi.Models.Blog

<div class="col-lg-12">
<form class="form-horizontal" id="BlogForm" method="post" action="">
    <div class="form-group">
        @Html.LabelFor(model => model.Name)
        @Html.TextBoxFor(model => model.Name, new { @class = "form-control", required = "" })
    </div>
    <div class="form-group">
        <label>Category Name</label>

        @Html.TextBoxFor(model => model.CategoryName, new { @class = "form-control", required = "" })
    </div>

    <div class="form-group">
        <label>Post Count</label>
        @Html.TextBoxFor(model => model.PostCount, new { @class = "form-control" })
    </div>

    <div class="row">
    <button type="button" class="btn btn-primary" id="Submit">Save</button>
</div>

</form>
</div>Note, I have added form tag in the above HTML, but we will be submitting values using jQuery (You can use other methods for it also) now jQuery code to load it in Modal-pop
 $("#Create").on('click', function () {

        $.get('/Home/Create', function (data) {

            //set Modal header text
            $("#ModalHeader").html("Create");

            //add returned partial view html into modal body
            $("#MainBody").html(data);

            //show modal
            $('#myModal').modal('show');

            //inititae jQuery validation
            $("#BlogForm").validate();
        });
    });
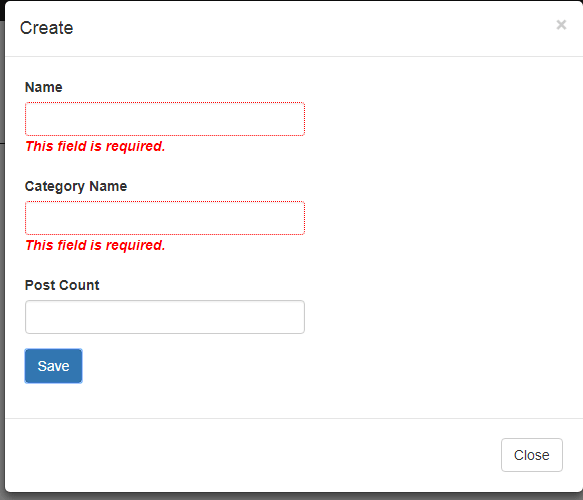
Try to check validation error messages
Now create a code in your Web API controller to save new Blog data
 public HttpResponseMessage Create(Blog blog)
        {
            HttpResponseMessage result;
            try
            {

                    using (var ctx = new BlogDbEntities())
                    {
                        //save new blog data in database
                        blog.DateAdded = DateTime.Now;
                        ctx.Blogs.Add(blog);
                        ctx.SaveChanges();
                    }
                 //create success response and return it
                  result = Request.CreateResponse(HttpStatusCode.Created, blog);
            }

            catch (Exception e)
            {
                result = Request.CreateResponse(HttpStatusCode.BadRequest, "Server failed to save data");
            }
            return result;


        }
In the Main view, use the jQuery code to validate form using jQuery validate on "Save" button click and pass it to Web API
$(document).on('click', '#Submit', function (event) {
event.preventDefault();
//check validation first
if ($("#BlogForm").valid())
{
var data = {
Name: $("#Name").val().trim(),
CategoryName: $("#CategoryName").val().trim(),
PostCount: $("#PostCount").val().trim()
}
$.ajax({
url: '/api/DataTableAPI/Create',
type: 'POST',
dataType: 'json',
data: data,
success: function (d) {
//values created
//close pop-up modal
$('#myModal').modal('hide');
//reload jquery datatable
$BlogTable.api().ajax.reload();
},
error: function () {
alert("Error please try again");
}
})
}
return false;
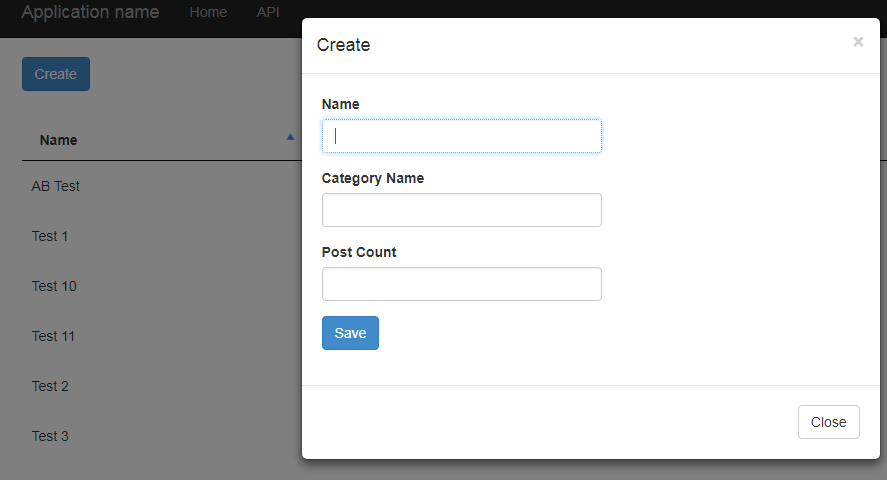
});Run your project, Enter details in Pop-up model like below

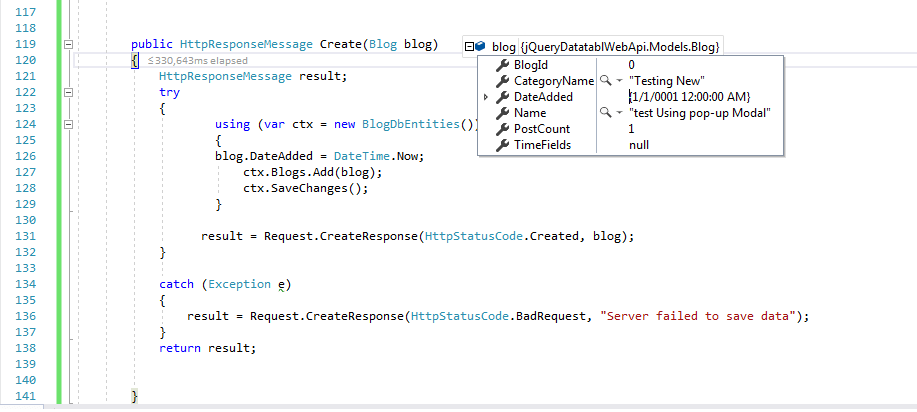
Confirm values in C# code using debug
Check the table updated data

Edit Data using Web api MVC and jQuery datatable
For editing we can use same procedure, just need to create a new jquery code to load partial view with data this time and then save using new web API code, so our C# call to get PartialView would be
 public ActionResult Edit(int id)
        {
            Blog bl = new Blog();
            using (var ctx = new BlogDbEntities())
            {
                bl = ctx.Blogs.Where(a => a.BlogId == id).FirstOrDefault();
                ctx.SaveChanges();
            }

            return PartialView("_CreateEdit",bl);
        }
In the View, we should add now Hidden Fields for Id, Date added (PartialView will still work for Create also)
@model jQueryDatatablWebApi.Models.Blog

<div class="col-lg-12">
<form class="form-horizontal" id="BlogForm" method="post" action="">

    @Html.HiddenFor(model => model.BlogId)
    @Html.HiddenFor(model=>model.DateAdded)

    <div class="form-group">
        @Html.LabelFor(model => model.Name)
        @Html.TextBoxFor(model => model.Name, new { @class = "form-control", required = "" })
    </div>
    <div class="form-group">
        <label>Category Name</label>

        @Html.TextBoxFor(model => model.CategoryName, new { @class = "form-control", required = "" })
    </div>

    <div class="form-group">
        <label>Post Count</label>
        @Html.TextBoxFor(model => model.PostCount, new { @class = "form-control" })
    </div>

    <div class="row">
    <button type="button" class="btn btn-primary" id="Submit">Save</button>
</div>

</form>
    </div>
Now let's add jQuery code to load data in Pop-up when Edit button is clicked
  //call pop-up on edit
    $(document).on('click','.edit', function () {
        var id = $(this).attr('data-id');
        $.get('/Home/Edit/' + id, function (data) {

            //set Modal header text
            $("#ModalHeader").html("Edit");

            //add returned partial view html into modal body
            $("#MainBody").html(data);

            //show modal
            $('#myModal').modal('show');

            //inititae jQuery validation
            $("#BlogForm").validate();


        });
    });
To save data of Edited Pop-up modal values, you can use old method but now you would have to check whether it's new value or Edited one so I have changed jquery code to saving little bit, complete code would be now
  //Submit form data to server(web api)
    $(document).on('click', '#Submit', function (event) {
        event.preventDefault();

        //check validation first
        if ($("#BlogForm").valid())
        {
            //for Add
            if ($("#ModalHeader").html() == "Create") {
                var data = {

                    Name: $("#Name").val().trim(),
                    CategoryName: $("#CategoryName").val().trim(),
                    PostCount: $("#PostCount").val().trim()

                }
                $.ajax({
                    url: '/api/DataTableAPI/Create',
                    type: 'POST',
                    dataType: 'json',
                    data: data,
                    success: function (d) {

                        //values created
                        //close pop-up modal
                        $('#myModal').modal('hide');

                        //reload jquery datatable
                        $BlogTable.api().ajax.reload();

                    },
                    error: function () {
                        alert("Error please try again");
                    }

                })
            }
            //for edit
            else {
                var data = {
                    BlogId: $("#BlogId").val().trim(),
                    DateAdded: $("#DateAdded").val().trim(),
                    Name: $("#Name").val().trim(),
                    CategoryName: $("#CategoryName").val().trim(),
                    PostCount: $("#PostCount").val().trim()

                }
                $.ajax({
                    url: '/api/DataTableAPI/Edit',
                    type: 'POST',
                    dataType: 'json',
                    data: data,
                    success: function (d) {

                        //values created
                        //close pop-up modal
                        $('#myModal').modal('hide');

                        //reload jquery datatable
                        $BlogTable.api().ajax.reload();

                    },
                    error: function () {
                        alert("Error please try again");
                    }

                })
            }
        }
        return false;
    });
We are checking using Pop-up modal "header" values if it is Create or Edit request
In the Web-Api add this C# code, to save updated values
        [System.Web.Http.Route("api/DataTableAPI/Edit")] // to avoid  "Multiple actions were found that match the request Web API"
        public HttpResponseMessage Edit(Blog blog)
        {
            HttpResponseMessage result;
            try
            {
                using (var ctx = new BlogDbEntities())
                {
                    //update logic, using Entity framework
                    ctx.Entry(blog).State = System.Data.Entity.EntityState.Modified;
                    //save changes
                    ctx.SaveChanges();
                }

                result = Request.CreateResponse(HttpStatusCode.Created, blog);
            }

            catch (Exception e)
            {
                result = Request.CreateResponse(HttpStatusCode.BadRequest, "Server failed to save data");
            }
            return result;


        }
Note the Route attribute here, which will help us get rid of error "Multiple actions were found that match the request Web API"
Run your project and try to update any value
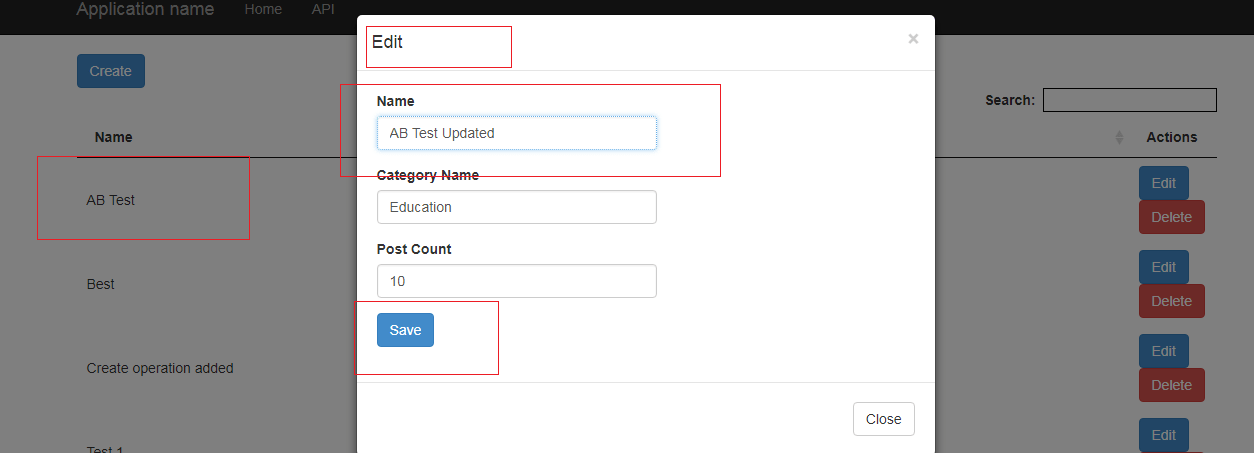
After Clicking on save the results are as below

Delete in Web API MVC C# and jQuery Datatable
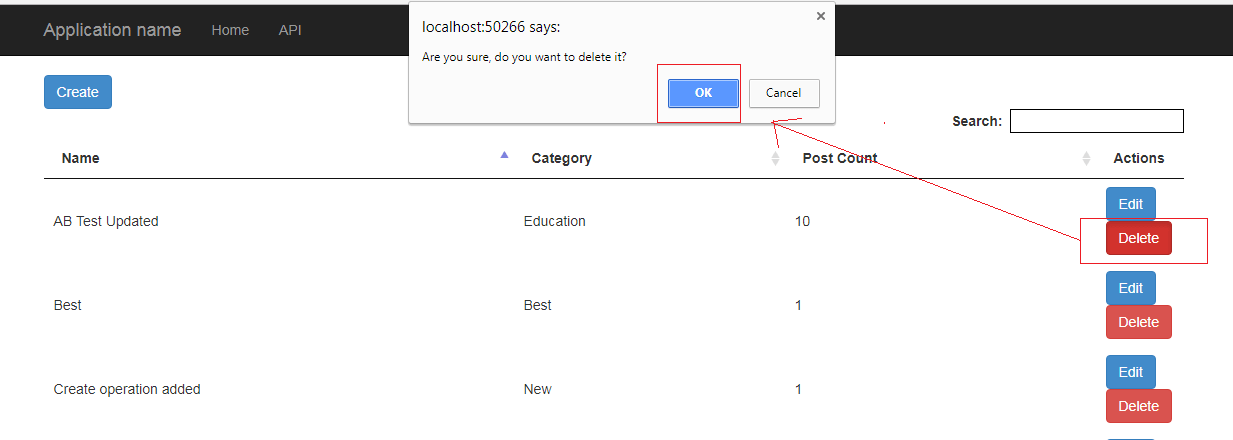
For delete we don't need to do much, just add a jquery call to back end Web-API server using jQuery ajax and Delete type request with Id of the value which you want to delete, so your jquery code for that will be
   //to delete
    $(document).on('click', '.delete', function () {

        var Confirm = confirm("Are you sure, do you want to delete it?");
        if (Confirm) {
            var id = $(this).attr('data-id');
            $.ajax({
                url: '/api/DataTableAPI/delete/' + id,
                type: 'Delete',

                success: function (d) {


                    //reload jquery datatable
                    $BlogTable.api().ajax.reload();

                },
                error: function () {
                    alert("Error please try again");
                }

            })

        }
        else
        {
            return false;
        }
    });
Note: You also need to add HTML for Delete button similar to Edit button
In the above jQuery code we are first confirming user if they want to delete the selected row, if clicked on ok , Call the below API C# code and reload jQuery datatable
[System.Web.Http.HttpDelete] //apply verb delete
[System.Web.Http.Route("api/DataTableAPI/delete/{id}")] //url to call
public HttpResponseMessage Delete(int id)
{
HttpResponseMessage result;
try
{
using (var ctx = new BlogDbEntities())
{
//delete logic here
var blogtoDelete = ctx.Blogs.Where(a => a.BlogId == id).FirstOrDefault();
ctx.Entry(blogtoDelete).State = System.Data.Entity.EntityState.Deleted;
//save changes
ctx.SaveChanges();
}
result = Request.CreateResponse(HttpStatusCode.OK);
}
catch (Exception e)
{
result = Request.CreateResponse(HttpStatusCode.BadRequest, "Server failed to save data");
}
return result;
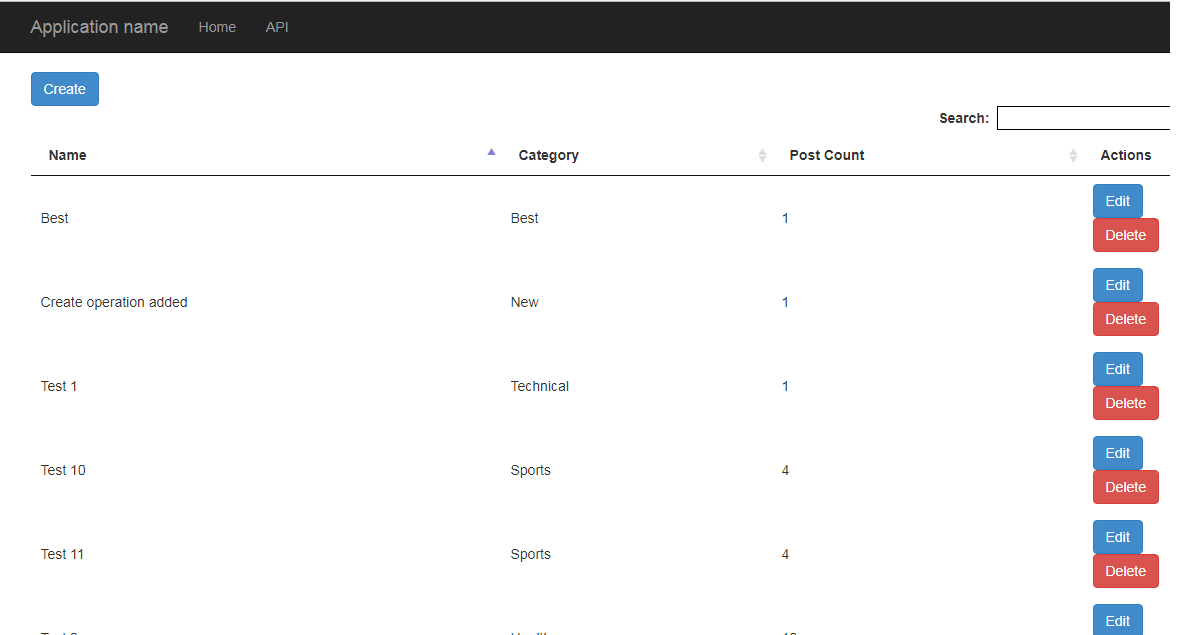
}This will delete the selected row from database permanently.
Updated Datatable will be as below
That's it, we are done with, feel free to post your comment on the article, or ask question related to it, using the questions sections and linking back to it.
 Buy us a coffee
 Become a Patron