
In previous article, I have mentioned token based authentication in C# using Web API but now in this article, I have mentioned how we can create a asp.net core web api in visual studio 2022, step by step with an example to call web-api from front-end using jQuery AJAX, by creating ASP.NET Core MVC project.
What is Web API in ASP.NET Core?
API stands for Application Programming Interface. It is an intermediate software agent that allows two or more applications to interact with each other.
Using ASP.NET Core Web API, we can build HTTP services which can be consumed by cross platform clients like web, desktop and mobile devices.
ASP.Net Core Web API supports RESTful applications and uses GET, PUT, POST, DELETE verbs for client communications.
Creating Web API in Visual Studio 2022 in .NET Core MVC project
So, there are 2 procedures to create web api in Visual Studio, one way is to create web-api controller directly in ASP.NET Core MVC project and second way is to create a seperate only Web-API project and then call it from .NET Core MVC project
Here we will discuss first procedure, which will make easy to test api output also.
Step 1: Open your Visual Studio 2022 -> Click on "Create new project"

and search for "ASP.NET Core MVC" template, select it and click "Next".

In the next step, give name to your project or solution

and then select version of .NET, since I have .NET 6 as latest version, I am using .NET Core 6 for creating .NET Core project with Web-API, you can use .NET Core 8 (Long term support), if you have that option.
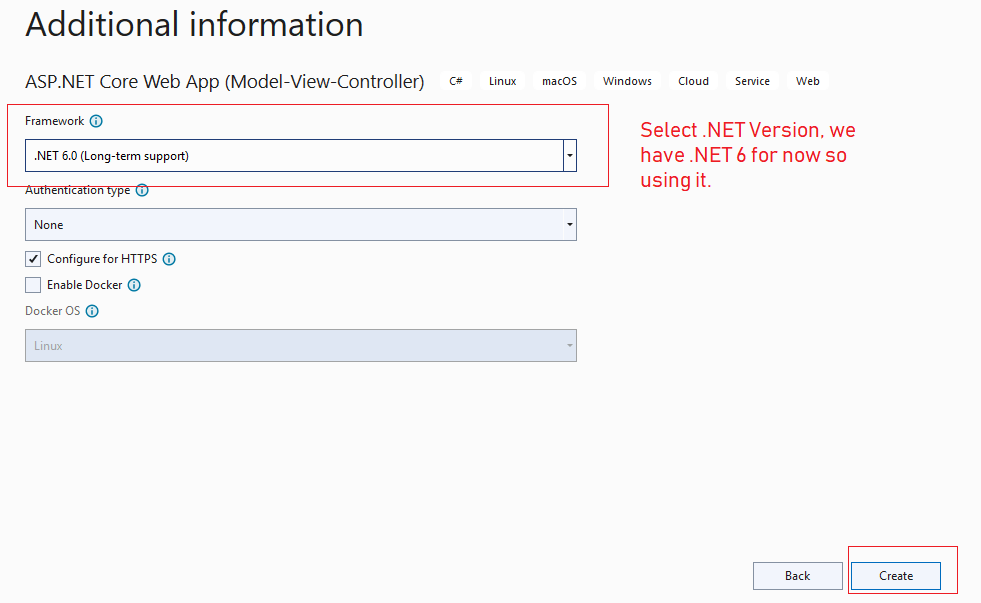
then click on "Create", Visual Studio will take some time to generate MVC template.
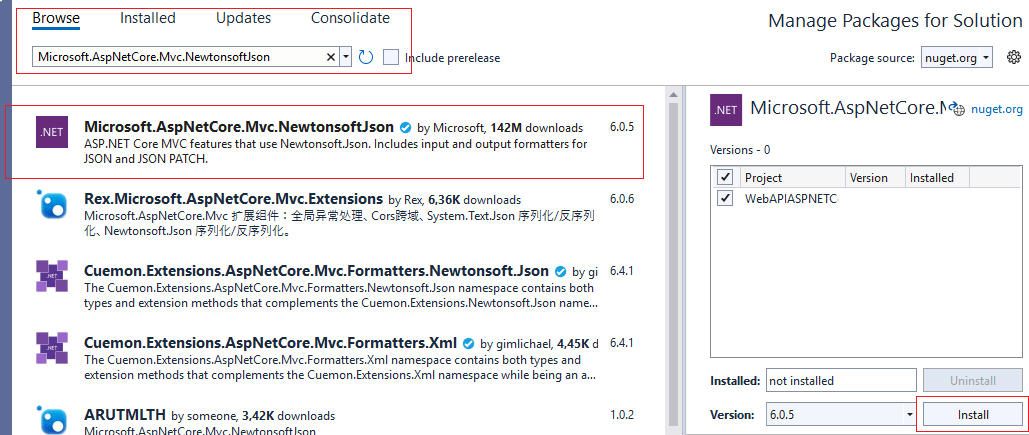
Step 2: Now, we will have to install the Nuget package to get JSON data from Web-API, so navigate to Tool -> Nuget Package Manager -> Nuget Package for Solution and Click on "Browse" tab then select "Microsoft.AspNetCore.MVC.NewtonsoftJson" package and then install package, by clicking on "Install" button.
Once package is installed, we will have to navigate to Program.cs and add settings to use JSON
Since .NET 6 doesn't have startup.cs, anymore, we will have to add JSON Configuration in Program.cs
using Newtonsoft.Json.Serialization;

var builder = WebApplication.CreateBuilder(args);

// Add services to the container.
builder.Services.AddControllersWithViews();
builder.Services.AddControllers().AddNewtonsoftJson(options =>
{
    // Use the default property (Pascal) casing
    options.SerializerSettings.ContractResolver = new DefaultContractResolver();
});
so your complete Program.cs would look like below
using Newtonsoft.Json.Serialization;

var builder = WebApplication.CreateBuilder(args);

// Add services to the container.
builder.Services.AddControllersWithViews();
builder.Services.AddControllers().AddNewtonsoftJson(options =>
{
    // Use the default property (Pascal) casing
    options.SerializerSettings.ContractResolver = new DefaultContractResolver();
});

var app = builder.Build();

// Configure the HTTP request pipeline.
if (!app.Environment.IsDevelopment())
{
    app.UseExceptionHandler("/Home/Error");
    // The default HSTS value is 30 days. You may want to change this for production scenarios, see https://aka.ms/aspnetcore-hsts.
    app.UseHsts();
}

app.UseHttpsRedirection();
app.UseStaticFiles();

app.UseRouting();

app.UseAuthorization();

app.MapControllerRoute(
    name: "default",
    pattern: "{controller=Home}/{action=Index}/{id?}");

app.Run();
Step 3: Add a Student.cs Model which we can use to add/update list items.
So, right-click on "Models" folder, then select Add" -> Select "New Item" -> Select "Class.cs" -> name it "Student.cs" and use the code as below
namespace WebAPIASPNETCoreMVC.Models
{
    public class Student
    {
        public string Name { get; set; }
        public string Class { get; set; }
    }
}
Step 4: Right-click on the "Controllers" folder and add a new MVC web-API Empty Controller
Right-Click on "Controller" folder, select "Add" -> Select "New Item" -> Select "API Controller - Empty"

Now, use the code below
using Microsoft.AspNetCore.Mvc;
using WebAPIASPNETCoreMVC.Models;

namespace WebAPIASPNETCoreMVC.Controllers
{
    [Route("api/[controller]")]
    [ApiController]
    public class StudentController : ControllerBase
    {
        //sample static list with students
        List<Student> students = new List<Student>()
        { new Student {Name = "Vikas", Class = "X" },
          new Student { Name = "Ramesh", Class = "X" },
        };


        [Route("GetStudents")] //api url to call
        [HttpGet] // we are not using this one for example, but added it for demo
        public List<Student> GetStudents()
        {
            return students;
        }

        [Route("AddStudent")] //api url to call
        [HttpPost] // post to save new student
        public List<Student> AddStudent(Student student)
        {
            students.Add(student);// add new student in list
            return students; // return updated list
        }
    }
}
In the above code, we have added "Route" attribute, which defines endpoint to call web-api
And we will be calling "HttpPost" method, from front-end, which will add new item in our controller demo list and then again pass it to front-end as list.
Step 5: Now, navigate to Views -> Home -> Index.cshtml and use the code below to call web-api using jQuery AJAX in .NET Core
@{
    ViewData["Title"] = "Home Page";
}
    Name : <input type="text" id="txtName" /> <br/>
    Class: <input type="text" id="txtClass" /><br/><br/><br/>
    <input type="button" id="btnGet" value="Get Updated Students" />

    <table id="students">

    </table>

    <script type="text/javascript" src="https://ajax.googleapis.com/ajax/libs/jquery/1.8.3/jquery.min.js"></script>
    <script type="text/javascript">
        $(function () {
            $("#btnGet").click(function () {
                var student = '{Name: "' + $("#txtName").val() + '", Class:"' + $("#txtClass").val() + '" }';
                console.log(student);
                $.ajax({
                    type: "POST",
                    url: "/api/Student/AddStudent",
                    data: student,
                    contentType: "application/json; charset=utf-8",
                    dataType: "json",
                    success: function (response) {
                         $("#students").append("<tr><td>Student Lists JSON Returned</td></tr>");
                         $.each(response, function(key, value) {
                            $("#students").append("<tr><td>"+JSON.stringify(value)+"</td></tr>");
                         })
                    },
                    failure: function (response) {
                        alert(response.responseText);
                    },
                    error: function (response) {
                        alert(response.responseText);
                    }
                });
            });
        });
    </script>
In above HTML/JS code, we have first added 2 input box to add new student name and class.
Once "btnGet" is clicked, AJAX "POST" call is made to API URL "/api/Student/AddStudent" which will pass student data and return update list.
Then we are looping the returned data in a success call and finally print it.
Once you will build the project and select "IIS Express" to run it in browser, you will see output like below

You may also like to read:
Top ASP.NET Web API Interview questions and answers
 Buy us a coffee
 Become a Patron