In previous article, we mentioned Foreach() vs Parallel.Foreach() in C# but in this article, we will learn how to authenticate users in ASP.NET Core 6 using the JWT token based Authentication technique in Web API, with step by step procedure.
What is JWT?
JWT is an abbreviation for JSON Web Tokens. They are digitally signed tokens that are provided by the token provider and signed using a secret key. This token helps the resource server to verify the caller.
JWT token comprises 3 parts
- Header – This contains the encoded data of the token type and the type of algorithm used to sign the data.
- Payload – Data of claims that need to be shared.
- Signature – this is created by the signing header and payload using the secret key.
Now that we have looked at what JWT is, let’s move to the practical.
Step 1 – Create a new ASP.Net Web API Project
As a first step, let’s create a new ASP.NET Web API project with .NET 6.0 as the framework. Let’s name our project "JWTAuthenticationTutorial".
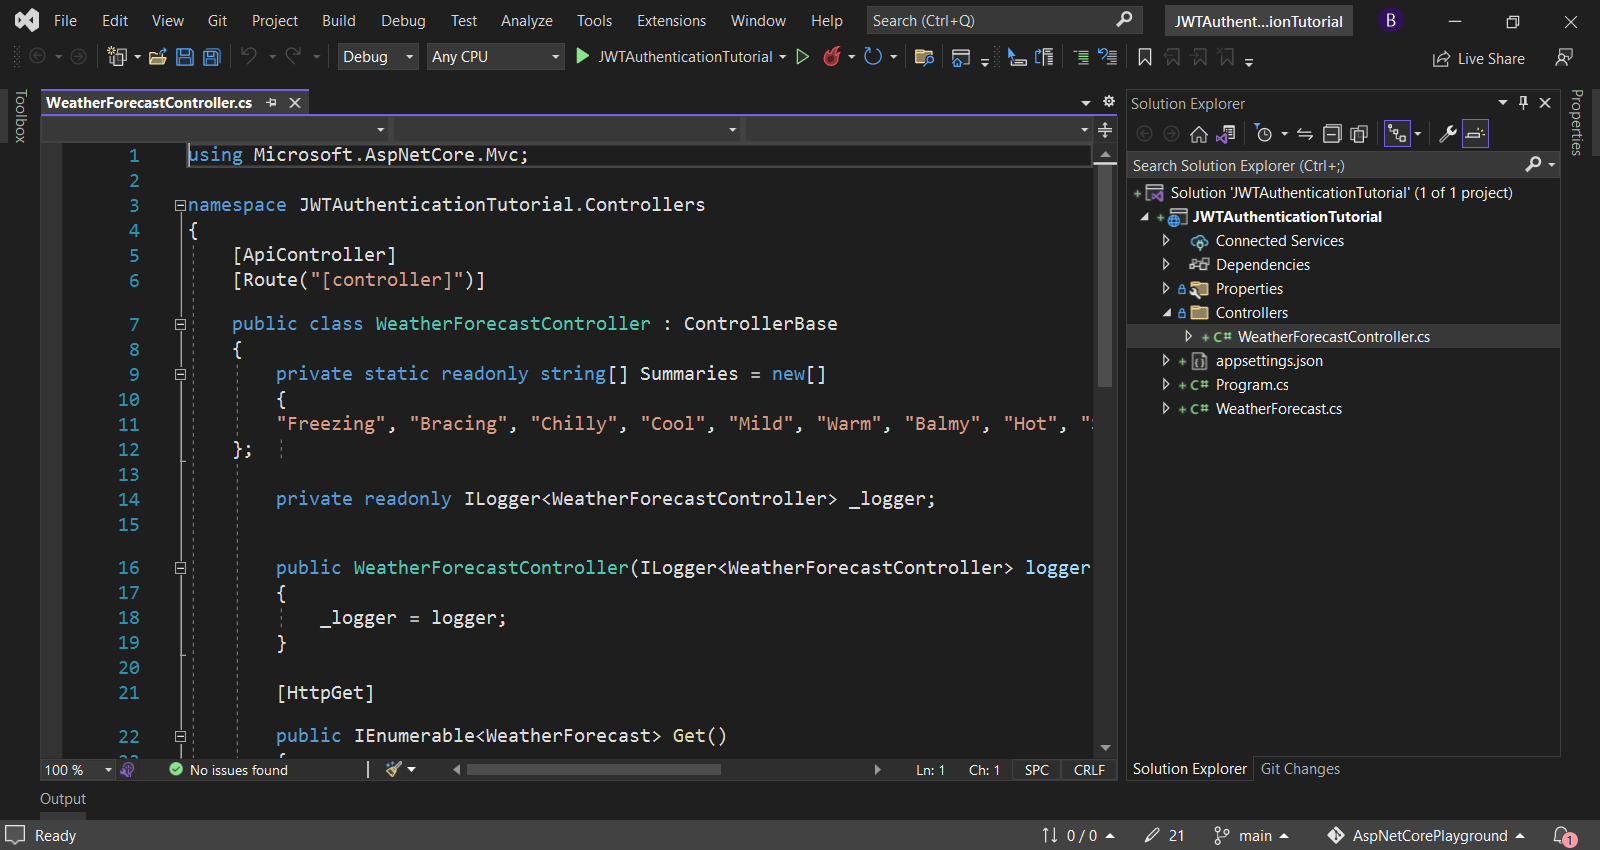
Step 2 – Create a database connection with Entity Framework Core.
To allow access to the applications, we will need to maintain the list of users. For this purpose, we will use the EntityFrameworkCore Code first approach to create our database.
In order to use EntityFrameworkCore, we need to add the following Nuget packages to our project, so navigate to Tools -> Nuget Package manager -> Package manager console and install following Nuget Packages.
Install-Package Microsoft.EntityFrameworkCore.SqlServerRepeat above procedure for below Nuget package's also.
- Microsoft.EntityFrameworkCore.Tools
- AspNetCore.Identity.EntityFrameworkCore
- AspNetCore.Authentication.JwtBearer
Now, let’s add the connection string in appsettings.json.
{
  "Logging": {
    "LogLevel": {
      "Default": "Information",
      "Microsoft.AspNetCore": "Warning"
    }
  },
  "ConnectionStrings": {
    "DefaultConnection": "Server=localhost\\SQLEXPRESS;Database=JWTAuthenticationTutorialDB;Trusted_Connection=True;"
  },
  "AllowedHosts": "*"
}
In order to manage users, we will use Microsoft Identity Core Framework in our application. So, create a folder named “DbContext”, and add the class with the name ApplicationDbContext class.
using Microsoft.AspNetCore.Identity;
using Microsoft.AspNetCore.Identity.EntityFrameworkCore;
using Microsoft.EntityFrameworkCore;

namespace JWTAuthenticationTutorial.DatabaseContext
{
    public class ApplicationDbContext : IdentityDbContext<IdentityUser>
    {
        public ApplicationDbContext(DbContextOptions<ApplicationDbContext> options)
            : base(options)
        {

        }
    }
}
Create a new migration and let’s apply the changes to the DB. Open Tools -> Nuget Package Manager -> Package manager console and run the below commands in sequence.
Add-Migration "JWT Authentication App Identity User Schema"and the now update dataabase using below command
Update-DatabaseThis should create the DB with the required tables.
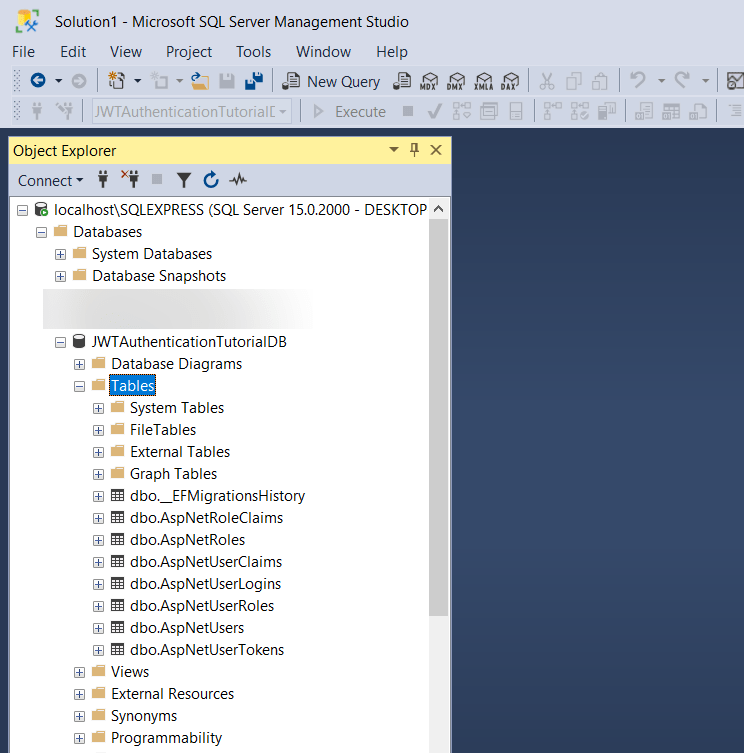
As you can see from above image, all tables are basically ASP.NET Identity table, which we will use for authentication.
Step 3 – Create required Models and classes
In order to pass the data in and out of the controllers, we will need some model classes, let's add them one by one.
Create a folder "Models" and add below two classes.
UserRegistration.cs
using System.ComponentModel.DataAnnotations;

namespace JWTAuthenticationTutorial.Models
{
    public class UserRegistration
    {
        [Required(ErrorMessage = "User Name is mandatory.")]
        public string? Username { get; set; }

        [EmailAddress]
        [Required(ErrorMessage = "Email is mandatory.")]
        public string? Email { get; set; }

        [Required(ErrorMessage = "Password is mandatory.")]
        public string? Password { get; set; }
    }
}
UserLogin.cs
using System.ComponentModel.DataAnnotations;

namespace JWTAuthenticationTutorial.Models
{
    public class UserLogin
    {
        [Required(ErrorMessage = "User Name is required")]
        public string? Username { get; set; }

        [Required(ErrorMessage = "Password is required")]
        public string? Password { get; set; }
    }
}
Step 4 – Add JWT Settings in appSettings.json
Since we have to generate the JWT Token, we will read some setings from appsettings.json file. Add below the JWT section in appsettings.json as shown below.
{
  "Logging": {
    "LogLevel": {
      "Default": "Information",
      "Microsoft.AspNetCore": "Warning"
    }
  },
  "ConnectionStrings": {
    "DefaultConnection": "Server=localhost\\SQLEXPRESS;Database=JWTAuthenticationTutorialDB;Trusted_Connection=True;"
  },
  "Jwt": {
    "Key": "Yh2k7QSu4l8CZg5p6X3Pna9L0Miy4D3Bvt0JVr87UcOj69Kqw5R2Nmf4FWs03Hdx",
    "Issuer": "JWTAuthenticationServer",
    "Audience": "JWTServicePostmanClient",
    "Subject": "JWTServiceAccessToken"
  },
  "AllowedHosts": "*"
}
In the above code:
- Key - Key will be used as the secret by the JWT Token generator. You can replace it with the secret that you want to use.
- Issuer – Issuer is the name of the entity who is issuing the token. In our case this is our application who is issuing the token. It means, the APIs from our system will only accept the token issued by our system.
- Audience – This is the audience to whom we want to allow the token to be used by. Again, we want this token to be used by our application only, so it will be localhost in this case.
Step 5 - Create User Auth Controller
Let’s now add a new controller named UserAuthController and add the below code to it.
using JWTAuthenticationTutorial.Models;
using Microsoft.AspNetCore.Identity;
using Microsoft.AspNetCore.Mvc;
using Microsoft.IdentityModel.Tokens;
using System.IdentityModel.Tokens.Jwt;
using System.Security.Claims;
using System.Text;

namespace JWTAuthenticationTutorial.Controllers
{
    [Route("api/[controller]")]
    [ApiController]
    public class UserAuthController : ControllerBase
    {
        private readonly UserManager<IdentityUser> _userManager;
        private readonly IConfiguration _configuration;

        public UserAuthController(UserManager<IdentityUser> userManager, RoleManager<IdentityRole> roleManager, IConfiguration configuration)
        {
            _userManager = userManager;
            _configuration = configuration;
        }

        [HttpPost]
        [Route("login")]
        public async Task<IActionResult> Login([FromBody] UserLogin model)
        {
            var user = await _userManager.FindByNameAsync(model.Username);
            if (user != null && await _userManager.CheckPasswordAsync(user, model.Password))
            {
                var userRoles = await _userManager.GetRolesAsync(user);

                var authClaims = new List<Claim>
                {
                    new Claim(ClaimTypes.Name, user.UserName),
                    new Claim(JwtRegisteredClaimNames.Jti, Guid.NewGuid().ToString()),
                };

                foreach (var userRole in userRoles)
                {
                    authClaims.Add(new Claim(ClaimTypes.Role, userRole));
                }

                var token = GetToken(authClaims);

                return Ok(new
                {
                    token = new JwtSecurityTokenHandler().WriteToken(token),
                    expiration = token.ValidTo
                });
            }
            return Unauthorized();
        }

        [HttpPost]
        [Route("register")]
        public async Task<IActionResult> Register([FromBody] UserRegistration model)
        {
            var userExists = await _userManager.FindByNameAsync(model.Username);
            if (userExists != null)
                return StatusCode(StatusCodes.Status500InternalServerError, "User with this username already exists!");

            IdentityUser user = new()
            {
                Email = model.Email,
                SecurityStamp = Guid.NewGuid().ToString(),
                UserName = model.Username
            };
            var result = await _userManager.CreateAsync(user, model.Password);
            if (!result.Succeeded)
                return StatusCode(StatusCodes.Status500InternalServerError, "Failed to create user, please try again.");

            return Ok("User created successfully.");
        }

        private JwtSecurityToken GetToken(List<Claim> authClaims)
        {
            var key = new SymmetricSecurityKey(Encoding.UTF8.GetBytes(_configuration["Jwt:Key"]));
            var signIn = new SigningCredentials(key, SecurityAlgorithms.HmacSha256);
            var token = new JwtSecurityToken(
                _configuration["Jwt:Issuer"],
                _configuration["Jwt:Audience"],
                authClaims,
                expires: DateTime.UtcNow.AddMinutes(10),
                signingCredentials: signIn);

            return token;
        }
    }
}
Let’s see what we have done here.
- We have added a new controller and injected UserManager which is provided by the Microsoft Identity Core framework to manage users. Also, we have injected IConfiguration to read the JWT Settings from appsettings.json.
- Then we have exposed two endpoints, one to register a new user which is "/api/UserAuth/register" and the second endpoint to login which is "/api/UserAuth/login".
- The registering endpoint will take the UserRegistration class as input which will read from the request body, validate if the user exists and create a new user if the user does not exist.
- The login endpoint will take the UserLogin class as input which will read from the request body, validate the username and password and return a JWT Token if the user is valid.
Step 6 – Add authorize attribute to WeatherForecastController
When you create a new project, the Visual Studio Web API template, by default adds a new controller for us called “WeatherForecastController”. If it’s not created, create a new controller and add the below code to it. We are going to add the Authorize Attribute to this controller so that it cannot be accessed anonymously and needs authentication before accessing it.
using Microsoft.AspNetCore.Authorization;
using Microsoft.AspNetCore.Mvc;

namespace JWTAuthenticationTutorial.Controllers
{
    [Authorize]
    [ApiController]
    [Route("[controller]")]
    public class WeatherForecastController : ControllerBase
    {
        private static readonly string[] Summaries = new[]
        {
        "Freezing", "Bracing", "Chilly", "Cool", "Mild", "Warm", "Balmy", "Hot", "Sweltering", "Scorching"
    };

        private readonly ILogger<WeatherForecastController> _logger;

        public WeatherForecastController(ILogger<WeatherForecastController> logger)
        {
            _logger = logger;
        }

        [HttpGet]
        public IEnumerable<WeatherForecast> Get()
        {
            return Enumerable.Range(1, 5).Select(index => new WeatherForecast
            {
                Date = DateTime.Now.AddDays(index),
                TemperatureC = Random.Shared.Next(-20, 55),
                Summary = Summaries[Random.Shared.Next(Summaries.Length)]
            })
            .ToArray();
        }
    }
}
Step 7 – Add the needed configuration in Program.cs
Update program.cs file to include the JWT configuration as given below.
using JWTAuthenticationTutorial.DatabaseContext;
using Microsoft.AspNetCore.Authentication.JwtBearer;
using Microsoft.AspNetCore.Identity;
using Microsoft.EntityFrameworkCore;
using Microsoft.IdentityModel.Tokens;
using System.Text;

var builder = WebApplication.CreateBuilder(args);
ConfigurationManager configuration = builder.Configuration;

// Add services to the container.


// Add Entity Framework Core
builder.Services.AddDbContext<ApplicationDbContext>(options =>
    options.UseSqlServer(configuration.GetConnectionString("DefaultConnection")));

// Add Identity Framework Core..
builder.Services.AddIdentity<IdentityUser, IdentityRole>()
    .AddEntityFrameworkStores<ApplicationDbContext>()
    .AddDefaultTokenProviders();

// Adding Authentication
builder.Services.AddAuthentication(options =>
{
    options.DefaultAuthenticateScheme = JwtBearerDefaults.AuthenticationScheme;
    options.DefaultChallengeScheme = JwtBearerDefaults.AuthenticationScheme;
    options.DefaultScheme = JwtBearerDefaults.AuthenticationScheme;
})

// Adding Jwt Bearer
.AddJwtBearer(options =>
{
    options.SaveToken = true;
    options.RequireHttpsMetadata = false;
    options.TokenValidationParameters = new TokenValidationParameters()
    {
        ValidateIssuer = true,
        ValidateAudience = true,
        ValidAudience = builder.Configuration["Jwt:Audience"],
        ValidIssuer = builder.Configuration["Jwt:Issuer"],
        IssuerSigningKey = new SymmetricSecurityKey(Encoding.UTF8.GetBytes(builder.Configuration["Jwt:Key"]))
    };
});


builder.Services.AddControllers();

var app = builder.Build();

// Configure the HTTP request pipeline.

app.UseHttpsRedirection();

app.UseAuthentication();
app.UseAuthorization();

app.MapControllers();

app.Run();
Step 8 – Let’s test our code.
Run the code in visual studio.
To verify the API endpoints, we will need POSTMAN to be installed. Please download it from here if it’s not already installed on your machine.
Once downloaded, Open postman and create a new GET Request to call the API “/weatherforecast” as shown below and check the output returned by the request.
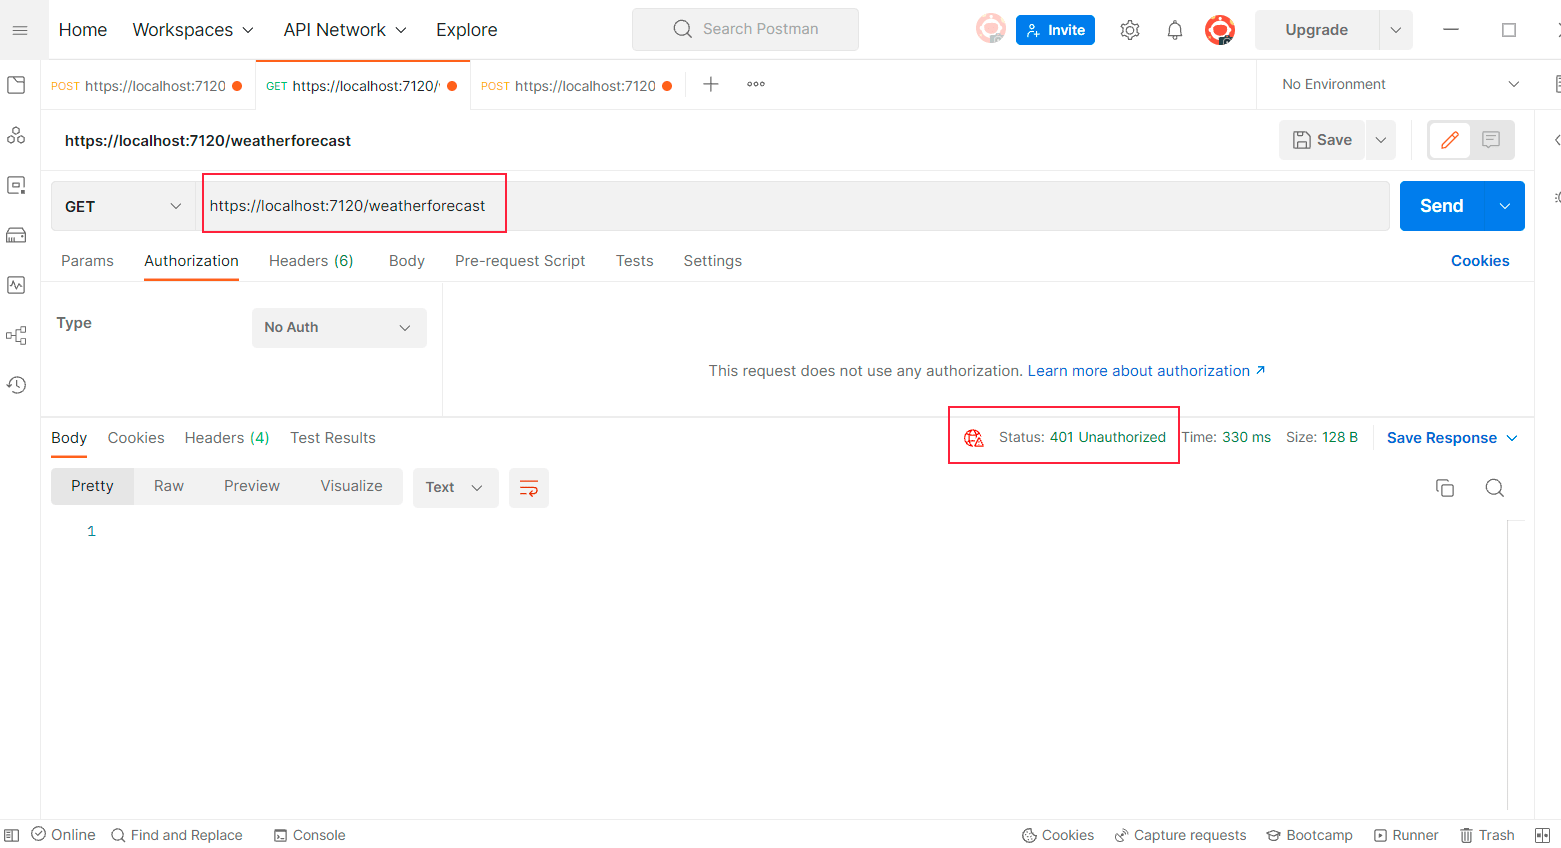
As expected, the API return 401 Unauthorized error. Because, in the above step, we secured this API.
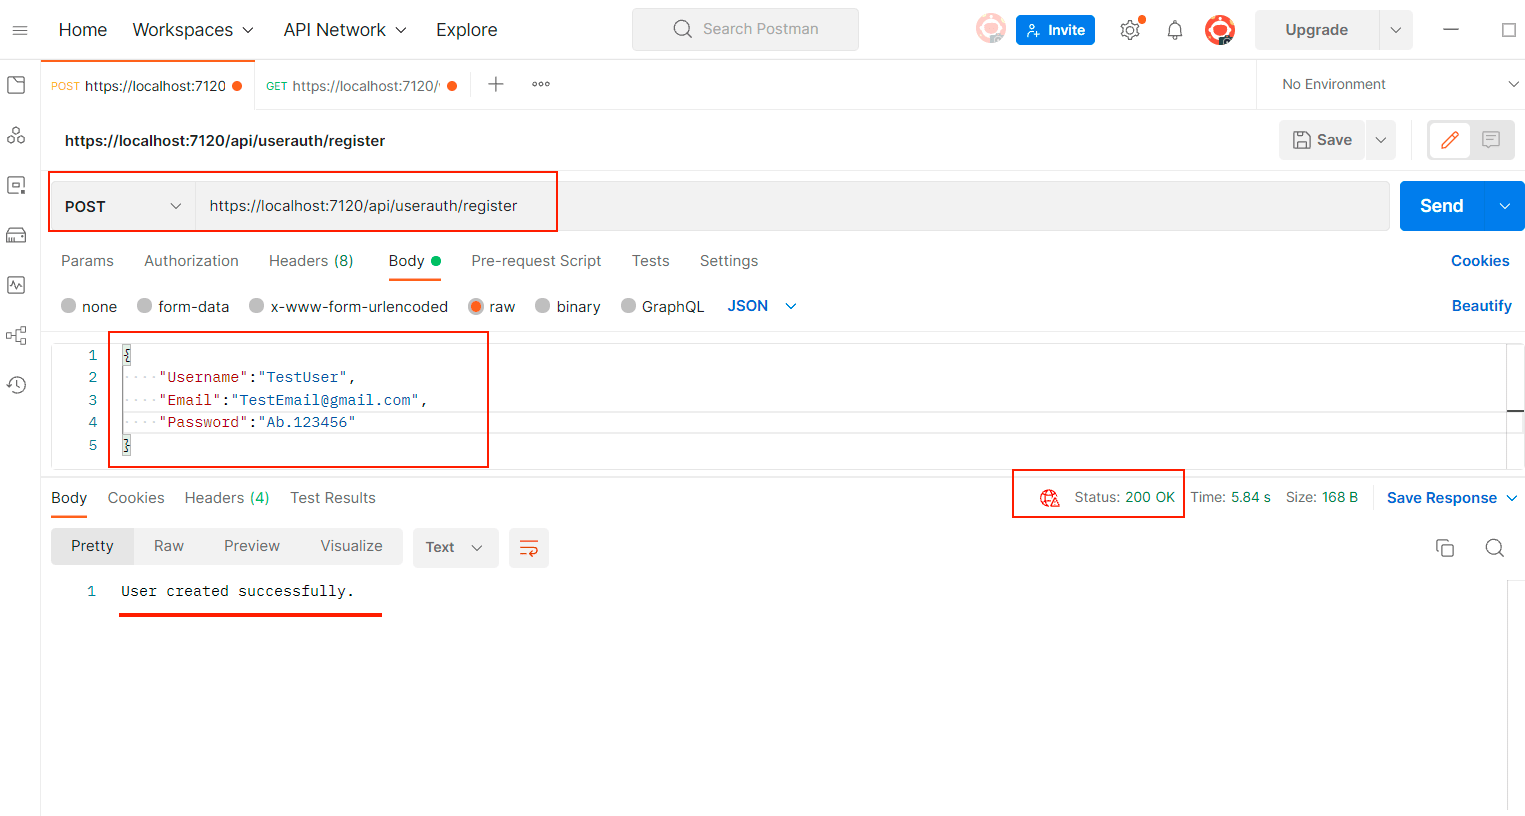
To access this, we need valid user. So let’s create a new user. Create a new POST Request and give a call to the URL - https://localhost:7120/api/userauth/register
{
    "Username":"TestUser",
    "Email":"TestEmail@gmail.com",
    "Password":"Ab.123456"
}
Once you execute it, it will create a new user as shown below.
Now we have a new user created, let’s get the authentication token for this user, which we will use to call the WeatherForecast API.
To do this, create a new POST Request to the API “/api/userauth/login” with the body –
{
    "Username":"TestUser",
    "Password":"Ab.123456"
}
And once you execute this request, you will get the token in the response.
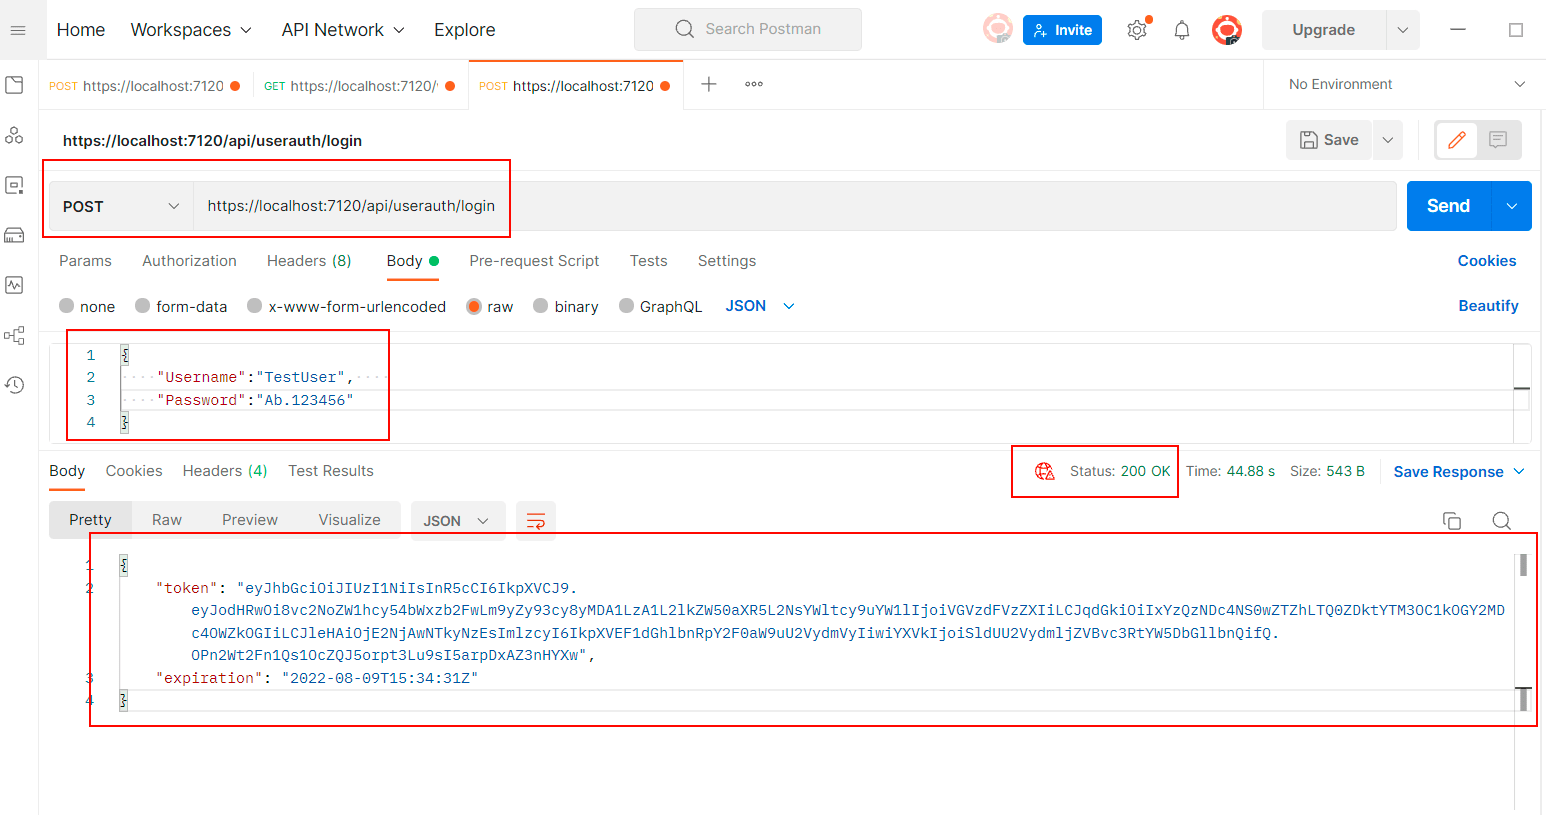
Copy this token and pass it as the bearer token. To do this, open the request for the WeatherForecast postman request. Go to the authorization tab. In the type, select Bearer Token and paste the token into the Token textbox. Then send the request.

And as you can see above, you should now get the response as 200 OK, which means the user is authenticated successfully.
And that's it, you have successfully implemented authentication in ASP.NET Core 6.0, here is the complete source code also
https://github.com/kdmbhushan/AspNetCorePlayground/tree/main/JWTAuthenticationTutorial
You may also like to read:
Token based authentication in C# using Web API
Create Web-API in Visual Studio 2022 Step by Step
PUT vs POST in RESTful services?
File Upload using Web API 2 and jQuery AJAX
File upload using Ajax in ASP.NET Core
Send Email in ASP.NET Core (With Attachments)
